
You are here:
Example: Configure an Approval Workflow
Let’s build a complete approval workflow to determine the approvals required on a quote’s discounts, implementing both Smart Approvals and Dynamic Approval Notifications.
Required Editions
| Available in: Lightning Experience |
| Available in: Enterprise, Unlimited, and Developer Editions where Advanced Approvals is enabled |
| User Permissions Needed | |
|---|---|
| To configure approval workflows: | Approval Designer |
To demonstrate this, we'll use an example of a vendor who sells products that require quotes. This vendor offers discounts and, to ensure approvals are applied efficiently, sets the following conditions:
| discount value | approval level |
|---|---|
| Up to 25% | No approval necessary |
| Over 25% | Approval necessary |
| Over 50% | Second level of approval necessary |
To ensure our approval process works seamlessly, you must first configure the approvers. This involves mapping them to their correct personas and assigning the corresponding permissions to control their access and actions. See Advanced Approvals Personas and Permissions for more information.
Here are the steps you must follow to configure an approval workflow.
- Create the Get Quote Record Flow
- Create a Discount Approval Workflow
- Make Decisions for Your Discount
- Create an Approval Stage
Create the Get Quote Record Flow
- From Setup, find and select Flows.
- Select New Flow.
- Select Autolaunched Flow (No Trigger).
-
Create a variable to store the quote record that we will fetch based on the ID provided as
input.
-
Click
 and select New Resource.
-
Specify these details.
- Resource Type: Variable
- API Name: FetchedQuoteRecord
- Description: Store the quote record that fetches the quote ID
- Data Type: Record
- Object: Quote
- Select Available for output.
- Click Done.
-
Click
-
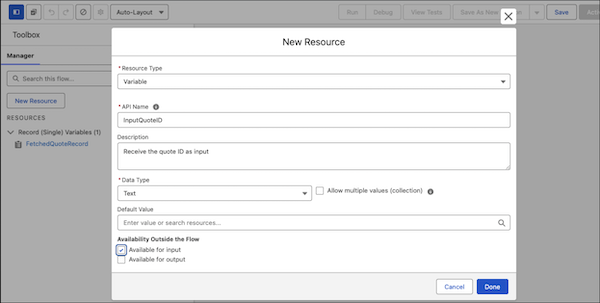
Create another variable to receive the quote ID as input.
- Resource Type: Variable
- API Name: InputQuoteID
- Description: Receive the quote ID as input
- Data Type: Text
- Select Available for output.
- Click Done.
-
Now, on your Flow Builder canvas, click
 and select the Get Records element to get the quote record details.
-
Specify these details.
- Label: Get the Complete Record
- Click Tab to autopopulate the API Name. Or provide an API name that’s similar to your label.
- Object: Quote
-
Then, set a condition to filter quote records.
- Condition Requirements: All Conditions Are Met (AND)
- Set Quote ID under Record Fields as the resource.
- Operator: Equals
- Value: InputQuoteID
-
Then, click to add the Assignment element to get the fetched quote record and assign it to the
fetched quote record variable.
-
Specify these details.
- Label: Assign the Fetched Record
- Click Tab to autopopulate the API Name. Or provide an API name that’s similar to your label.
-
Set the variable values.
- Variable: FetchedQuoteRecord
- Operator: Equals
- Value: Quote from Get the Complete Record
-
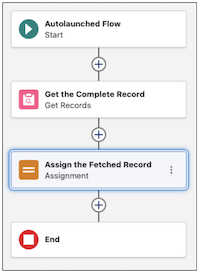
Save your flow as Fetch Quote Details and activate it.
Your flow should look like this.
Create a Discount Approval Workflow
- From Setup, find and select Flows.
- Select New Flow.
- Select Autolaunched Flow Approval Process (No Trigger).
-
Click and and verify that you see these predefined variables..
- recordId - Represents the submitted approval record
- submitter - Represents the user who submitted the approval
- submitterComments - Represents the comments provided by the submitter
-
Now, on your Flow Builder canvas, click and select the Stage element to invoke the fetch the quote record.
-
Specify these details.
- Label: Get quote record
- Click Tab to autopopulate the API Name. Or provide an API name that’s similar to your label.
- Condition: When all steps have been marked Completed, the state is marked Completed
- In the Get quote record element, click + Add Step.
-
Select Background Step and specify these details.
- Label: Get quote record for record id
- Click Tab to autopopulate the API Name. Or provide an API name that’s similar to your label.
- Condition: When the stage starts, the step starts
-
Under the Select an Action to Run section, select the flow you created in the previous
step.
- Action: Fetch Quote Details
- InputQuoteID: recordId
Your background step should look like this.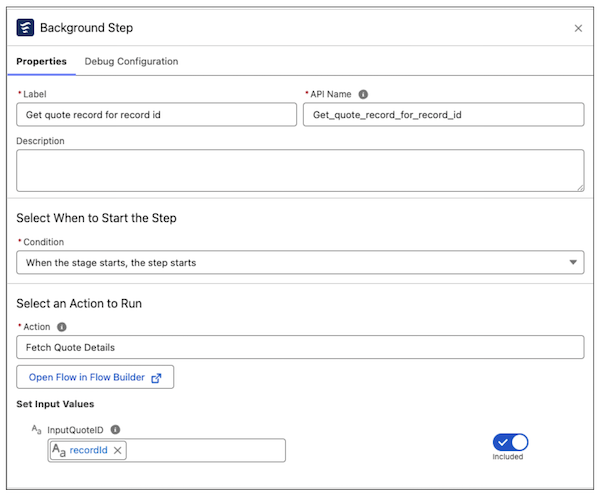
Make Decisions for Your Discount
Decision elements are used to evaluate conditions and route the workflow down different paths. For example, a designer can configure a Decision element to check if a business rule is met, such as a discount exceeding a certain discount percentage. Based on the outcome, the approval workflow will be routed to the next step or stop the process by routing it to a default outcome.
-
On the same flow, click and select the Decision element.
- Enter If quote discount is greater than 25 as the label.
- Next, set your outcomes.
-
Specify these details under New Outcome.
- Outcome Label: Discount > 25
- Condition Requirements to Execute Outcome: All Condition Are Met (AND)
- Resource: Get quote record > Get quote record for record id > Outputs > FetchedQuoteRecord > Discount
- Operator: Greater Than
- Value: 25
Your outcome should look like this.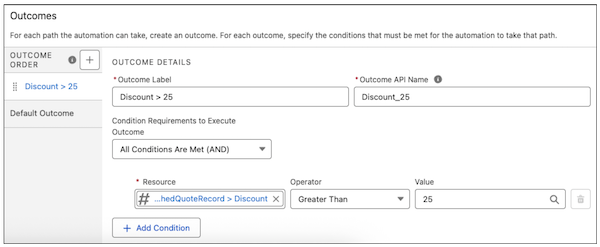
Create an Approval Stage
Approval Steps are used to assign a request to a specific user or queue and can require the approver to complete a specific action. For example, following an outcome from a Decision element (like a discount exceeding a certain percentage), a designer can add an Approval Step to route the request to a manager where they can approve or reject the record.
-
On the same flow, after the Discount > 25 outcome, click to another Stage element.
-
Specify these details.
- Label: Send for approval
- Click Tab to autopopulate the API Name. Or provide an API name that’s similar to your label.
- Condition: When all steps have been marked Completed, the state is marked Completed
- In the Send for approval element, click + Add Step.
-
Select Approval Step and specify these details.
- Label: Approval discount greater than 25
- Click Tab to autopopulate the API Name. Or provide an API name that’s similar to your label.
- Condition: When the stage starts, the step starts
- Under the Select an Action to Run section, select the Evaluate Approval Requests action.
- Assign an approver by selecting the Approver Type as User and providing the user’s name. Users see this option only if they’ve enabled the Enable email approval response setting. Also, users must use recognizable keywords such as Approve or Reject, for the response to be processed.
-
Under the Select the Record to Approve, specify these details.
- Record: recordId
- Optionally, select Use Smart Approvals to set automatic approvals.
- Finally, if you’ve set serial or parallel approvals, provide a chain name to ensure approvers can provide the approval sequentially or simultaneously.
- To complete the workflow, add another Decision element under the Send for approval Stage element to set outcomes if the discount is greater than 50%.
-
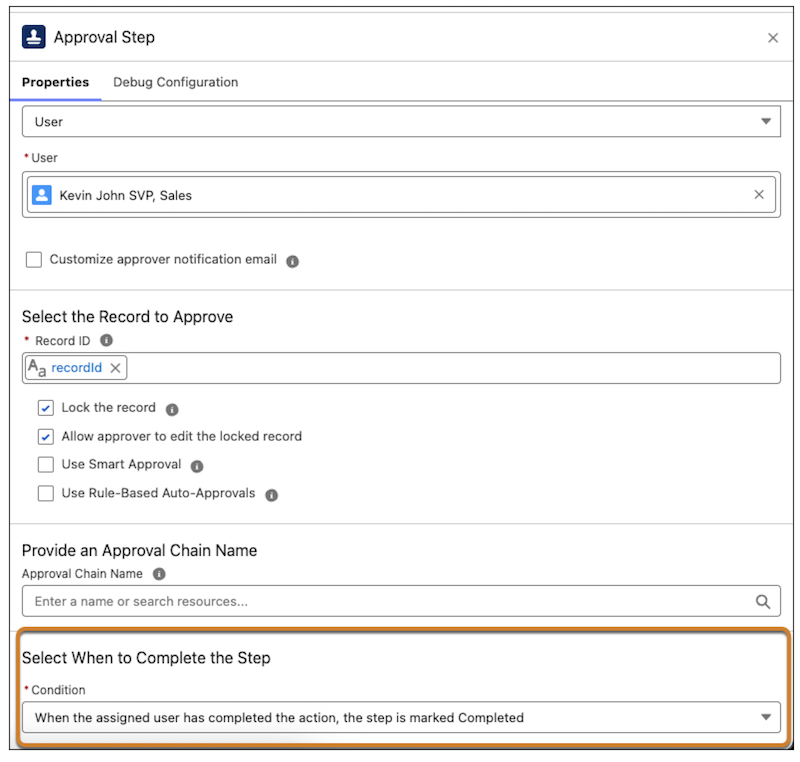
Add a final approval stage element with
an approval step, assigning it to the appropriate approver. Inside this step, set the
completion condition to When the assigned user has completed the action, the step
is marked Completed.
Finally, save the flow with the name Discount Threshold Approval; this exact name is essential as the integration layer will use it to invoke the flow.
