
You are here:
Customize the Asset Page for Automotive Cloud
While products represent the vehicles, parts, and accessories that your company sells, assets represent the specific products that your customers have purchased. Configure the Asset page layout to capture key information about the products that you’ve sold or installed, and add the Vehicle lookup to help users relate an asset with a vehicle. Add related lists that help your users view asset relationships and associated records.
Required Editions
| Available in: Enterprise, Unlimited, and Developer Editions. |
| User Permissions Needed | |
|---|---|
| To customize page layouts: | Customize Application |

Note You can also use the default Asset console page layout that is available with the
Automotive and Service Console for Automotive apps. See Explore the Asset Console in Automotive Cloud for details.
We recommend that you create two record types for Asset. An asset can be either a vehicle or a standalone part or accessory. Separate record types and page layouts help users find relevant information. See Create Assets to Model Vehicles and Parts for details.
-
Create two record types.
- From Setup, go to Object Manager.
- Search for and select Asset.
- Select Record Types, and click New.
- Enter a record type label that's unique within the object.
-
Enter a record type name.
The Record Type Name refers to the component when using Metadata API and prevents naming conflicts on package installation in managed packages.
- Activate the record type.
-
To make the record type available to a user profile, select Make
Available.
To make the record type available for all profiles, select the checkbox in the header row.
- Click Next.
- Select a page layout option to determine what page layout displays for records with this record type.
- To apply a single page layout for all profiles, select Apply one layout to all profiles, and select the page layout from the dropdown list.
- To apply different page layouts based on user profiles, select Apply a different layout for each profile, and select the page layout for each profile.
- To create another record type, click Save & New.
-
Add fields to the Vehicle record type Asset page layout.
- From Setup, go to Object Manager.
- Search for, and select Asset.
- Select Page Layouts and, select the page layout corresponding to the Vehicle record type.
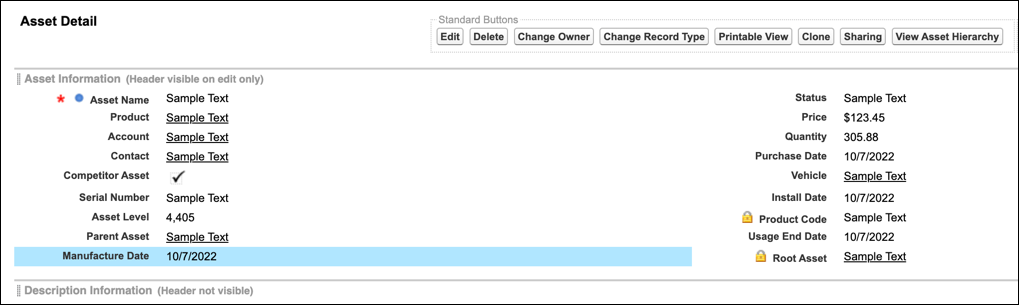
- Drag the Vehicle and Asset Level fields from the palette onto the Asset Detail section on the page.
- Save your changes.
-
Add fields to the Parts record type Asset page layout.
- From Setup, go to Object Manager.
- Search for, and select Asset.
- Select Page Layouts, and select the page layout corresponding to the Parts record type.
- Drag these fields from the palette onto the Asset Detail section on the page.
- Asset Level
- Serial Number
- Root Asset
- Parent Asset
- Install Date
-
Save your changes.
Note All other Asset fields can be added to both page layouts as per your business requirements.
-
Add related lists for both page layouts.
- From Setup, go to Object Manager.
- Search for, and select Asset.
- Select Page Layouts, and select a page layout.
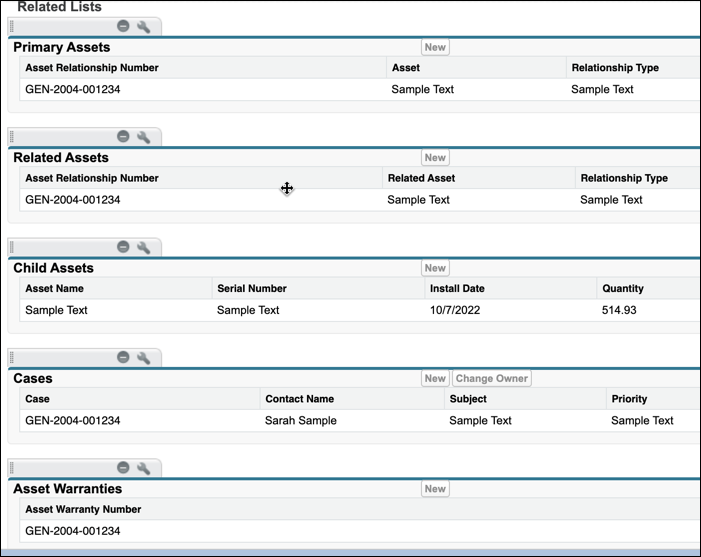
- Drag these related lists from the palette onto the Asset Related Lists section on the page.
- Primary Assets
- Related Assets
- Child Assets
- Cases
- Serialized Products (only for parts)
- Asset Warranties
-
Save your changes.
-
Add a quick action to both page layouts.
- From Setup, go to Object Manager.
- Search for, and select Asset.
- Select Page Layouts, and select a page layout.
- Drag the View Asset Hierarchy action from the palette onto the Asset Mobile & Lightning Actions section on the page.
- Save your changes.
Did this article solve your issue?
Let us know so we can improve!
