Loading
Feature Disruption - Service Cloud VoiceRead More
Feature degradation | Gmail Email delivery failureRead More
Automotive Cloud
Table of Contents
Select Filters

          No results
          No results
          Here are some search tips

          Check the spelling of your keywords.
          Use more general search terms.
          Select fewer filters to broaden your search.

          Search all of Salesforce Help
          Customize the Lead Page for Automotive Cloud

          Customize the Lead Page for Automotive Cloud

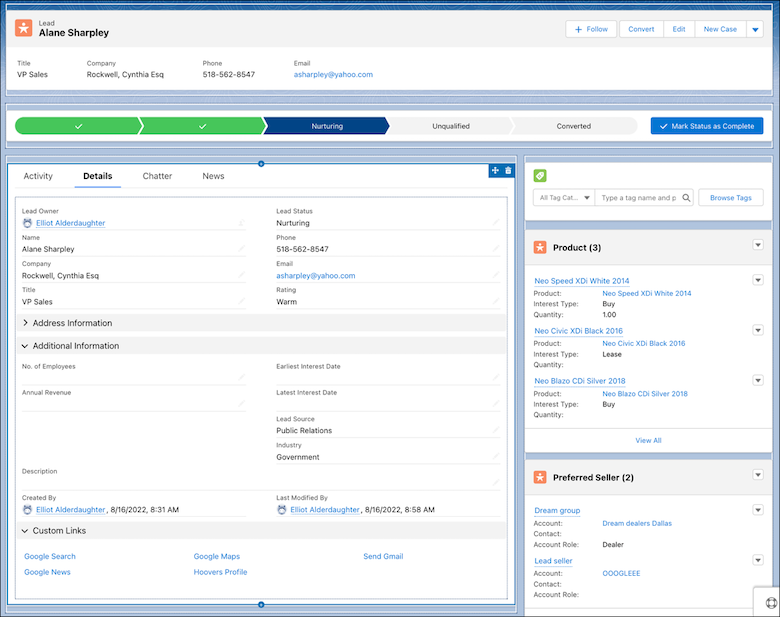
          Capture key information about when a lead is interested in buying, selling, or trading in vehicles and parts. Add relevant fields to the page layout of a Lead record. Add the Lead Products and Lead Preferred Sellers related lists to the page layout to capture information about the items the lead is interested in, the dealers they prefer, and the accounts that provided the leads.

          Required Editions

          Available in: Enterprise, Unlimited, and Developer Editions.
          User Permissions Needed
          To customize page layouts: Customize Application
          1. From Setup, go to Object Manager.
          2. Search for and select Lead.
          3. Click Page Layouts and select a page layout.
          4. Drag the Earliest Interest Date and Latest Interest Date fields from the palette onto the Lead Detail section on the page.
          5. Drag the Products, Preferred Sellers, and Service Appointments related lists from the palette onto the Lead Related Lists section on the page.
          6. Drag the Schedule Test Drive button from the palette onto the Standard Buttons section of the page.
          7. Remove the Schedule Appointment quick action from the page.Drag the Related Lists component onto the right sidebar area on the page. Or, add a Related tab in the main region, and add the Related Lists component to that tab.
            Important
            Important This quick action automatically gets added to the page layout when you enable Salesforce Scheduler but launching this action would allow you to only use the default flow for appointment scheduling. To use the predefined test drive appointment flow unique to Automotive Cloud, remove this action and add the Schedule Test Drive button to the page.
          8. Save your changes.
          9. Open a Lead record, and click Edit Page.
          10. Drag the Related Lists component onto the right sidebar area on the page. Or, add a Related tab in the main region, and add the Related Lists component to that tab.
            Tip
            Tip It’s easier for sales personnel and dealer reps to view information when you add the related lists to the right sidebar because the related lists appear as cards showing key details of records.
          11. Drag the Interest Tags component to an area of the page, preferably to the right sidebar.
          12. Select the following.
            • Enter a title.
            • To let users search for interest tags, select Show Search.
            • Enter the maximum number of tag categories to display in the component. Users can expand the list to see more.
            • Enter the maximum number of interest tags to display in the component. Users can expand the list to see more.
          13. Save your changes.
          14. To apply the changes, click Activation.
            Lead page layout
           
          Loading
          Salesforce Help | Article