Loading
Automotive Cloud
Table of Contents
Select Filters

          No results
          No results
          Here are some search tips

          Check the spelling of your keywords.
          Use more general search terms.
          Select fewer filters to broaden your search.

          Search all of Salesforce Help
          Find and Create Alerts on Vehicle Activities

          Find and Create Alerts on Vehicle Activities

          Use record alerts on the Vehicle record page to preempt critical issues and warnings related to a vehicle. Service technicians and sales and service dealers can view alerts related to warranty expiration, scheduled maintenance and repairs, lease extensions, and more. If your company has integrated data from telematics and other connected vehicle systems, you can also surface data related to engine overheating, parts malfunctions, and other details on a Vehicle record.

          Required Editions

          Available in: Enterprise, Unlimited, and Developer Editions.
          User Permissions Needed
          To create record alerts: Automotive Foundation User permission set.

          Make sure your admin has added the Flexcard component to the Vehicle page layout to display record alerts.

          Note
          Note Create record alerts within Salesforce or via integration with an external system. Record alerts aren’t intended to be created manually in an org.
          1. To create a record alert, perform these steps.
            1. From App Launcher, find and select Record Alerts.
            2. Click New
            3. For What Record, select the record that the record alert pertains to.
              For example, select the Vehicle record where you want the alert to appear.
            4. For Parent Record, select the record that sets the context for the alert.
              For example, select a Warranty record that needs attention or that expires soon.
            5. Select a record alert category.
            6. To activate the record alert, select Active.
            7. Enter a source system ID.
            8. Enter a subject and a detailed description. These values are visible on the record alert component on What Record.
              For example, enter the subject as Standard warranty for vehicle expires soon.
            9. For Effective Start Date, select the date from when the alert becomes active.
              For example, enter a date that’s 4 months before the warranty expiration date so that the user has adequate time to act on the alert.
            10. For Valid Until Date, select the date when the record alert becomes invalid.
              For example, enter a date that’s a week before the warranty expiration date so that the user is prompted to take immediate notice.
            11. For Snooze Until Date, select the date until which the user can snooze the alert.
              For example, enter a date that’s 2 months before the warranty expiration date.
            12. Select a Severity, which is populated from the record alert category, if any.
              Info, Error, and Warning are the available predefined values, but your admin can add other types.
            13. Save your changes.
          2. To view the record alerts on a Vehicle record, perform these steps.
            1. Open a Vehicle record, and select the Alerts component.
            2. To refresh the list of alerts, click Refresh.
            3. To snooze the alert or dismiss and remove the alert from your view, click Quick Actions.
              When you snooze a record alert, the Snooze Until Date field is updated for your reference.

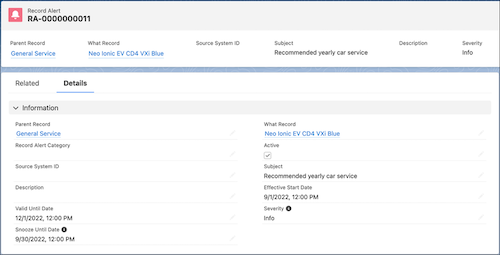
          A record alert record.

           
          Loading
          Salesforce Help | Article