
You are here:
Set Up Billing Dispute Management
Track and resolve billing inquiries, service requests, and invoice-related disputes by using Billing Dispute Management.
Required Editions
| Available in: Lightning Experience |
| Available in: Enterprise, Unlimited, and Developer Editions with the Revenue Cloud Billing license. Contact your Salesforce account executive for more information. |
| User Permissions Needed | |
|---|---|
| To install and deploy service process templates: |
|
| To create and customize an Experience Cloud site by using the self-service Billing Portal template: | Billing Admin permission set |
-
From Setup, in the Quick Find box, navigate to these settings and enable access.
- In Billing Settings, turn on Manage Billing Disputes and Service Requests.
- In Omnistudio Settings, turn on Omnistudio Metadata.
- In Context Service Settings, turn on Context Definitions.
-
In Sharing Settings, specify the level of access to these objects.
OBJECT DEFAULT INTERNAL ACCESS DEFAULT EXTERNAL ACCESS Catalog Public Read/Write Public Read Only Dispute Public Read/Write Private Omni Data Transformation Public Read/Write Public Read Only Omni Process Public Read/Write Public Read Only Product2 Public Read/Write Public Read Only Product Component Group Public Read/Write Public Read Only Product Component Group Override Public Read/Write Public Read Only Product Configuration Flow Public Read/Write Public Read Only Product Related Component Override Public Read/Write Public Read Only Service Catalog Request Public Read/Write Private
-
Configure Digital Experiences settings.
- From Setup, in the Quick Find box, enter Digital Experiences, and then select Digital Experiences.
- Click Settings, and in the Role and User Settings section, enable Allow using standard external profiles for self-registration, user creation, and login.
-
Create Customer Community users, enable the customer users from contacts, and add
permissions.
- Create Customer Community Plus users for your Experience Cloud site.
- On the account’s contact related list, view or add the contact record for the user that you want to add to a site. When you create a customer user, Salesforce creates a user record in your org with some details pre-populated from the contact record.
- On the contact detail page, click the actions dropdown, and then select Enable Customer User.
-
Add these permissions to the community user.
- UnifiedCatalogCommunityUserPsl permission set group
- Unified Catalog Community User permission set
- Omnistudio User permission set
- Billing Experience Cloud User permission set
- Repeat the above steps to add multiple users and then refresh the page.
-
Set up your Self-Service Billing Portal.
-
Create and publish an Experience Cloud site by using the Self-Service
Billing Portal template.
Starting Spring ’26, the new Billing self-service portal tabs are available by default only for newly created portals. If your Salesforce org was created before or upgraded to Spring ‘26, manually add the new Cases and Help Center tabs to the existing self-service billing portal configuration.
- Add the Customer Community Plus user to your Experience Cloud site.
-
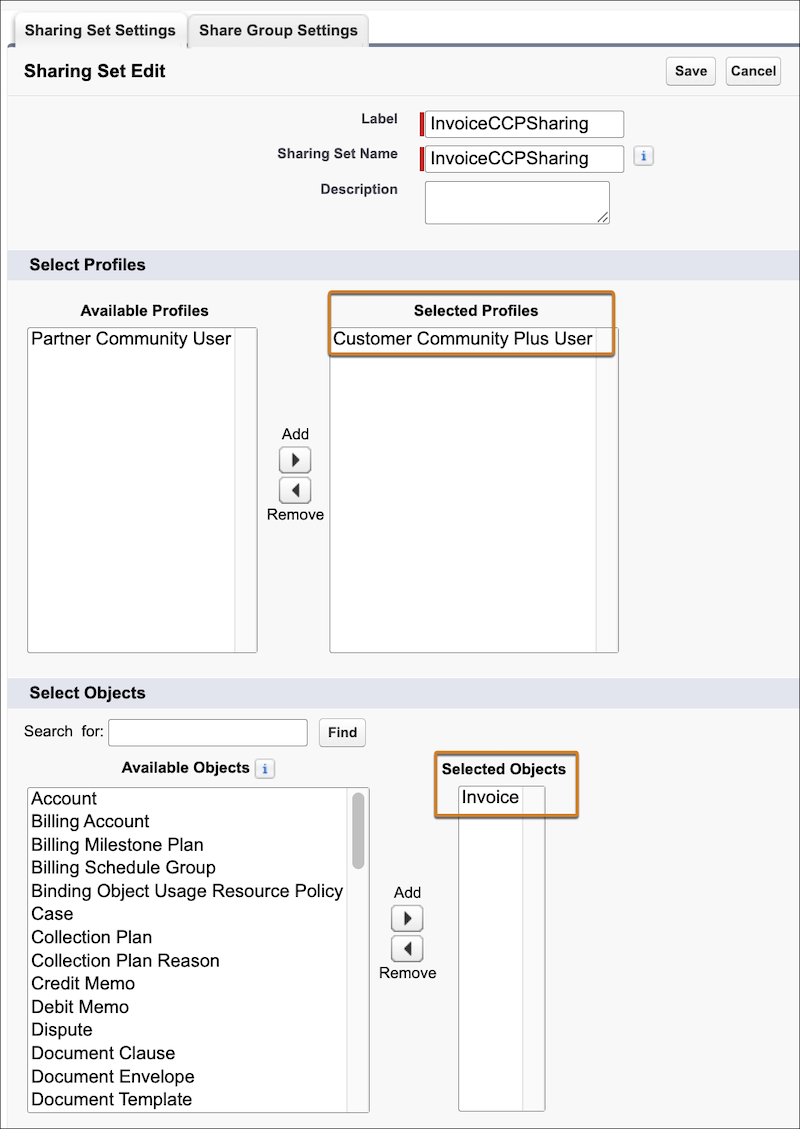
In Digital Experiences Settings, navigate to the Sharing Sets section, and create a new
sharing set. Add the Customer Community Plus user profile and the Invoice object.
-
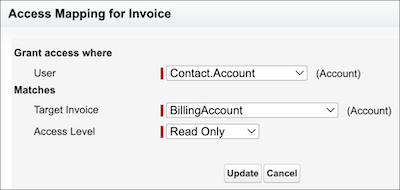
Configure access for the Invoice object.
- Refresh the page.
-
Create and publish an Experience Cloud site by using the Self-Service
Billing Portal template.
-
Add dynamic picklist values in the Dispute Type and Dispute Subtype fields of the Dispute
object.
- In Object Manager, navigate to the Fields & Relationships section of the Dispute object.
-
Edit these fields to add the dynamic picklist values.
- Add Billing Dispute as the picklist value in the Dispute Type field.
- Add Incorrect Invoice Charge as the picklist value in the Dispute Subtype field.
-
Clone the out-of-the-box Billing service process Omniscripts.
- From the App Launcher, find and select Omniscripts.
-
Create a new version of these Omniscripts.
- BillingSvcProcessSuspendBilling
- BillingSvcProcessUpdateBillToContact
- BillingSvcProcessExtendDueDate
- BillingSvcProcessInvoiceChargeCorrection
- BillingSvcProcessOtherBillingRequests
-
Install the service process templates by using Unified Catalog.
- From the App Launcher, find and select Unified Catalog.
- In Templates, select the service process template that you want to install and click Install.
- Review the data model and attributes of the installed template.
- Continue to click Next until you view the intake form.
- Click Open Editor to view the intake form in Omniscript Designer.
- Activate the Omniscript.
- Save and activate the template.
- Repeat the above steps to install each service process template.
After installation, the service process templates are saved as service processes in Unified Catalog. -
Organize your service processes in Unified Catalog.
- Create a catalog and select Service Process as the catalog type.
- Create a catalog category for your catalog.
- Add the service processes to the catalog and save your changes. Note the catalog ID as you need it to configure the Help Center page in Experience Builder.
-
Edit the Help Center page and Unified Catalog component in Experience Builder.
- Open the Help Center page and select the Unified Catalog component.
- Enter the catalog ID in the RecordId field of the Unified Catalog component.
- Preview and publish your site.
-
Set object permissions for the Customer Community Plus User profile.
- In Setup, navigate to the Customer Community Plus User profile.
- In the Standard Object Permissions section, enable the View All Fields access for the Omni Data Transformations and Omni Data Transformation Items objects.
-
Configure the Action Launcher component to add your service catalog.
- Edit the Account Record page in the Billing app.
- Select Unified Catalog in Action Launcher Configuration.
- Search and select your service catalog.
- Enter the name of your service catalog Service Catalog or any other appropriate name as the action launcher title.
Save and activate the Action Launcher component.
We recommend that you clone the out-of-the-box Resolve Service Request screen flow. In the cloned screen flow, you can modify the invoice charge correction resolution screen to make the Approved Amount column editable. This configuration helps your customer service reps directly update approved amounts on disputed invoice lines when they resolve invoice charge disputes.
Your dispute management setup is complete. Your billing portal or community user can now raise billing inquiries and disputes that can be resolved by your customer service representatives.

Note To resolve any Omniscripts component issues in the Help Center, we recommend
that you set the field-level security for Content and Sequence fields of the Omni Process
Compilation object.
Did this article solve your issue?
Let us know so we can improve!
