
Create an Advanced Order
Create advanced orders through the Lightning Web Component in the Consumer Goods Cloud Desktop app. Orders are generally created by field reps on mobile devices during store visits. However, sales managers, supervisors, or sales reps can place orders through the CGCloud Desktop app when store managers contact them directly via the call center or the local sales office.
Required Editions
Available in: Lightning Experience Available in: Enterprise and Unlimited Editions where Consumer Goods Cloud is enabled |
| User Permissions Needed | |
|---|---|
| To create advanced orders: | CGCloud Business Admin OR CGCloud Retail Business Admin OR CGCloud Supervisor OR CGCloud Retail Sales User OR CGCloud Sales User OR CGCloud Retail Supervisor User |

Order workflow is the lifecycle of an order and order workflow state is the status of an order at various stages of the lifecycle. An order template can be linked to only one order workflow.
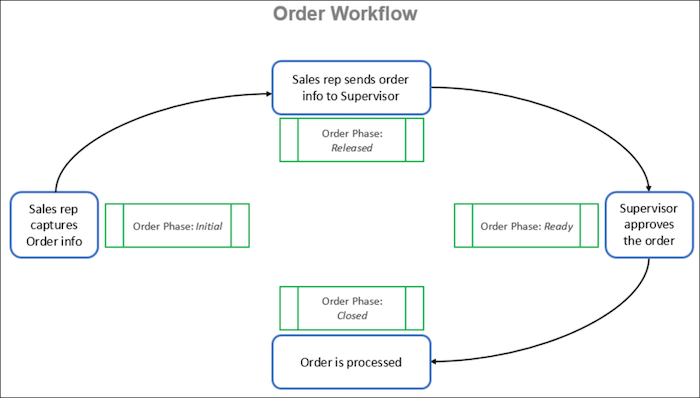
For existing projects and templates, in Order Template, add the Quantity field to the Custom JSON for Add Items or reset the Custom JSON field.
- From the App Launcher, find and select Advanced Orders.
- Select New Advanced Order.
- If you know the customer's name, enter the name.
-
If you’re unsure of the customer’s name, search for and select the customer using one
of these filters:
- Customer Number
- Shipping Street
- Shipping Zip/Postal Code
- Shipping State/Province
- Shipping City
- Priority Class of Trade
- Select an order template.
-
Save your changes.
Products are prepopulated and shown in the Order Item screen. Order items in an order are prepopulated based on the prefetching rules. For more information on prefetching, see Order Management.
Some of the details, such as Payer and Document Transaction Type are preset based on the order template that's used to create the order.
-
If you want to add a product that isn’t listed or belongs to a different order
type:
-
Click Add Items.
Up to 1000 products are shown.
- Filter the products by using one of these options, and then select one or more products.
- Add the quantity.
- If you selected multiple products, use the context menu for the Quantity field and update the quantity for all the filtered or selected products.
- Click Apply.
- Click Add.
The products and product quantities appear on the Order Items page. -
Click Add Items.
-
To filter and find order items, select one or more of these product filter options:
- Brand
- Category
- Consumer Goods Cloud Product Code
- Order Item Template
 Tip Use the hierarchical search in product filter options to quickly filter and find order items. As you specify the filter criteria, the order items are filtered and shown in real time. You can choose one or more brands, categories, or order item templates.
If you’re upgrading to the Consumer Goods Cloud managed package starting Winter ‘26, add the hierarchicalSearch attribute in the Custom JSON for order items. See Custom JSON for Order Items.
- Add the quantity for each product. If necessary, modify the quantity for each product.
-
Enter a discount percentage for the products, if any.
If Compute Price of the order template is set to Add and Save, then values in the Total Value Gross and Value Receipt fields are recalculated and shown whenever the quantity and discount change for a product.
-
To calculate the penny perfect pricing for the order, Click
Calculate.
Note The calculate button is shown only if Compute Price is Offline (Button) in the order template. If Compute Price is Offline (Edit Mode), then order calculation is triggered automatically on editing an order. You can skip this step if Compute Price is any value other than Offline (Button) in the order template.
-
Click Basket.
Products selected for the order are shown.
-
Save your changes.
The gross value of the order appears on the order header.
- On the order header, click Edit.
-
If necessary, edit these fields that are preset based on the order template that's used
to create the order:
- Order Date
- Initiation Date
- Delivery Date
- Customer Order Id
- Accountable
- Responsible
- Delivery Recipient
- Wholesaler
- If necessary, enter the order note for the invoice or delivery.
-
Submit the order.
- If Approval History is configured, in the Approval History section, click
Submit for Approval and then click OK.
The order passes through several approval levels based on the configuration of the
approval process.
For Approval History to be shown, the Consider Selectable Promotion field must be Unchecked and Compute Price musn’t be Offline (Button) or Offline (Edit Mode) in the Order Template.
The order is created and integrated into the ERP system. The state of the order changes based on the workflow selected for the order template. - If Approval History is configured, in the Approval History section, click
Submit for Approval and then click OK.
The order passes through several approval levels based on the configuration of the
approval process.
- Products in Disposal List
If Consider Field Availability is selected in an order template, then the disposal list shows products that are in the Field state. Depending on the configuration of the order template, you can also show listed products, historic products, and promotional products. Competitor products are included in an order if Allow Competitor Products is selected in the order template.
