
You are here:
Sync Display Attachments with Named Fetch Trees
To sync display data and images to the Consumer Goods offline mobile app, add images as attachments and create a named fetch tree for the display object in Consumer Goods Cloud. Sync the attachments and define how to show them on a new tab using a named fetch tree in the Sync Management app.
Required Editions
Available in: Lightning Experience Available in: Enterprise and Unlimited Editions where Consumer Goods Cloud is enabled |
| User Permissions Needed | |
|---|---|
| To configure file related list and add image as icon | CGCloud Business Admin |
- From the object management settings for Display, go to Page Layouts.
- Select Display Layout and then click Related Lists.
- Drag Files to the Related Lists section.
- Save your changes.
-
Attach sample images to a display record.
- In the Display tab, open multiple display records.
- In the Related tab of a display record, upload few sample JPG files as image attachments.
- Save your changes.
-
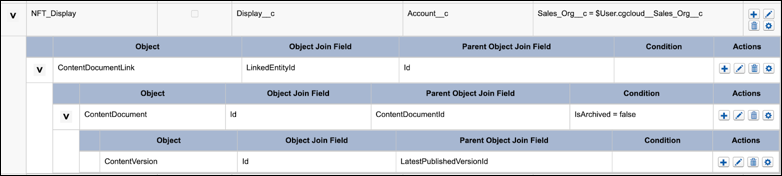
Create an named fetch tree query for Display records, including the
attachments.
- In Sync Configuration, click Named Fetched Tree.
-
Click New and enter these details:
Field Value Fetch Tree Name NFT_Display Object Name Display__c Join Field Account__c Where Sales_Org__c = $User.cgcloud__Sales_Org__c - Save your changes and click Back.
-
Create a second level in the named fetch tree.
-
Click plus (+) in NFT_Display and enter these details:
Field Value Object Name ContentDocumentLink Join Field LinkedEntityId Parent Join Field Id - Save your changes and click Back.
- Add additional nested levels to the named fetch tree with a specific configuration at each level.
- Save your changes and click Back.
-
Click plus (+) in NFT_Display and enter these details:
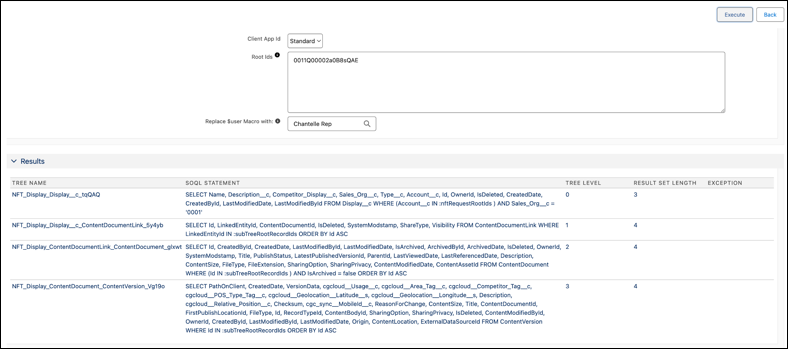
- Test the named fetch tree configuration and review the attachments that will be synchronized for a list of account IDs.
- To sync the display records and the attachments using named fetch tree, disable the Display tracked object.
-
To trigger the loading of the named fetch tree from the offline mobile app,
configure the
ReplicationCallbackfunction.Named fetch trees aren't loaded automatically during each sync. Trigger them manually from the offline mobile app after sync.- In Visual Studio Code based Modeler, open BoSfReplicationCallbacks.RequestOnDemandDataAsync.bl.js.
-
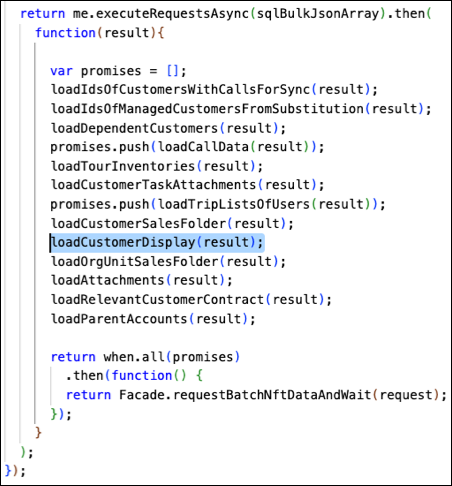
Add a function
loadCustomerDisplayparallel toloadCustomerSalesFolder.var loadCustomerDisplay = function (result) { idsOfAccountDisplayForSync = me.removeLocalIDs(me.getPropertyValuesFromArray(result.ManagedCustomers, "AccountID")); if (idsOfAccountSalesFolderForSync.length > 0) { request.addRequest('NFT_Display', idsOfAccountDisplayForSync); } }; -
Add the call of the
loadCustomerDisplayfunction with the signature in this format:function(result){: loadCustomerDisplay(result);


Did this article solve your issue?
Let us know so we can improve!
