You are here:
Integrate Customer Lookup on Display Card
To show the current account in Displays, configure the BoMyDisplay business object and DsBoMyDisplay datasource contracts in Visual Studio Code based Modeler. To create a wizard to select a different account, add an action to the MyDisplay_DisplayDetailsProcess process contract. Lastly, test the configuration in the simulator app.
Required Editions
Available in: Lightning Experience Available in: Enterprise and Unlimited Editions where Consumer Goods Cloud is enabled |
| User Permissions Needed | |
|---|---|
| To configure customer look-up to a display record | Developer, Customizer |
-
In Visual Studio Code based Modeler, adapt business object and datasource to
load the customer ID from the database.
-
Add this snippet to the
Attributesnode in DsBoMyDisplay_sf.datasource.xml contract.This snippet defines an attribute named
customerthat maps to theAccount__ccolumn in theDisplay__ctable.<Attribute name="customer" table="Display__c" column="Account__c" /> -
Add this snippet to the
SimplePropertiesnode in BoMyDisplay.businessobject.xml contract.This code snippet defines a simple property named
customerwith the typeDomPKeyand links it to thecustomerdata source property.<SimpleProperty name="customer" type="DomPKey" dataSourceProperty="customer"/> -
Add this snippet to the
ObjectLookupsnode in BoMyDisplay.businessobject.xml contract.This code snippet defines the
luCustomerobject lookup that references theLuCustomerobject class, links it to thecustomerdata source property and uses thepKeyproperty for the lookup.<ObjectLookup name="luCustomer" objectClass="LuCustomer" dataSourceProperty="customer" lookupProperty="pKey" />
-
Add this snippet to the
-
Create a lookup control in the Detail area of the Display module.
-
In MyDisplay_DisplayDetailsUI.userinterface.xml,
add a lookup control in the
Infogroup.This code snippet defines the
Customerlookup with bindings for a label and a two-way value binding to the current display's customer name. It also defines an event for the customer lookup.<Lookup name="Customer"> <Bindings> <Resource target="Label" type="Label" id="CustomerId" defaultLabel="Customer" /> <Binding target="Value" binding="ProcessContext::CurrentDisplay.luCustomer.name" bindingMode="TWO_WAY" /> </Bindings> <Events> <LookupEvent event="CustomerLookup" /> </Events> </Lookup>This snippet shows the position of the
Lookupcode block in theAreasection.<Area areaName="detailArea" areaPattern="GroupedElementsArea"> <GroupElement name="Info"> <Bindings> <Resource target="Title" type="Label" id="DisplayDetailInfoGroup" defaultLabel="Info" /> </Bindings> <InputArea name="Name"> <Bindings> <Resource target="Label" type="Label" id="DisplayName" defaultLabel="Name" /> <Binding target="Value" binding="ProcessContext::CurrentDisplay-name" bindingMode="TWO_WAY" /> </Bindings> </InputArea> <InputAreaMultiLine name="Description" no0fRows="3"> <Bindings> <Resource target="Label" type="Label" id="DisplayDescription" defaultLabel="Description" /> <Binding target="Value" binding="ProcessContext: :CurrentDisplay.description" bindingMode="TWO_WAY" /> </Bindings> </InputAreaMultiLine> <Lookup name="Customer"> <Bindings> <Resource target="Label" type="Label" id="CustomerId" defaultLabel="Customer" /> <Binding target="Value" binding="ProcessContext:: CurrentDisplay. luCustomer.name" bindingMode="TWO_WAY" /> </Bindings> <Events> <LookupEvent event="CustomerLookup". /> </Events> </Lookup> - Save all the contracts.
-
In MyDisplay_DisplayDetailsUI.userinterface.xml,
add a lookup control in the
-
To change the account for an existing display, call an existing wizard to
select a customer.
-
To trigger the lookup wizard of the customer module in Displays, in
MyDisplay_DisplayDetailsProcess.processflow.xml,
configure the event handler for the UI action. Add this snippet to the
View Action Eventsnode.This code snippet defines the
CustomerLookupevent that triggers the actionOpenCustomerNameLookup.<Event name="CustomerLookup" action="OpenCustomerNameLookup"/> -
To create an action to call a lookup process to retrieve an account ID,
add this
Actioncode to theActionsnode.This code snippet defines the
OpenCustomerNameLookupaction that triggers theCustomer::LookupProcessprocess, returns a customer primary key value to the current display's customer context, and transitions to theLoadCustomerLookupaction.<Action actionType="PROCESS" name="OpenCustomerNameLookup" process="Customer::LookupProcess"> <ReturnValues> <Return name="ProcessContext::CurrentDisplay.customer" value="customerPKey" /> </ReturnValues> <TransitionTo action="LoadCustomerLookup" /> </Action> -
To load the lookup object for a given account ID, create an action. Add
this
Actionsnippet to theActionsnode.This code snippet defines the
LoadCustomerLookupload action that loads a customer lookup of typeLuCustomerusing the customer primary key from the current display's context and returns the loaded customer lookup to the current display's context.<Action actionType="LOAD" name="LoadCustomerLookup" type="LuCustomer"> <Parameters> <Input name="pKey" value="ProcessContext::CurrentDisplay.customer" /> </Parameters> <Return name="ProcessContext::CurrentDisplay.luCustomer" /> </Action> - Save all the contracts.
-
To trigger the lookup wizard of the customer module in Displays, in
MyDisplay_DisplayDetailsProcess.processflow.xml,
configure the event handler for the UI action. Add this snippet to the
-
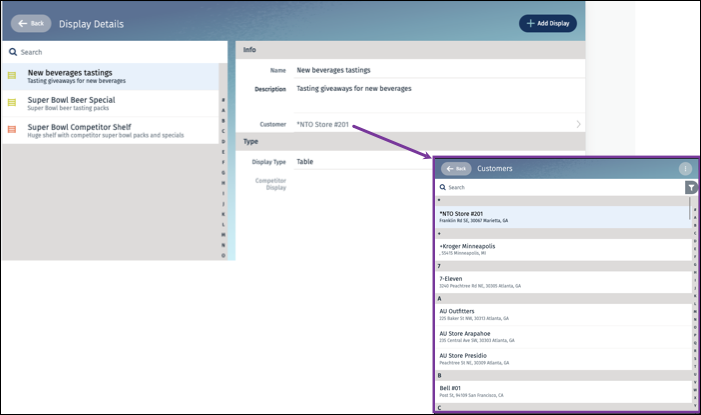
To verify the changes, test the app with the customer lookup.
-
To build your contracts, run
sf mdl build. - To test the changes, restart the simulator app.
-
To build your contracts, run