
Upload Data for Individuals Using Data Loader
Start by uploading data about individuals using Data Loader. First upload Account data, then, if your org uses the individual model, Contact data. You can then add identification documents, employment, and education details that you hold for individuals.
Required Editions
| Available in: Lightning Experience |
| Available in: Professional, Enterprise, and Unlimited Editions |
Before you start, we recommend that you:
- Ensure that you’ve identified all the picklist values in use for each object so that you load valid values for picklist or multi-select picklist fields.
- Run the latest version of Data Loader, which is always available in Salesforce.
-
In Developer Console, look up the Id for the Account object record
type.
When using the individual object model, use the
IndustriesIndividualAccount object record type. When using the person accounts, usePersonAccount Note If you created custom record types, use your values rather than the ones above. If you are using multiple record types, remember to look up their IDs too and assign users the correct record type ID.
- From the Salesforce header, open Developer Console.
- Select Query Editor.
-
Enter this SOQL query:
SELECT DeveloperName, Id,
                SobjectType FROM RecordType Where SobjectType='Account' AND
                DeveloperName='<record type ID>'
.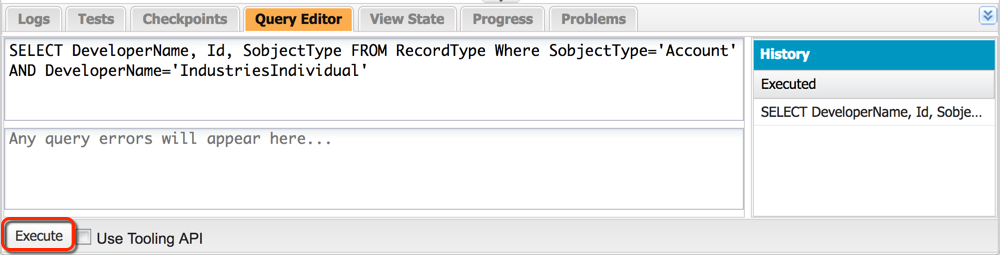
- Execute the query.
-
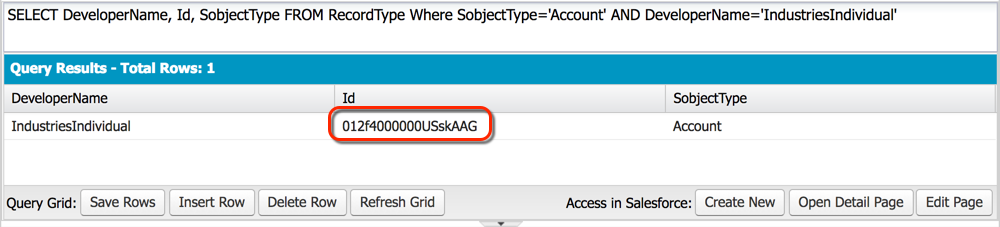
From the query results, copy the Id from the record.
-
In Data Loader, after you’ve logged in, export the Account object to a CSV file.
- Export the data to a new CSV file. Use the file name account.csv.
- Choose Select all fields when creating your SOQL query.
-
In the resulting account.csv file, paste the
Id value that you copied from your earlier query into the
RecordTypeId field for every record that you upload.
 Important Every record must have this same RecordTypeId value. The FinServ__IndividualType__c field also shows the value, Individual, which confirms that the record is for an individual.
 -
In the account.csv file, enter the rest of your individuals’ data
to upload data for the account part of each individual.
Remember these guidelines.
- As records are created, the value of OwnerID defaults to your user ID. To assign another team member as owner, set the OwnerID to the person’s user ID.
- Ensure that dates are formatted to match the date format specified for your org.
- When entering data for an org using the person account model.
- Used the FirstName and LastName columns instead of the Name column.
- To import a custom Contact field, use the column <Namespace_FieldName>__pc. For example, to add data for the contact field <Namespace>__Citizenship__c add data to the <Namespace>__Citizenship__pc column
- To import data a standard Contact field, use the Person<FieldName>. For example, to add a contact’s Birthdate field use the PersonBirthdate column.
-
In the Data Loader, use Insert and identify that you are uploading data to the Account
object with the data from your updated account.csv file. Then choose
Create or Edit a Map and select Auto-Match Fields to
Columns. Upload your data.
 Tip For every Account record that has the individual RecordTypeId, Salesforce automatically creates a primary Contact record for each Account record. In a later step, you perform another data upload to update these Contact records.
 - In your org, check for the records for individuals to verify the upload of Account data.
-
When using the individual object model, import the contact records corresponding to the
imported account records.
- In Data Loader, export the Contact object to a CSV file.
- Export the data to a new CSV file. Use the file name client_contact.csv.
-
Choose Select all fields when creating your SOQL query.
Specify the condition that the
FinServ__IndividualType__c
                field = Individual
. -
In the client_contact.csv file, enter the data for the contact
part of each individual, such as mailing address and email.
Important Do not edit these fields as they uniquely identify each Contact record and its relationship with the Account record for the individual.
- RecordTypeId
- Id
- FinServ__IndividualId__c
- FinServ__IndividualType__c
- AccountId
- In Data Loader, use Update and identify that you are updating the Contact object with the data from your updated client_contact.csv file. Then choose Create or Edit a Map and select Auto-Match Fields to Columns. Upload your data.
- In your org, check for the updated individual records to verify your upload of Contact data.
-
If you have identification documents to upload:
-
In Data Loader, export the Identification Document object to a CSV file.
We recommend that you:
- Export the data to a new CSV file.
- Use the file name id_docs.csv.
- Choose Select all fields when creating your SOQL query.
-
In the resulting id_docs.csv file, delete these columns:
- Id
- IsDeleted
- CreatedDate
- CreatedById
- LastModifiedDate
- LastModifiedById
- SystemModStamp
- LastActivityDate
- LastViewedDate
- LastReferencedDate
-
In the id_docs.csv file, enter your data for identification
documents.
Note If you haven’t done so already, in Data Loader, export the Contact object to a CSV file. In the downloaded CSV file, look up the AccountId for each record and add it to
FinServ__Account__c. - In Data Loader, use Insert and identify that you are updating the Identification Documents object with the data from your updated id_docs.csv file. Then choose Create or Edit a Map and select Auto-Match Fields to Columns. Upload your data.
- In your org, check for the identify document for individuals to verify the load.
-
In Data Loader, export the Identification Document object to a CSV file.
-
If you have employment data to upload:
-
In the Data Loader, export the Employment object to a CSV file.
We recommend that you:
- Export the data to a new CSV file.
- Use the file name employment.csv.
- Choose Select all fields when creating your SOQL query.
-
In the resulting employment.csv file, delete these columns:
- Id
- IsDeleted
- CreatedDate
- CreatedById
- LastModifiedDate
- LastModifiedById
- SystemModStamp
- LastActivityDate
- LastViewedDate
- LastReferencedDate
-
FinServ__LengthOfEmployment__c
-
In the employment.csv file, enter your data for employment
records.
Note If you haven’t done so already, in Data Loader, export the Contact object to a CSV file. In the downloaded CSV file, look up the Contact ID for each record and add it to
FinServ__Contact__c - In Data Loader, use Insert and identify that you are updating the Employment object with the data from your updated employment.csv file. Then choose Create or Edit a Map and select Auto-Match Fields to Columns. Upload your data.
- In your org, check for the employment records for individuals to verify the load.
-
In the Data Loader, export the Employment object to a CSV file.
-
If you have education data to upload:
-
In Data Loader, export the Education object to a CSV file.
We recommend that you:
- Export the data to a new CSV file.
- Use the file name education.csv.
- Choose Select all fields when creating your SOQL query.
-
In the resulting employment.csv file, delete these
columns:
- Id
- IsDeleted
- CreatedDate
- CreatedById
- LastModifiedDate
- LastModifiedById
- SystemModStamp
- LastActivityDate
- LastViewedDate
- LastReferencedDate
-
In the education.csv file, enter your data for education
records.
Note If you haven’t done so already, in Data Loader, export the Contact object to a CSV file. In the downloaded CSV file, look up the Contact ID for each record and add it to
FinServ__Contact__c. - In Data Loader, use Insert and identify that you are updating the Education object with the data from your updated education.csv file. Then choose Create or Edit a Map and select Auto-Match Fields to Columns. Upload your data.
- In your org, check for the education records for individuals to verify the load.
-
In Data Loader, export the Education object to a CSV file.
Did this article solve your issue?
Let us know so we can improve!
