
Example: Migrate a Service Process to the Unified Catalog
Simplify how you manage intake requests by converting your service process definitions in Service Process Studio into standard product records. Manage all your product and service offerings together in one place.
Required Editions
| Available in: Lightning Experience |
| Available in: Enterprise, Unlimited, and Developer Editions with Financial Services Cloud and Unified Catalog. |
Before you begin, make sure that you have an active Stop Check payment service process originally created in Service Process Studio.
This task uses the Stop Check Payment service process as an example to demonstrate the migration steps. In this scenario, the original service process definition contains three attributes, such as Check Number, Check Date, and Amount, with their corresponding API names as Check_Number, Check_Date, and Amount. Follow these steps to migrate this specific process, and adapt the logic to migrate your own service processes.
-
Create the service in the Unified Catalog.
Unified Catalog uses Product2 records to define services. Create this record to generate a unique product ID for the service.
- From the App Launcher, find and select Unified Catalog.
- On the Home page, click New and select Service Process.
- For name, enter Stop Check Payment, and fill out the remaining fields.
- Save your changes.
-
In the service designer on the Unified Catalog, perform these actions.
- Click Next.
-
In the Attributes step, recreate the attributes of your original service process
definition.
For the Check Number attribute, use Text as the data type. For the Check Date attribute, use Date as the data type. For the Amount attribute, use Number as the data type. See Configure Process Attributes.
 Note Make sure to match the API name of each attribute with the API name in your original Service Process Studio definition to prevent mismatch errors in your intake or fulfillment processes.
 - In the Intake Form step, attach the intake form and the fulfillment flow that you want to associate with the Stop Check Payment service. See Design Request Intake Form.
- In the Fulfillment Flow step, add the fulfillment flow that you want to associate with the Stop Check Payment service. See Configure Request Fulfillment.
- Under Advanced Options, in the Integrations step, add the integration definitions that you want to associate with the Stop Check Payment service.
-
In the browser URL of this new service, copy the record ID, for example
01tDn00000Wxyz.
01tDn00000Wxyz is the product ID for the service.
- Save your changes and activate the Stop Check Payment service.
-
Create an Omnistudio Data Mapper Transform.
Map your intake form data to the CustomAttributes JSON structure. The Unified Catalog Connect API requires all service-specific data wrapped inside a specific JSON node called CustomAttributes. Your existing Omniscript likely stores data in a flat key-value format, so this transformation is necessary to structure the payload correctly for the API.
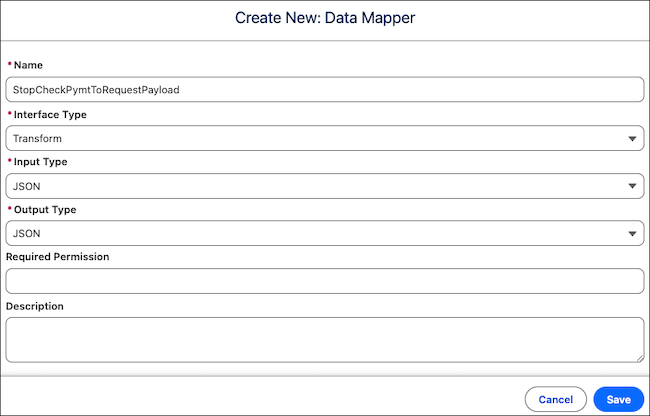
- In the Data Mapper Transform that you created, go to the Transform tab.
- Click Manage Input/Output Type.
-
In the Edit Input JSON field, enter your input JSON.
The Input JSON represents the data exactly as it exists inside your Omniscript right before you submit the service process request.
Here’s a sample input JSON structure for the Stop Check Payment service process:
{ "Check_Number": "1042", "Check_Date": "2026-02-15", "Amount": "2500" } -
In the Edit Expected JSON Output, enter your expected output JSON.
The Expected Output JSON is the payload format that the Unified Catalog Connect API requires.
Here’s a sample expected output JSON structure with CustomAttributes node for the Stop Check Payment service process:
{ "CustomAttributes": { "checkNumber": "1042", "checkDate": "2026-02-15", "amount": "2500" } } -
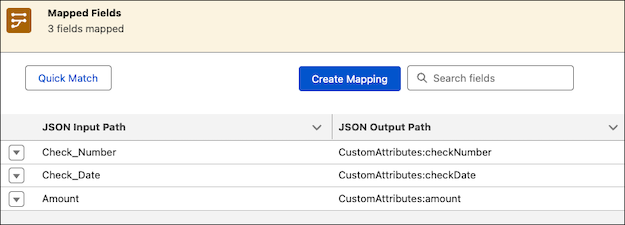
Map your Omniscript’s input fields to the corresponding output fields in the
CustomAttributes node. See Map Inputs and Outputs for Transformations.
Here’s an example of the mapped input and output fields.
-
Create an Omnistudio Integration Procedure.
Configure an Integration Procedure to call the Unified Catalog Connect API and pass your service process data. The original Service Process Studio used the Service Process Connect API to create cases for the service process requests. The Unified Catalog uses a product-driven API called ServiceRequestCaseApiService. This API requires you to pass the productId to link the newly created case to your catalog item. It also requires you to map each specific service attribute as a distinct key-value pair. This guarantees that the Unified Catalog accurately reads your intake data and structures it correctly for the case record. Copy the name of the Integration Procedure for later use.
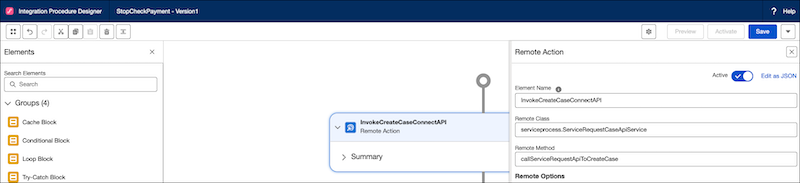
- In the Integration Procedure that you created, add a Remote Action step.
- Enter serviceprocess.ServiceRequestCaseApiService as the remote class.
-
Enter callServiceRequestApiToCreateCase as the remote
method.
- Expand the Additional Input, Additional Output, and Failure Response section.
- In the Additional Input section, add the productId, svcCatalogItemDefApiName, and inputToRequestPayloadTransformDataMapper keys.
- For the productId key, enter the product ID of the service. For example, 01tDn00000Wxyz.
- For the svcCatalogItemDefApiName key, enter the name of your service. For example, Stop a Check Payment.
- For the inputToRequestPayloadTransformDataMapper key, enter the API name of the Data Mapper Transform that you created.
-
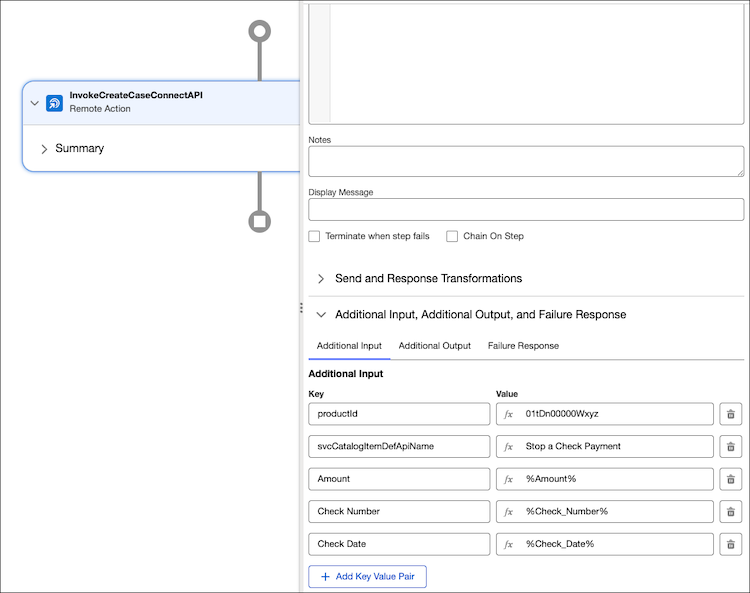
In the same Additional Input section, add each attribute of the service process as a new
key-value pair. For example, set the key to Amount, and the value to map the data from your
Omniscript into the Integration Procedure.
Here’s a sample input to the Integration Procedure for the Stop Check Payment service process.
- Save and activate the Integration Procedure.
-
Update the intake Omniscript of the Stop Check Payment Service Process.
- Create a version of your existing Omniscript.
- Locate and select the CreateCase step that creates the case for the service process request.
- In the Integration Procedure Action Properties, in the Integration Procedure field, add the name of the Integration Procedure that you created.
- In the Extra Payload section, add all the attributes of the service process as key-value pairs.
- Activate the Omniscript.
