You are here:
Tracking Earned and Unearned Revenue
You can use Insurance for revenue recognition for insurance policies. Revenue recognition tracks revenue per-policy as follows:
-
Earned Revenue
The portions of the total policy premium that have been paid to a given date
-
Unearned Revenue
The portions of the total policy premium that have not been paid yet
The earned revenue is posted to the carrier's accounting system as revenue on the income statement, and the unearned portion is posted as a deferred revenue on its balance sheet.
For example, an insurance policy you sell has a one-year term with monthly payments. Five months into the policy term, your earned revenue = 5/12 of the total policy premium. Your unearned revenue = 7/12 of the total policy premium, which is subject to modification or cancellation by the policy holder.
Services
The revenue tracking feature uses the following ApexVlocity Insurance services:
Adding Revenue Tracking to OmniScripts
You can add revenue tracking to Integration Procedures and OmniScripts.
To create revenue tracking for new policies, follow the steps in Create Revenue Tracking for a New Policy in a quote-to-policy OmniScript.
To modify revenue tracking for an updated policy, follow the steps in Modify Revenue Tracking for an Existing Policy in the OmniScript you use for policy updates. To cancel revenue tracking for a canceled policy, follow the steps in Cancel Revenue Tracking for a Canceled Policy in the OmniScript you use for policy cancellation.
Create Revenue Tracking for a New Policy
To add revenue tracking to a new insurance policy when it's created:
-
After the Create Policy remote action, add an action that creates a transaction record for the policy.
For example, you can add an Omnistudio Data Mapper Post Action that includes the following fields:
Add back image
-
Add a Remote Action to the OmniScript after the Data Mapper Post Action in step 1.
-
In Remote Class, enter InsPolicyRevenueScheduleService.
-
In Remote Method, enter create.
-
Under Remote Options, enter two new key/value pairs:
-
For the first pair, key = assetId, value = %policyId%.
-
For the second pair, use a merge field to get the transaction ID created in step 1. For example:
key = transactionId, value = %transactionId_for_policy_creation%
-
-
(Optional) Under Conditional View, click Add Condition. Enter a condition under which you do not want the revenue tracking action to appear in the OmniScript.
Modify Revenue Tracking for an Existing Policy
To set up Vlocity to modify a revenue schedule, you must do the following:
-
Capture the modification the user made to the policy.
-
Capture the modification amount of the policy premium.
-
Create a modification transaction.
-
Use the modify revenue schedule service to calculate the changes to the revenue schedule.
Here's an example that shows one way to create an OmniScript that modifies the revenue schedule:
-
Create a calculation procedure that takes changes a user to makes to a policy and calculates a modified revenue schedule.
-
Create a Data Mapper Transform to use as a Pre-Transform Data Mapper Interface in the next step.
This Data Mapper Transform must have the following Input JSON Paths and Output JSON Paths:
-
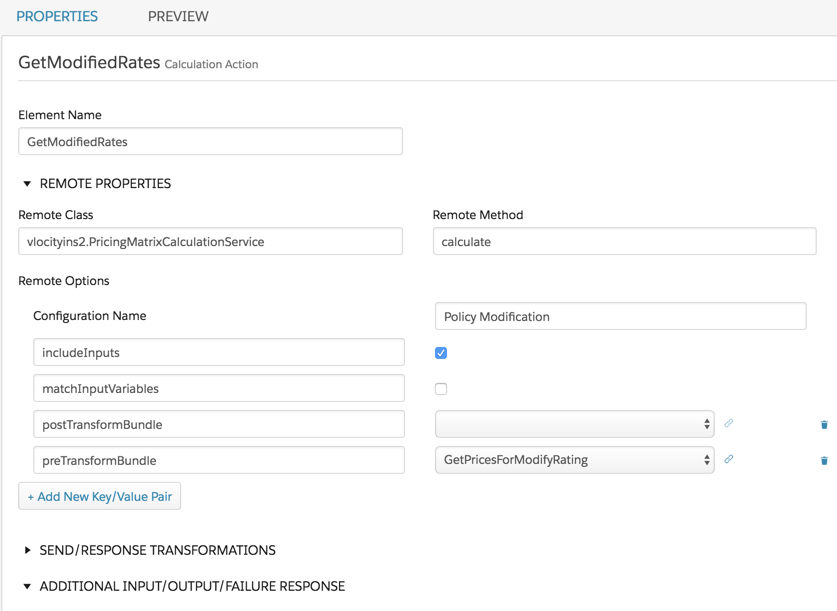
Add a Calculation Action to the OmniScript after the policy update Remote Action.
-
In the Remote Options section, verify that the Remote Class and Remote Method are those you use for calculation procedures. Enter a Configuration Name.
-
Select the Include Inputs checkbox.
-
In Pre-Transform Data Mapper Interface, select the Data Mapper Transform you created in step 2.
-
-
Add a Data Mapper Post Action after the Calculation Action.
-
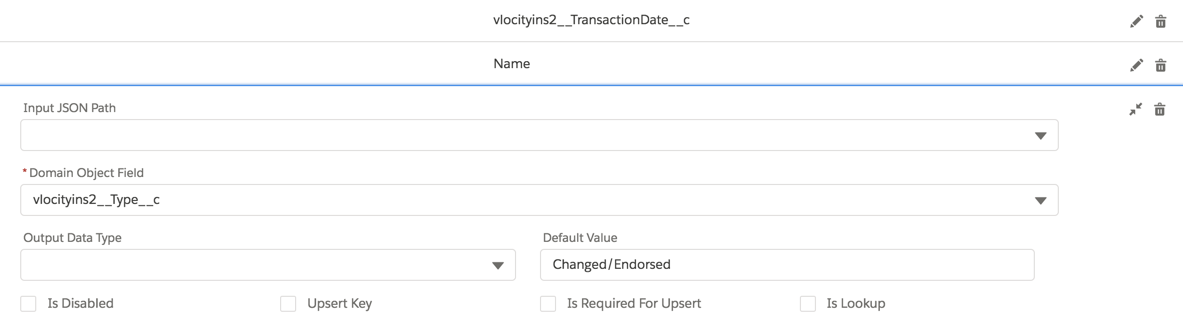
Verify that the following fields exist for Asset Transaction:
-
In the Type field, enter a Default Value that works across all the policies that will use this Integration Procedure. Use this default value for every policy, don't change or customize it. The value gets taken up by the service in the remote action following this Data Mapper.
For example:
-
-
Add a Remote Action after the Data Mapper Post Action.
-
Remote Class =
InsPolicyRevenueScheduleService -
Remote Method =
modify. -
Remote Options include the following key/value pairs:
Key
Value
assetId%policyId%transactionId%transactionId_for_policy_modification%effectiveDate%policy:modificationDate%
-
If you plan to add revenue schedule modification to multiple OmniScripts, you can create an Integration Procedure using steps 1-5. You can then add the Integration Procedure to any OmniScript.
Cancel Revenue Tracking for a Canceled Policy
To set up Vlocity to cancel a revenue schedule, you must do the following:
-
Calculate a refund amount.
-
Create a transaction that captures the cancellation.
-
Set up the cancel revenue schedule service to use the transaction to calculate the cancellation of the revenue schedule.
Here's an example that shows one way to create an OmniScript that cancels a revenue schedule:
-
Create a calculation procedure that takes policy cancellation and calculates a canceled revenue schedule.
-
Create a Data Mapper Transform to use as a Pre-Transform Data Mapper Interface in the next step.
This Data Mapper Transform must have the following Input JSON Paths and Output JSON Paths:
-
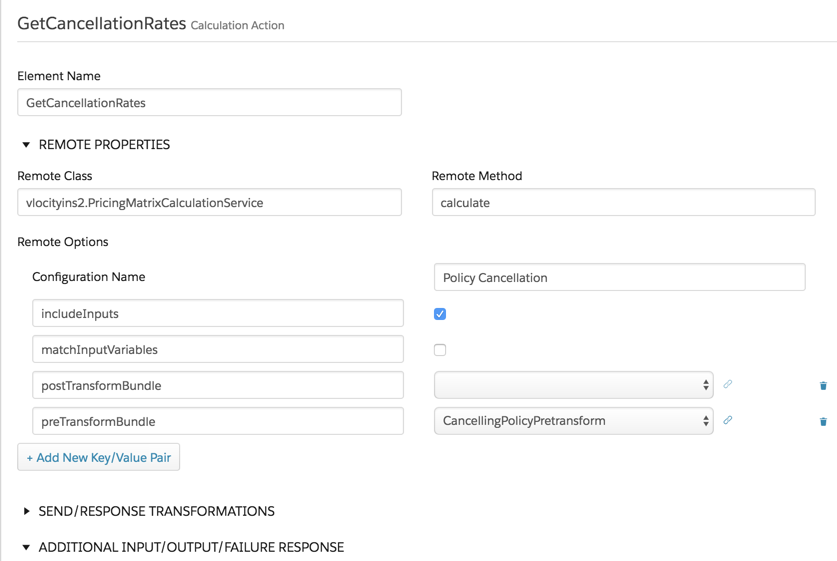
Add a Calculation Action to the OmniScript after the policy update Remote Action.
-
In the Remote Options section, verify that the Remote Class and Remote Method are those you use for calculation procedures. Enter a Configuration Name.
-
Select the Include Inputs checkbox.
-
In Pre-Transform Data Mapper Interface, select the Data Mapper Transform you created in step 2.
-
-
Add a Data Mapper Post Action after the Calculation Action.
-
Verify that the following fields exist for Asset:
-
Verify that the following fields exist for Asset Transaction:
-
Enter a formula similar to the following to make the transaction amount captured into a negative amount (refund):
-
-
Add a Remote Action after the Data Mapper Post Action.
-
Remote Class =
InsPolicyRevenueScheduleService -
Remote Method =
cancel. -
Remote Options include the following key/value pairs:
Key
Value
assetId%policyId%transactionId%transactionId_for_policy_cancellation%effectiveDate%policy:cancellationDate%
-
-
Add a Response Action after the Remote Action to echo the policy ID.
If you plan to add revenue schedule cancellation to multiple OmniScripts, you can create an Integration Procedure using steps 1-5. You can then add the Integration Procedure to any OmniScript.
- Configuring the Asset Page to Track Revenue
To see the revenue schedule, with earned and unearned revenue, go to the policy (asset) object for a specific policy. - Revenue Schedule Display Lightning Web Components
You can view the Revenue Schedule for a policy on the Policy (Asset) record. The Revenue Schedule tab displays two Lightning Web Components (LWC): Vlocity Insurance Revenue Charts and Vlocity Insurance Revenue Schedule.
