
You are here:
Show Display Records as a Picklist
Set up a picklist for the display records so that sales reps can quickly select a display type. Use Visual Studio Code based Modeler to create a domain and picklist for Display. Then, link them with a picklist mapping.
Required Editions
| Available in: Enterprise and Unlimited Editions where Consumer Goods Cloud is enabled |
| User Permissions Needed | |
|---|---|
| To add a mobile app domain | CGCloud Business Admin |
| To add a domain and configure picklist in VS Code Modeler | Customizer, Developer |
- Add a domain for the offline mobile app in Visual Studio (VS) Code based Modeler. Open the domain.xml contract in the $workspace/src/SharedWebData folder.
-
Add this snippet to the
Domainnode.<Domain name="DomDisplayType" baseType="Toggle" length="255"> <Initializer> <Default value="' '" /> <Empty value="" /> </Initializer> </Domain>Data types are defined as domains in the offline mobile app. The domain DomDisplayType is based on a toggle type and has a length of 255 characters. The initial value is a single space. If there is no value, it’s an empty string. -
To create a mobile app domain in Salesforce:
- From the App Launcher, find and select Mobile App Domain.
- Click New.
- Specify the mobile app domain name as DomDisplayType.
- Save your changes.
-
To map the DomDisplayType mobile app domain to the Display picklist, create a picklist
mapping.
- From the App Launcher, find and select Mobile App Picklist Mapping.
- On the Mobile App Domain page, find and select the Display record.
- In the Type field of the Display record, enter DomDisplayType.
- Save your changes.
- Click Extension.
- Set sales org 0001 for each picklist item. In Mobile App Picklist Mapping Extension, select the business area as 0001.
- In Text Language 1, enter the values for all the picklist items.
- Save your changes.
-
To synchronize the Type attribute and make it available in the CG Cloud offline mobile
app, add Type to the Mobility relevant field set.
- From the object management settings, click Display.
- On the Display object page, click Field Sets.
- Drop the Type attribute from the field set properties to the In the Field Set box.
- Save your changes.
- In VS Code Terminal, press CTRL+C to stop the backend server.
-
To clear the local database, run
sf mdl cleanup. -
To rebuild the contracts, run
sf mdl build. -
To restart the server, run
sf mdl simulate. -
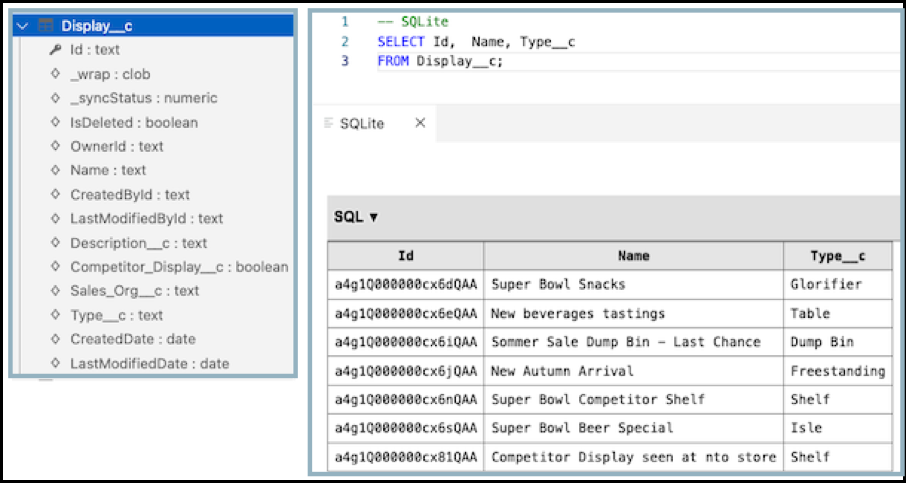
After a successful sync, run an SQLite query to verify that the
Type__ccolumn is available in the database.
-
Add the
typeattribute to data source and business object. Then add aSelectionBoxpicklist control for the Type field in the UI contract.-
Add the
typeattribute to DsBoMyDisplay_sf.datasource.xml.For example,<Attribute name="type" table="Display__c" column="Type__c" /> -
Add a simple property for the
typeattribute in BoMyDisplay.businessobject.xml.For example,<SimpleProperty name="type" type="DomDisplayType" dataSourceProperty="type"/> -
Add a
SelectionBoxcontrol for theTypeattribute in MyDisplay_DisplayDetailsUI.userinterface.xml. Bind theTypeSelectionBox control to the new simple property, and specify the new domain for the values to appear in the display list.The selection box makes it easy for sales reps to select a display type from a list of options. The SelectionBox component has bindings for the label, data source, and value. The Items section contains bindings for the values and text of each item in the selection list.<SelectionBox name="Type"> <Bindings> <Resource target="Label" type="Label" id="DisplayType" defaultLabel="Display Type" /> <Binding target="DataSource" toggleId="DisplayType" bindingMode="TWO_WAY" /> <Binding target="Value" binding="ProcessContext::CurrentDisplay.type" bindingMode="TWO_WAY" /> </Bindings> <Items> <Bindings> <Binding target="ItemValue" type="Text" binding=".id" bindingMode="ONE_WAY" /> <Binding target="ItemText" type="Text" binding=".text" bindingMode="ONE_WAY" /> </Bindings> </Items> </SelectionBox> - Save your changes.
-
Add the
-
To test the changes, build the contracts by running this command.
sf modeler
            workspace build
. - Restart the simulator app and verify the changes.

Example
Datasource Contract
<DataSource name="DsBoMyDisplays" backendSystem="sf" business0bjectClass="BoMyDisplay" external="false" >
   <Attributes>
      <Attribute name="pKey" table="Display__c" column="Id" />
      <Attribute name="name" table="Display__c" column="Name" />
      <Attribute name="description" table="Display__c" column="Description__c" />
      <Attribute name="competitorDisplay" table="Display__c" column="Competitor_Display__c" />
      <Attribute name="type" table="Display__c" column="Type__c" />
   </Attributes>
   <Entities>
      <Entity name="Display__c" alias=" idAttribute="Id" />
   </Entities>
   <QueryCondition>
      <! [CDATAI
         Display__c.Id = #pKey#
      ]]>
   </QueryCondition>
   <OrderCriteria/>
   <Parameters>
      <Parameter name="pKey" type="TEXT" />
   </Parameters>
</DataSource>
Business Object Contract
<BusinessObject name="BoMyDisplay" schemaVersion="1.1">
    <DataSource name="DsBoMyDisplay"/>
    <SimpleProperties>
         <SimpleProperty name="pKey" type="DomPKey" dataSourceProperty="pKey"/>
         <SimpleProperty name="name" type="DomText" dataSourceProperty="name"/>
         <SimpleProperty name="description" type="DomLongDescription" dataSourceProperty="description"/>
         <SimpleProperty name="competitorDisplay" type="DomBool" dataSourceProperty="competitorDisplay"/>
         <SimpleProperty name="type" type="DomDisplayType" dataSourceProperty="type"/>
    </SimpleProperties>
    <NestedObjects/>
    <ObjectLookups/>
    <ListObjects/>
    <Methods> - </Methods>
    <Validations> - </Validations>
</BusinessObject>
UI Contract
Here’s a sample code that defines the display details UI with a master-detail layout. The master section contains a single-area section and the detail section uses a grouped element area with the two group elements Info and Type. The Type group element includes a selection box for choosing the display type, with options for item value and item text. There’s also a checkbox to select a competitor display.
<UIDescription name="MyDisplay::DisplayDetailsUI" schemaVersion="0.0.0.5">
         <Page pagePattern="MasterDetailSectionPage" masterSectionFlex="40" detailSectionFlex="60">
             <PageHeader>-</PageHeader>
             <Section sectionName="masterSection" sectionPattern="SingleAreaSection">
             </Section>
             <Section sectionName="detailSection" sectionPattern="SingleAreaSection">
                  <Area areaName="detailArea" areaPattern="GroupedElementsArea">
                      <GroupElement name="Info">
                      </GroupElement>
                      <GroupElement name="Type">
                          <Bindings>
                             <Resource target="Title" type="Label" id="DisplayDetailTypeGroup" defaultLabel="Type" />
                          </Bindings>
                          <SelectionBox name="Type">
                               <Bindings>
                                   <Resource target="Label" type="Label" id="DisplayType" defaultLabel="Display Type" />
                                   <Binding target="DataSource" toggleId="DisplayType" bindingMode="TWO_WAY" />
                                   <Binding target="Value" binding="ProcessContext::CurrentDisplay.type" bindingMode="TWO_WAY"/>
                               </Bindings>
                               <Items>
                                   <Bindings>
                                       <Binding target="ItemValue" type="Text" binding=".id" bindingMode="ONE_WAY" />
                                       <Binding target="ItemText" type="Text" binding=".text" bindingMode="ONE_WAY"/>
                                   </Bindings>
                             </Items>
                          </SelectionBox>
                          <CheckBox name="CompetitorDisplay" >
                          </CheckBox>
                      </GroupElement>
                      </Area>
             </Section>
           </Page>
       </UIDescription>
Did this article solve your issue?
Let us know so we can improve!
