
You are here:
Simple Pricing Procedure Example
Let’s configure and simulate a simple pricing procedure using some common pricing elements to calculate discounts for a laptop.
Required Editions
| Available in: Lightning Experience |
| Available in: Enterprise, Unlimited, and Developer Editions of Revenue Management (formerly Revenue Cloud) with the Revenue Cloud Growth license or the Revenue Cloud Advanced license. |
| User Permissions Needed | |
|---|---|
| To create, update, and delete pricing procedures: | Salesforce Pricing Design Time User |
| To use pricing procedures: | Salesforce Pricing Run Time User |
To follow this example, make sure your organization is set up with the following.
- Decision tables
- Context Service enabled, with a defined context definition. You can also use one from Revenue Management.
- Two simple products called Laptop and Printer configured with necessary attributes and classifications. To learn how to create a simple product see, Create Simple Products.
- Added the products as a price book entries to a price book. To learn more about price books and price book entries, see Cost Books and Price Books.
- The required price adjustment schedule record created. To create a price adjustment schedule record, see Create Price Adjustment Schedules.
- A constant resource created. To learn how to create constant resources, see Create Constant Resources.
-
Create a pricing procedure and associate it with a context definition. Ensure that the
usage type is set to Pricing and save your procedure. Provide these details:
- Name: Laptop Sales
- Usage Type: Pricing
- Context Definition: SalesTransactionContext
-
Open your pricing procedure and add the Pricing Setting element
and map these variables.
- Input Variables
- Line Item: LineItem
- Output Variables
- Price Waterfall: price_water_fall
- Net Unit Price: NetUnitPrice
- Subtotal: ItemNetTotalPrice
- Input Variables
-
Let’s start by fetching the base price of the laptop using the List Price element.
Under Lookup Table Details, select the Price Book Entries decision
table and map these variables.
- Input Rule Variables
- Product:Product
- Price Book: PriceBooks
- Product Selling Model: ProductSellingModel
- Input Variables
- Quantity: LineItemQuantity
- Output Variables
- List Price: ListPrice
- Subtotal: ItemNetTotalPrice. You can also leave this variable blank because you've already mapped the Subtotal variable in step 2.
- Input Rule Variables
- To provide discounts on laptops when they’re purchased in bulk, add the Volume Discount element.
-
To the Volume Discount element, search for and add the Volume Discount
Entries decision table and map these variables.
- Input Rule Variables
- Price Adjustment Schedule: VolumePriceAdjustmentScheduleId
- Lower Bound: LineItemQuantity
- Upper Bound: LineItemQuantity
- Product: Product
- Product Selling Model: ProductSellingModel
- Effective From: EffectiveFrom
- Effective To: EffectiveFrom
- Input Variables
- Quantity: LineItemQuantity
- Input Unit Price: ListPrice
- Input Rule Variables
-
To empower sales reps to apply discretionary discounts and encourage sales of laptops
to longtime customers, use the Manual Discount element. This
discount type can be applied as a percentage or an amount. Map these input
variables.
- Adjustment Type: AdjustmentType
- Adjustment Value: AdjustmentValue
- Quantity: LineItemQuantity
- Input Unit Price: NetUnitPrice
-
To calculate the aggregate price of a group of products, define the
Aggregate Price element. In our example, let’s calculate the
aggregate price of a laptop and printer at the line item level.
- In the Group By field, search for and select ProductSellingModel to group both the laptops and printers.
-
Set a condition to decide the product quantities. Here, set:
- Where: LineItemQuantity
- Operator: Greater Than
- Output Value: 2
-
Enter the aggregation formula as:
- Formula: SUM(ItemNetTotalPrice)
- Output Variable: NetUnitPrice
-
Click
 and select Include in Output.
- Finally, set your preferences to view pricing information, profile access, and rank information.
- Save your procedure.
-
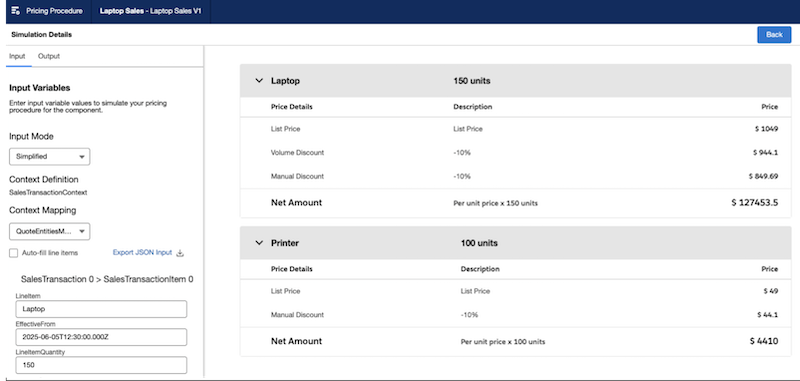
Click Simulate to test your procedure. Enter the input values
for your laptop product and click Simulate again.
The price waterfall shows the volume and manual discounts used to calculate the final price of the laptop and printer, confirming that your procedure is working as expected.
 Important If your simulation fails or you can't see the waterfall view, we recommend refreshing your decision tables and verifying if the input values entered are accurate.
Looking for a hands-on way to practice with Pricing Procedures? We've got just the thing! We recommend checking out this Trailhead resource: Price Management with Revenue Management.
Did this article solve your issue?
Let us know so we can improve!
