
You are here:
Configure the View Fee Payment History Page
Give constituents insight into the regulatory transaction fees associated with their applications and inspections.
Required Editions
| View supported product editions. |
| User Permissions Needed | |
|---|---|
| To access regulatory transaction fees: | Public Sector Access |
| To create custom list views: | Read on the type of record included in the list AND Create and Customize List Views |
| To customize or publish an Experience Cloud site: | Be a member of the site AND Create and Set Up Experiences OR Be a member of the site AND an experience admin, publisher, or builder in that site |
Create a custom site page based on list views of regulatory transaction fees in your org. Public Sector Solutions includes an All Regulatory Transaction Fees list view; create additional list views of paid transaction fees and due transaction fees. Then, create a View Fee Payment History page on your licenses and permits site that uses all three list views to show constituents transaction information about fees associated with their applications and inspections.
Create List Views for Regulatory Transaction Fees
First, create a list view of upcoming regulatory transaction fees that are due, and a list view of past fees that are paid.
-
From the App Launcher (
 ), find and select Regulatory Transaction Fees.
-
Click
 , and then
click New.
, and then
click New.
- For List Name, enter Due Regulatory Transaction Fees, and then press Tab to autopopulate the list API name.
-
Save your changes.
On the list view page, specify the fields to show in the view.
-
Click
 .
.
- Click Filter by Owner, select All regulatory transaction fees, and then click Done.
- Click Add Filter. For Field, select Status, for Operator select equals, and for Value select Due. Then click Done.
- Save your work.
-
Create another list view that displays records of regulatory transaction fees that have
been paid.
- Name the list Paid Regulatory Transaction Fees.
- For Filter by Owner, select All regulatory transaction fees.
- Add a filter, and for Field, select Status, for Operator select equals, and for Value select Paid.
Create the View Fee Payment History Site Page
Now, create the site page that shows constituents the regulatory transaction fees based on the list views.
- From Setup, in the Quick Find box, enter Digital Experiences, and then select All Sites.
- Click Builder for your licenses and permits site.
-
Click
 , and then select
New Page.
, and then select
New Page.
- Select Standard Page, select Flexible Layout, and then click Next.
-
For Name, enter View Fee Payment History, and then click
Create.
The URL and API name are automatically generated.
Now, add Lightning components to the page.
-
Click
 , and then drag
the Rich Content Editor component to the canvas.
, and then drag
the Rich Content Editor component to the canvas.
- Click Edit Content.
-
Enter a page title and brief description. Format the text as desired. For example, for
the title, enter View Fee Payment History in bold text. On a new
line, enter the description View transactions grouped by their status, or view
a list of all transactions. Click a transaction to see its details..

-
Click , and then drag
the Tabs component to the canvas under the component with the title
and description.
-
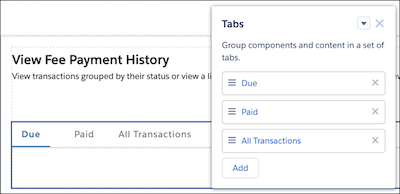
In the Tabs properties panel, rename Tab 1 Due, rename Tab 2
Paid, and rename Tab 3 All
Transactions.
 Next, add the regulatory transaction fee list views to the tabs.
 - Select the Due tab, and then drag the Record List component to the canvas.
-
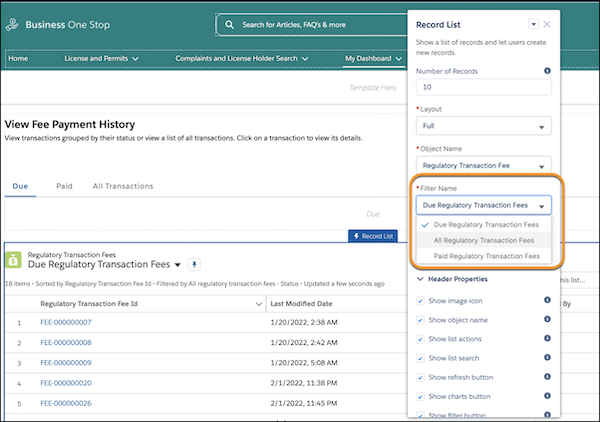
In the Record List properties panel, for Object Name, select Regulatory
Transaction Fee, and for Filter Name, select Due Regulatory
Transaction Fees. Specify other options as desired.
- Select the Paid tab, and then drag the Record List component to the canvas.
- In the Record List properties panel, for Object Name, select Regulatory Transaction Fee, and for Filter Name, select Paid Regulatory Transaction Fees. Specify other options as desired.
- Select the All Transactions tab, and then drag the Record List component to the canvas.
-
In the Record List properties panel, for Object Name, select Regulatory
Transaction Fee, and for Filter Name, select All Regulatory
Transaction Fees. Specify other options as desired.
Now that the page is configured, add it to the site navigation menu.
- Select the Theme Navigation Menu component. In the properties panel, click Edit Default Navigation, and then click Add Menu Item.
- Name the menu item View Fee Payment History. For Type, select Site Page, and for Page, select View Fee Payment History.
- Specify other options based on your needs, drag to position your menu item as desired, and save your menu.
- Preview the page, test your site navigation, and publish your changes when you’re ready.
