
You are here:
Configure Advanced Approvals for Salesforce Contracts
Set up contract approval workflows by associating approval flows with contract types, configuring approver resolution, and defining lifecycle actions.
Required Editions
| Available in: Lightning Experience |
| Available in: Professional, Enterprise, Unlimited, and Developer Editions |
| User Permissions Needed | |
|---|---|
| To configure advanced approvals for contracts: | CLM Admin |
Before you begin:
- Enable Salesforce Contracts.
- Verify that Advanced Approval is enabled and configured in your org. Advanced Approvals is included with Salesforce Contracts (CLM) licenses.
- Identify contract types that require approval workflows.
- Assign CLM Runtime permissions to users who submit the contract for approval.
Note For Flow design and approval stage configuration, see Advanced Approvals in Revenue Cloud.
-
Create an approval flow.
- From the App Launcher, find and select Approvals.
-
Click Create Flow Approval Process, and then select
Start from Scratch.
The Autolaunched Flow Approval Process (No Trigger) opens. See Example: Configure an Approval Workflow.
-
Define approval stages within the flow.
Design the approval flow with a main path and a recall path to handle contract updates. In the recall path, configure a status update stage to change the contract status from In Approval to Draft. Use conditions such as contract value thresholds to determine when specific approval steps run. See Design an Approval Workflow.
- Add serial or parallel approval steps
- Configure entry conditions based on contract data
- If needed, you can add Apex actions to evaluate complex conditions.
- Add approval actions such as Approve, Reject, and Recall.
-
Activate the flow.
The approval flow runs only when it’s mapped through Contract Type Config. The Flow runs as an autolaunched flow (no trigger) and runs when you submit a contract for approval.
-
Associate a flow with a contract type.
- From Setup, enter Contract Type Config in the Quick Find box, and then select it.
- Click New, and select a contract type.
- Set the usage type to Approval Setting.
- Set Config Type to Advanced Contract Approval Flow Name.
- To associate the flow you created earlier to this contract config, enter the flow API name in the Config Value.
-
Click Create to save your changes.
This step maps the approval flow to run during contract submission.
-
Configure smart approval logic.
Define conditions to skip previously approved steps when contract values remain unchanged.
- Open the approval flow.
- Add conditions to evaluate attributes, such as total price or key terms.
- Define which approval steps to skip when conditions remain unchanged or meet thresholds.
- Activate the updated flow.
-
Configure recall behavior.
-
Open the approval flow and add a recall path to handle recall actions in the approval
flow.

- Add an Update Records action in the recall path.
-
Update the contract status to Draft.
Recall ends the approval process and updates the contract based on the logic defined in the approval flow.
-
Open the approval flow and add a recall path to handle recall actions in the approval
flow.
-
Configure cancel behavior.
Configure how the contract status updates when a user cancels an approval request.
- Create a record-triggered flow on the Approval Submission object.
-
Configure the flow to run when a record is updated.
Use the same pattern to configure contract status updates for other approval actions. For example, set the status to Negotiating for Approved and Rejected for Rejected.
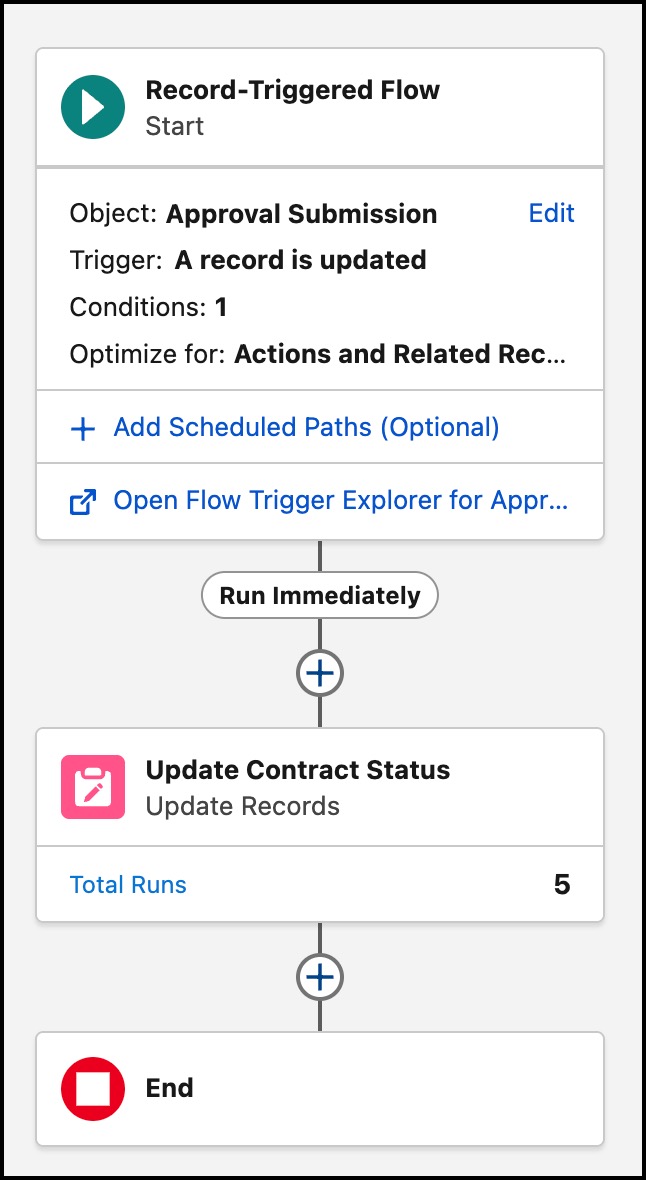
- Add entry conditions to run the Flow when the approval submission status changes to Canceled.
- Retrieve the related contract record by using the relationship from the Approval Submission record, and add an Update Records element to update the contract.
-
Set the contract status to Draft.
Cancel ends the approval process. The record-triggered flow updates the contract status so that the contract lifecycle reflects the cancellation outcome.
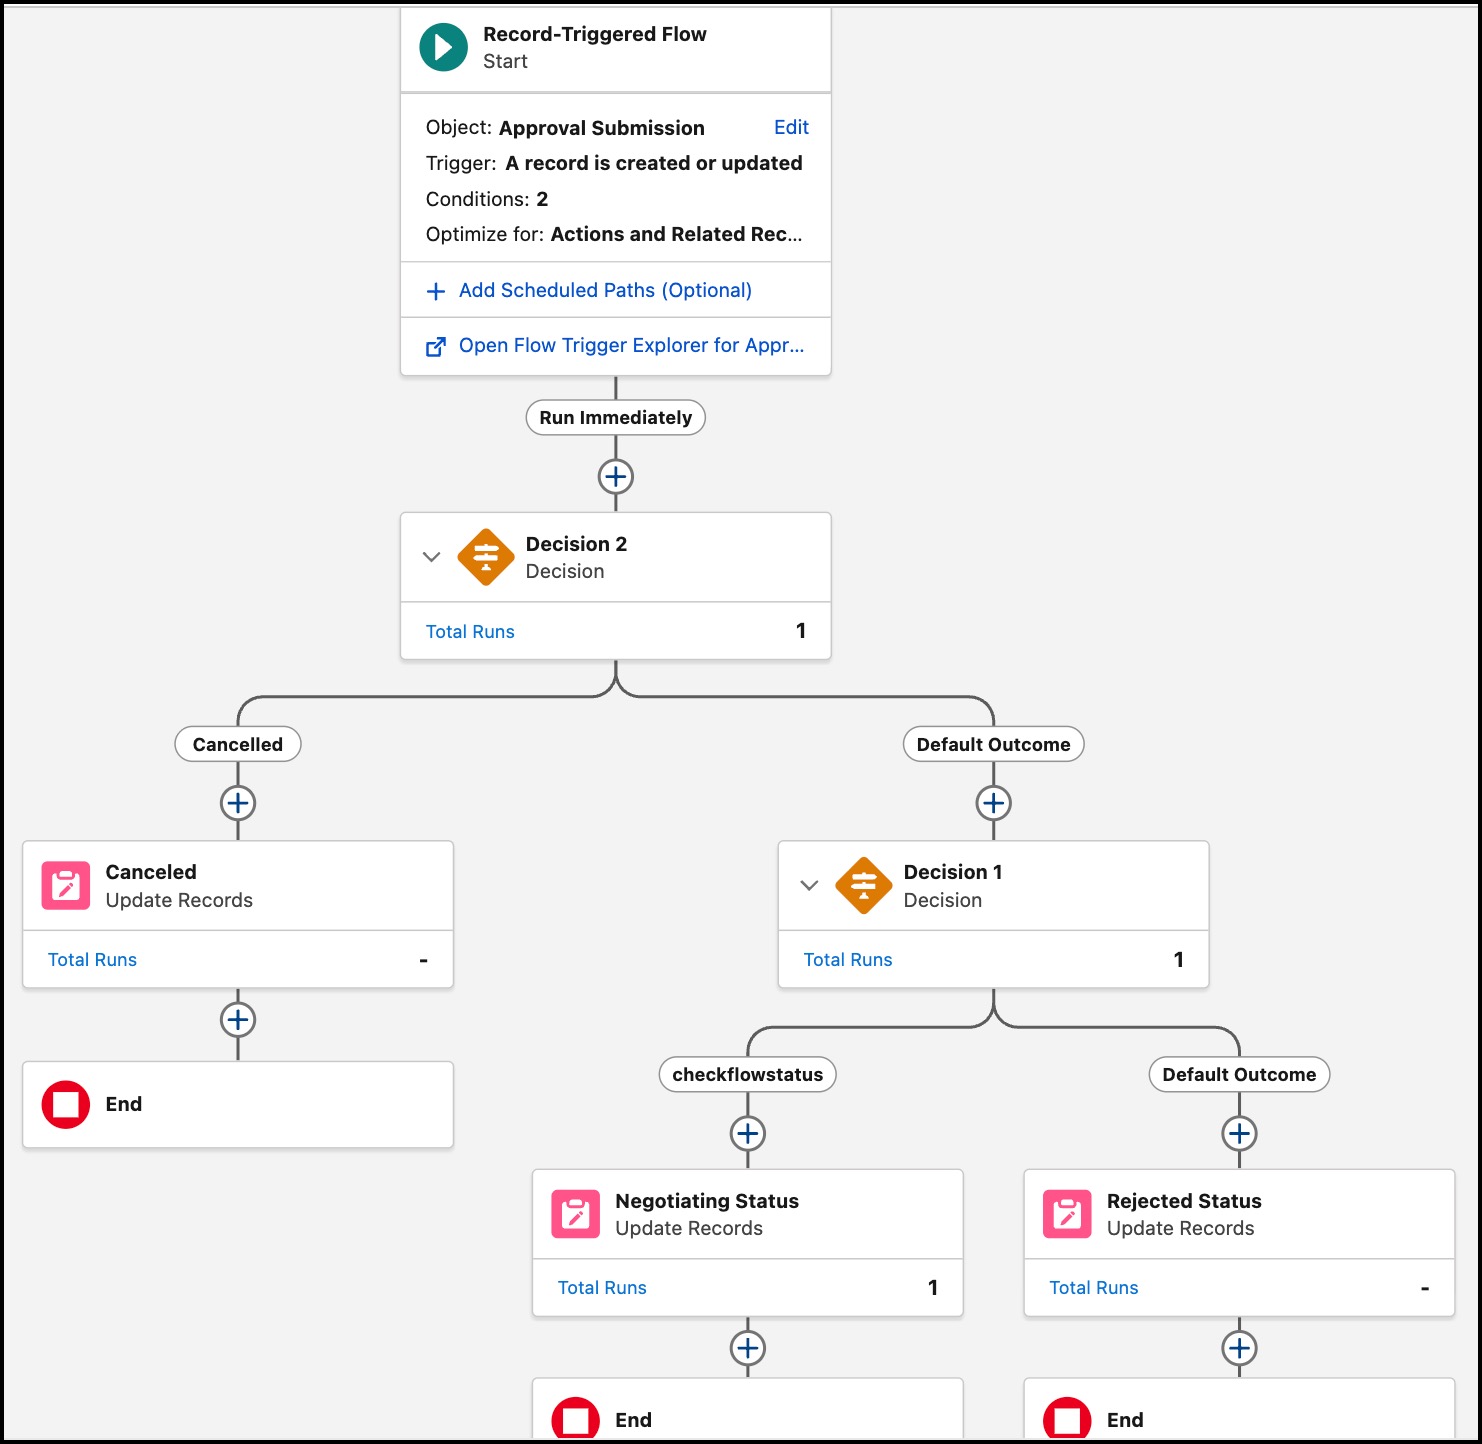
-
If needed, add a decision element to handle multiple approval outcomes.
You can extend this configuration by using a Decision element in the same flow to handle other approval outcomes. For example, update the contract status based on approval status values such as Approved or Rejected.
-
Configure email notifications.
- Add email actions in the approval flow by using text templates for dynamic content such as Contract ID and total price.
- Turn on email reply handling to process approval responses.
-
Test the end-to-end flow.
- Create or open a contract associated with the configured contract type.
- Submit the contract for approval.
-
Verify that the flow:
- Invokes the correct approval flow.
- Assigns approvers correctly.
- Runs approval stages as expected.
- Updates contract status correctly for approve, reject, recall, and cancel actions.
Did this article solve your issue?
Let us know so we can improve!