
You are here:
Add Messaging to the Service Console
Configure the Service Console to put all messaging tools at your team's fingertips. Add Omni-Channel, customize the Messaging Session page layout, and make the Send Message global action available. Optionally, customize the Enhanced Conversation component and add messaging components to the Service Console.
Required Editions
| View supported editions. | |
 This article applies to:
|
Enhanced In-App Chat, Enhanced Web Chat v1, Enhanced Web Chat v2, Enhanced WhatsApp, Standard and Enhanced Facebook Messenger, Standard and Enhanced SMS, Enhanced Apple Messages for Business, Enhanced LINE, and Bring Your Own Channel |
| User Permissions Needed | |
|---|---|
| To create or edit a console app: | Customize Application AND View Setup and Configuration |
| To create and save Lightning pages in the Lightning App Builder: | Customize Application |
If your org will contain both standard channels and enhanced Messaging or Messaging for In-App and Web channels, create one Messaging Session page layout for your standard channels and another for your enhanced channels and Enhanced Chat. Enhanced channels and Enhanced Chat use different page components. In particular, they require the Enhanced Conversation page component, while standard channels require the Conversation component.
When you activate each page, use record types to control which types of messaging sessions the page is used in. Base your record type assignment criteria on the Conversation field on messaging sessions. If the Conversation field contains a value, the session is enhanced and should use your layout for enhanced channels. If it’s empty, the session is standard and should use your layout for standard channels.
- From Setup in Lightning Experience, enter App Manager in the Quick Find box, and then select App Manager.
- Click Edit next to the app that you want to add Messaging to, typically your Service app.
-
Add the Omni-Channel sidebar (recommended) or utility to your console app. Service reps
use the sidebar or utility to accept messages sent over Messaging channels.
- To add the sidebar, select Use Omni-Channel Sidebar on the App Options page.
- To add the utility, in the Utility Items section, click Add Utility Item, select Omni-Channel, and click Save.
- In the Navigation Items section, move Messaging Sessions to the Selected Items list and click Save.
- In the User Profiles section, verify that the user profiles who need access to Messaging are in the Selected Profiles list.
-
Edit the Messaging Session page layout. Service reps see this page when they’re
messaging with customers.
- From the Object Manager in Setup, click Messaging Session, and then click Lightning Record Pages.
-
Click the page name and then click Edit, or create another
page that’s a clone of the default Salesforce page.
Lightning App Builder opens.
- Drag page components onto the page. Below, we’ve suggested a list of components.
- Save your changes.
- To let service reps proactively message customers in enhanced Messaging channels from any page in Salesforce, go to the Publisher Layouts page in Setup and add the Send Message global action to your global action layout. To let service reps message customers from the Salesforce mobile app, create a layout for the app.
These page components are relevant to Messaging.
- Enhanced Conversation: A real-time transcript of the messaging session. Used in enhanced Messaging channels and Enhanced Chat.
- Conversation: A real-time transcript of the messaging session. Used in standard Messaging channels.
- Related Record: Messaging User: Shows the customer’s name, messaging consent status, and other channel-specific details.
- Flow: Lets service reps run flows to send certain types of messaging components, such as time selectors, in enhanced Messaging channels and Enhanced Chat.
- Actions & Recommendations: Shows service reps a list of actions they can take.
- Next Best Action: Suggests the service rep's next action based on past activity.
- Knowledge: Lets service reps share knowledge articles in messaging sessions.
- After Conversation Work: Starts a timer at the end of a messaging session to give service reps a set amount of wrap-up time.
Customizing the Enhanced Conversation Component
When you add the Enhanced Conversation component to the Messaging Session page layout, decide which actions are visible to service reps and customize other component settings.
- In the Lightning App Builder, open the Messaging Session page layout and click the Enhanced Conversation component.
-
Configure the component properties in the Properties pane. The Enhanced Conversation
component includes these editable properties, which are all deselected or blank by
default.
- Hide transfer action: Don’t show service reps the option to transfer messaging sessions to another rep, queue, or flow.
- Hide conference action: Don’t show agents the option to invite other agents to a conference.
- Hide emoji action: Don’t show service reps the option to send emoji.
- Hide quick text action: Don’t show service reps the option to send quick text.
- Hide flag raise action: Don’t show service reps the option to raise a flag requesting help from a supervisor.
- Hide file attachment action: Don’t show service reps the option to attach files.
- Hide messaging component action: Don’t show service reps the option to send messaging components.
- Hide voice message action: Don’t show service reps the option to record and sent voice messages.
- Enter starts a new text line: If selected, a service rep can press Enter/Return to start a new line of text. If deselected, Enter/Return sends the message.
- Limit conversation history: Don’t show the customer’s previous messaging sessions in the Enhanced Conversation component.
- Blur file preview: If selected, all file preview thumbnails for files sent by an end user are blurred. Service reps are protected from seeing potentially harmful content.
- Hide customer inactive action: Remove the option to let service reps mark an active messaging session as inactive.
- Hide Translation Preview: Remove the translation preview bar from the enhanced conversation component in the Service rep console.
- Show chat exit confirmation: Present a confirmation modal to Service reps when they end or leave a chat.
- Minutes to Respond: Prompt service reps to respond if too much time has passed since the customer’s last message. For example, enter 4 to prompt reps after 4 minutes passed since the customer’s last message. To prompt a user to respond in a combination of minutes and seconds, use this field in conjunction with the Seconds to Respond field.
- Seconds to Respond: Prompt service reps to respond if too much time has passed since the customer’s last message. To respond in under a minute, enter a number between 1 and 59, and leave the Minutes to Respond field blank. To prompt a user to respond in a combination of minutes and seconds, use this field in conjunction with the Minutes to Respond field. To prompt a user to respond after a number of whole minutes have passed, leave this field blank and only use the Minutes to Respond field.
- Adjust Height (in Pixels): Enter a value from 500 to 1000 to adjust the Enhanced Conversation component height in the Service Console. Note that you can't manually set the width, but you'll get an error message if the width is below 320 pixels due to the layout getting crowded.
- Save your changes.
Showing Messaging Components in the Service Console
To send most messaging components, service reps click the messaging component action in the messaging window and select a component. However, reps must run a flow to send messaging components with dynamic content, such as time selectors or components that rely on parameters.
Here’s how to show dynamic messaging components in the Service Console.
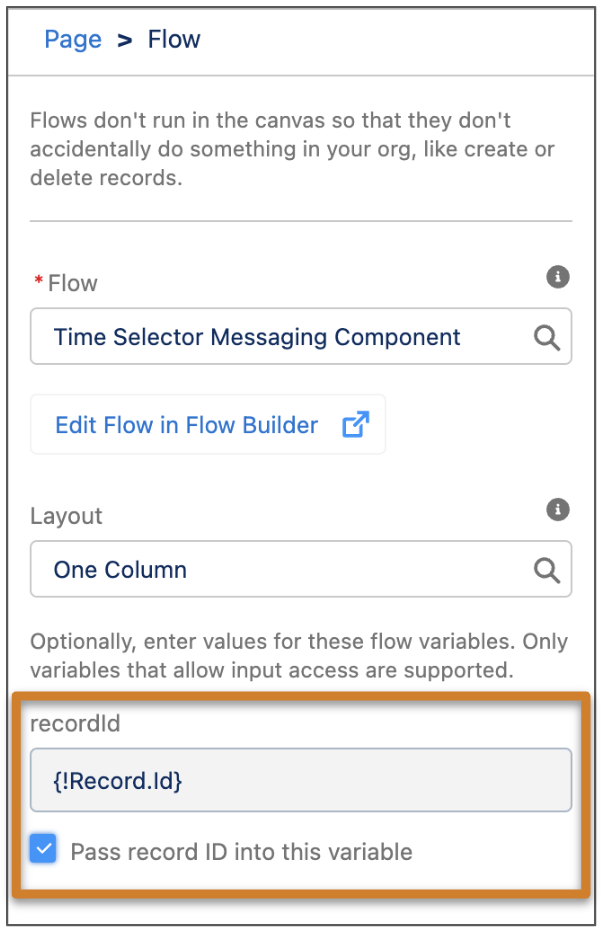
- Drag a Flow component onto your Messaging Session page layout.
- In the properties pane, select a flow that references a messaging component.
-
In the recordID field, enter the variable that is included in the selected flow’s
Enhanced Message component. Then, select Pass record ID into this
variable. If these properties aren’t completed, service reps can’t send the
messaging component to customers.
- Save your changes and activate the page.
If you plan to create multiple messaging components that are linked to flows, here are two ways to help service reps quickly find the flow they need in the Service Console:
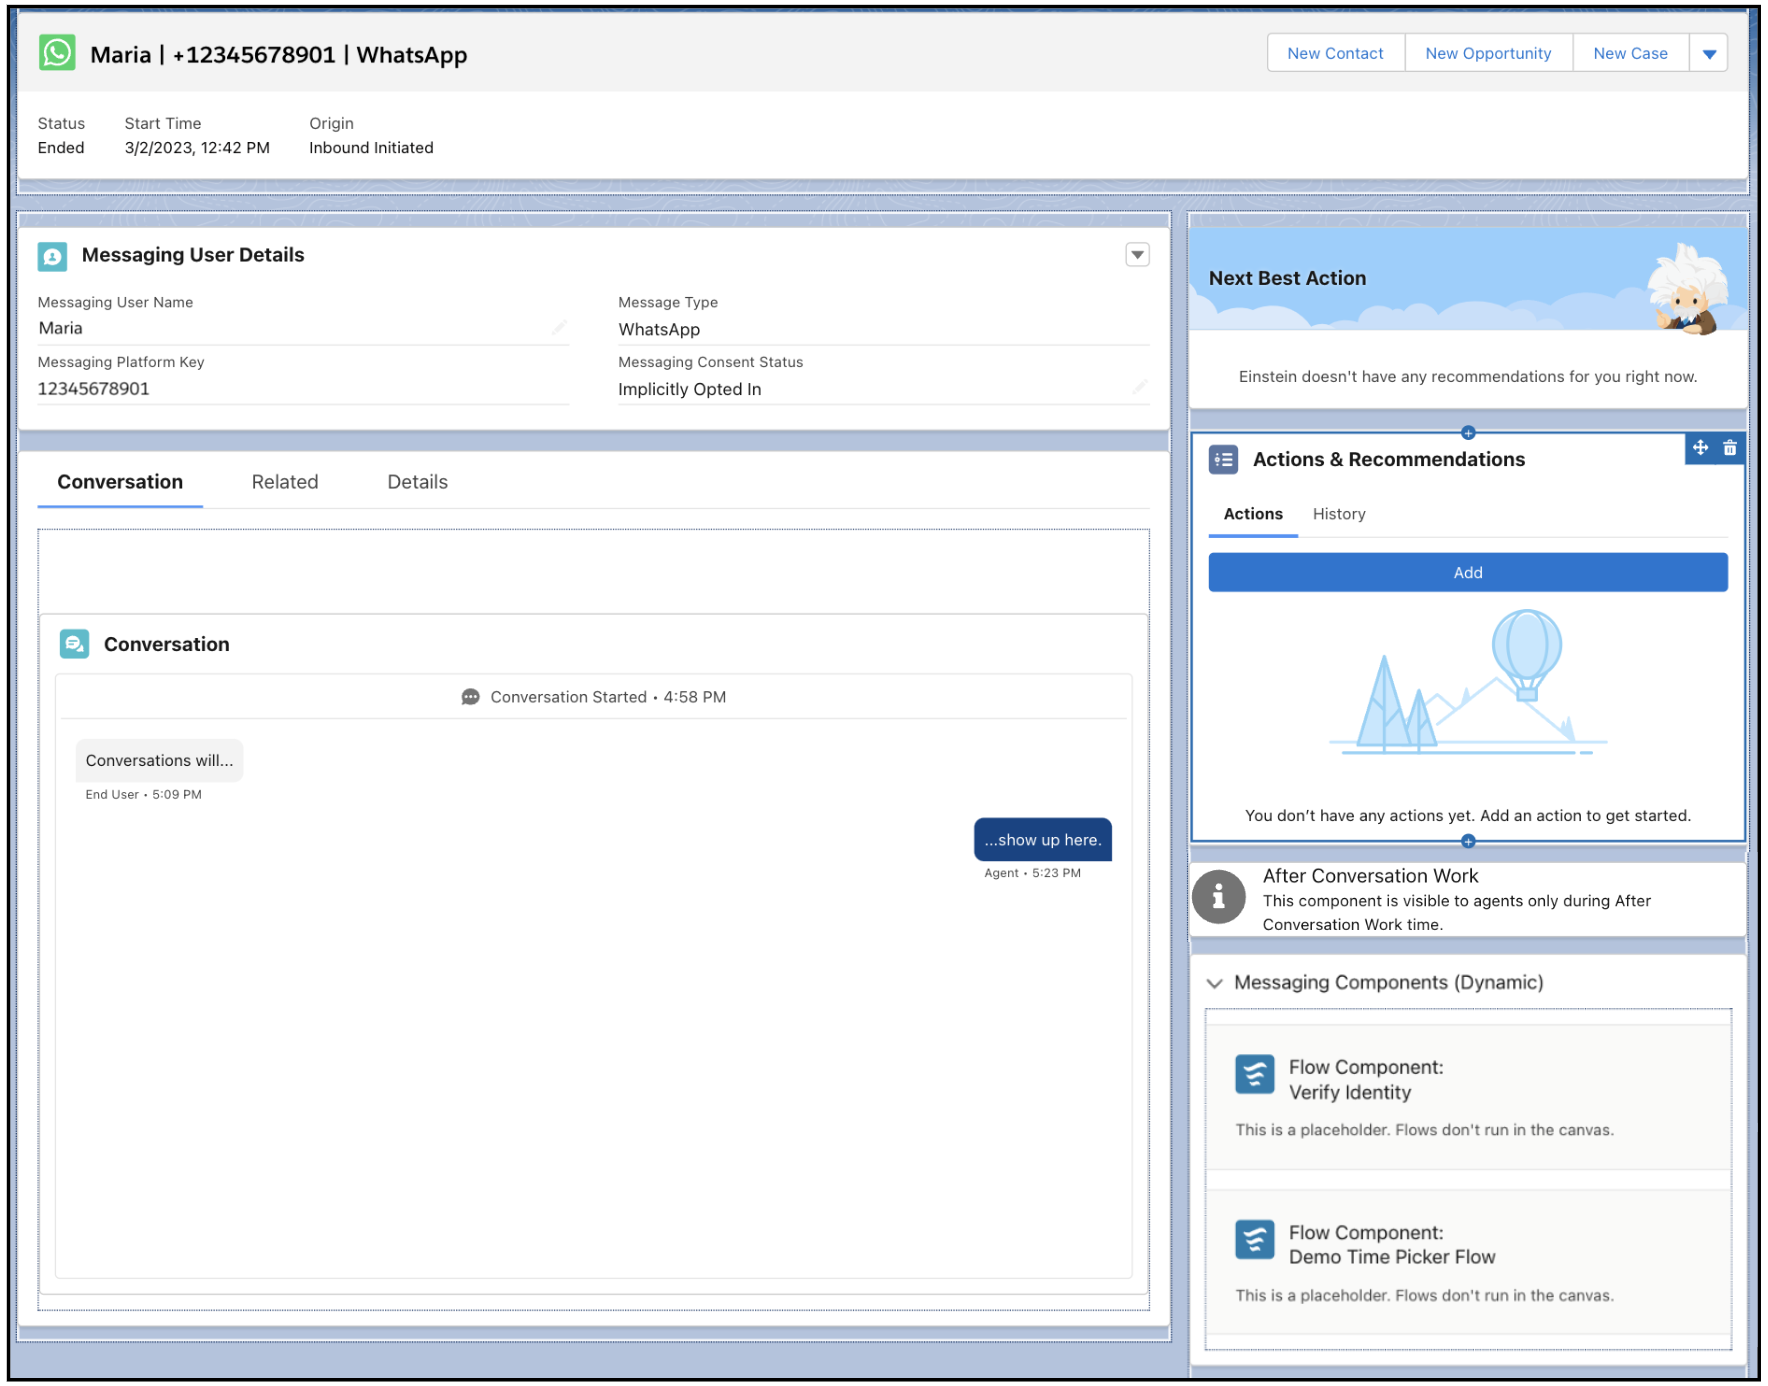
- Group the Flow components in an Accordion component. To help service reps understand the purpose of the accordion component, enter a custom section label—for example, the screenshot shows an accordion component labeled Messaging Components (Dynamic).
- Group all messaging component flows as subflows within one larger flow. When a service rep runs the flow, they select the relevant sub-flow to insert the messaging component they need.