
You are here:
Use MobilePush with Automation Studio
You can create four different automations in Automation Studio for MobilePush. Use Automation Studio to schedule recurring messages, such as a monthly reminder.
- Import Mobile Contacts
- Refresh Mobile Filtered List
-
Send Push
 Note If the APNS certificate associated with your app is expired, you can't add messages for that app to activities until the certificate is updated. Update your certificate in the iOS Provisioning Portal and upload the updated certificate in MobilePush Administration. If your app is provisioned with iOS and Android, sends to Android devices through apps with expired APNS certificates aren’t affected.
 - Data Extract File
Import Mobile Contacts
Note If you import contacts from a data extension, you must enable
the subscriber key feature and use a sendable data
extension.
- Create the import definition in Contact Builder and map fields from source file to fields in MobilePush.
- Create the automation in Automation Studio.
- Drag your starting source onto the canvas and click to configure.
- Drag the Import Mobile Contacts activity onto the canvas and click to configure.
- Select the import definition you created in the first step.
Refresh Mobile Filtered List
- Create the filtered list of contacts in MobilePush.
- Create the automation in Automation Studio.
- Add Refresh Mobile Filtered List Activity to the first step.
- Add Wait Activity to the second step. We recommend at least 5–15 minutes.
- Add Send Push Activity to the third step.
-
Select the filtered list in the automation.
Note Ensure that the Mobile Filtered List is set to Auto-refresh before send the list or the SMS message, but not both. Multiple processes trying to run on the same asset at the same time could create issues.
Send Push
Note Create an outbound message to use the automation send
method.
- Create the outbound message in MobilePush.
- Select Automation as the send method.
- Create the automation in Automation Studio.
- Drag the Send Push activity into the automation.
- Select the outbound message in the automation.
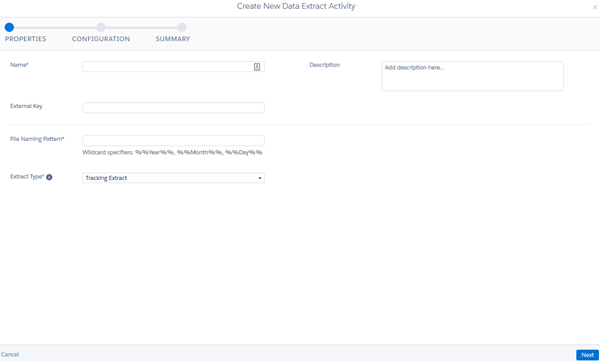
Create a Data Extract File
- Click Create Activity.
- Select Data Extract.
- Add a name, external key, and description for the activity.
-
Enter a file naming pattern so that the activity knows
what to name the file it creates. Use when you have
set up a workflow to drop a file whose
auto-generated filename matches a pattern into the
file location. Enter a static name or include
placeholders for the date. Use the following
personalization strings in your filename:
%%Year%% %%Month%% %%Day%% %%Hour%% %%Minute%% %%Second%% -
To determine the web analytics tools used to interpret
the extracted file, select MobilePush extract type.
The value you select determines the data you can
include in the file.
Note Extract types must be provisioned for your account. Contact your account executive for more information.
- To determine the date range for information to include in the extract file, select an extract range. Choose 1 day, 7 days, or 30 days.
- Select a type of file encoding to use.
-
Configure the extract by choosing the fields that
appear in the data extract file.
- Select a field name to include it in the data extract file.
- If the data extract you choose includes the columnDelimiter field, insert the character you wish to use as a delimiter within the data extract.
-
Valid choices include the following
characters:
- ,
- tab
- |
Note When setting a time zone for the output file, select Use Local TZ in Query. When this option isn’t selected, the output file defaults to Central Standard Time and doesn’t observe Daylight Savings Time.
Did this article solve your issue?
Let us know so we can improve!
