Loading
Salesforce now sends email only from verified domains. Read More
Market to Your Customers with Account Engagement
Table of Contents
Select Filters

          No results
          No results
          Here are some search tips

          Check the spelling of your keywords.
          Use more general search terms.
          Select fewer filters to broaden your search.

          Search all of Salesforce Help
          Set Up a Confirmed Opt-In Process in Account Engagement

          Set Up a Confirmed Opt-In Process in Account Engagement

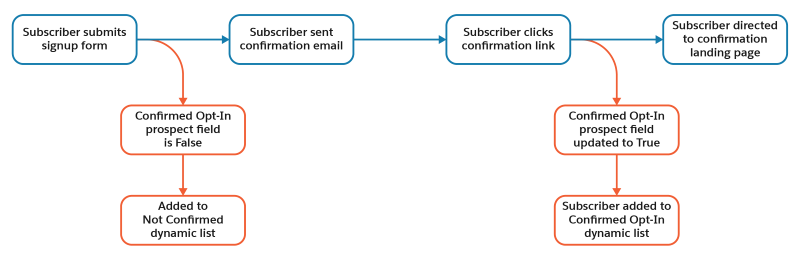
          This process ensures that someone didn’t mistype the email address or fraudulently subscribe on behalf of someone else. To verify that an opt-in request is coming from the owner of the email address, set up a confirmed opt-in process. After setup is complete, new subscribers are added to an unconfirmed opt-in list and receive an email with a link asking them to verify that they opted in. When they click the link, they’re added to a confirmed opt-in list and directed to a landing page confirming their subscription.

          Required Editions

          Available in: All Account Engagement Editions

          Here’s a diagram of how this process works:

          Visual overview of the subscriber experience with a confirmed opt-in process in place.

          Setting up a confirmed opt-in process requires you to edit or create these assets:

          • A landing page
          • A custom prospect field
          • A form handler with a completion action
          • An email template
          • A signup form or a form handler with a completion action
          • Two dynamic lists
          1. Guidelines for Setting Up a Confirmed Opt-In Process
            Before setting up a confirmed opt-in process in Account Engagement, keep these guidelines in mind.
          2. Identify Prospects Who Confirmed Their Opt-In
            To identify whether a prospect has confirmed their subscription, create a custom prospect field in Account Engagement. This field doesn’t need to sync with Salesforce.
          3. Update Prospect Opt-In Status with a Form Handler
            To mark a prospect as confirmed opt-in, create a form handler with a completion action to update the confirmed opt-in custom prospect field. The endpoint URL for the form handler is the confirmation link you include in your email to new subscribers. After the prospect clicks the link, the completion action updates the custom prospect field to confirm their opt-in status.
          4. Add a Confirmation Link to an Email Template
            To confirm their opt-in, a subscriber clicks the confirmation link in an email you send after they submit your signup form. You can add the confirmation link to an existing Account Engagement email template, or create a template to use.
          5. Automatically Send Prospects an Email When They Submit Your Signup Form
            When someone submits your signup form, they receive the email template you created with a link to confirm their subscription. Add a completion action to the Account Engagement form or form handler that you use as your email signup form.
          6. Create Dynamic Lists to Manage Opt-Ins
            To manage your confirmed opt-in process, create two dynamic lists in Account Engagement. The first is for people who submitted your signup form but haven’t confirmed their subscription. The second dynamic list is for subscribers who have clicked the confirmation link in the autoresponder email.
           
          Loading
          Salesforce Help | Article