
You are here:
Quick Start: Set Up Email Sending
This Quick Start guide covers the steps that are required to send email with Marketing Cloud Next. It outlines the simplest implementation, so that your team can get up and running. For in-depth information, special features, or customization options, we provide additional resources along the way.
Required Editions
| Available in: Salesforce Enterprise and Unlimited Editions with Marketing Cloud Next Growth or Advanced Edition |
| User permissions needed | |
|---|---|
| To manage settings in Salesforce Setup: | System Administrator profile AND Marketing Cloud Admin permission set |
| To manage settings in Data 360: | Data Cloud Architect permission set |
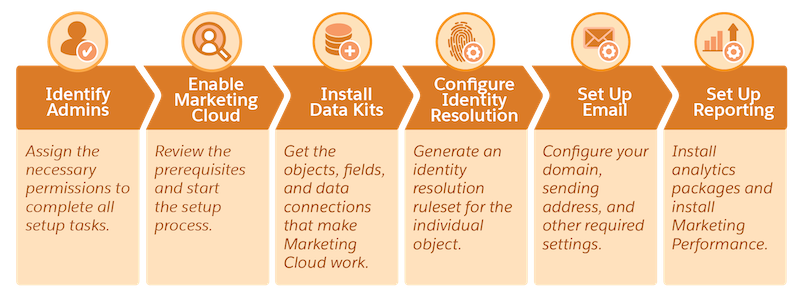
Included in this guide:
- Identify Admins and Assign Permissions
- Enable Marketing Cloud Next
- Deploy Data Kits
- Configure Identity Resolution
- Set Up Email
- Set Up Reporting
Identify Admins and Assign Permissions
When you configure Marketing Cloud Next, you work in Salesforce Setup, Data 360, and Data Cloud Architect Setup. Before you can begin, make sure you or other admins on your team have the necessary roles and permissions.
- From Setup, in the Quick Find box, enter Users, and then select Users.
- Select a user.
- In the Permission Set Assignments related list, click Edit Assignments.
-
Under Available Permission Sets, select the permission sets you want to add, and then
click Add.
- Marketing Cloud Admin—Users who have this permission set can configure most settings in Salesforce Setup. They can also publish and activate campaigns and segments.
- Data Cloud Architect—Users who have this permission set can configure settings in Data 360 setup and on other data modeling objects.
- To remove a permission set assignment, select it under Enabled Permission Sets, and then click Remove.
- Save your changes.
To learn more about user access in Marketing Cloud Next, including how to add workspace and site contributors, check out User Permissions in Marketing Cloud Next and Manage User Access.
Enable Marketing Cloud Next
Next, go to Setup | Marketing Cloud | Basic Settings. In the Enable Marketing Cloud section, confirm that each task is complete. Then, click Enable to start the automated process of connecting the necessary content and privacy tools.
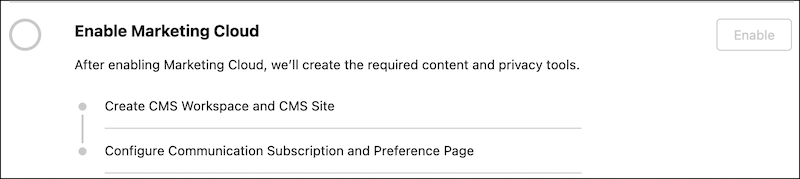
To troubleshoot or learn more about the prerequisites, check out Getting Started with Marketing Cloud Next Setup.
Deploy Data Kits
On the Basic Settings page, click Deploy to get data kits that are required to work with marketing data. This process automatically deploys the related data streams in Data 360.
This process may take a few minutes. Refresh the page to confirm everything deployed successfully. To learn more about the data kit deployment process, see Deploy Data Streams.

Configure Identity Resolution
You’re almost done setting up your marketing data environment. The next step is to tell Salesforce how you want to unify your customer data by creating an identity resolution ruleset. Quickly generate a default ruleset that uses Normalized Email as a match rule, or configure a custom ruleset.
- On the Basic Settings page, scroll to the Identity Resolution Rulesets section.
- In the Unified Individual section, click Generate Ruleset.
- Review the confirmation details and click Generate.
-
Confirm that your new ruleset is published.
- In Data 360, go to Identity Resolutions.
- Next to the Identity Resolution ruleset that you generated, confirm that the ruleset status is published.
To learn more, including steps for how to create a custom ruleset for both the Individual and Account objects, see Configure Identity Resolution Rulesets.
Set Up Email
To send emails with Marketing Cloud Next, you must authenticate a domain for sending, verify at least one sender email address, and provide a physical address to include in your email.
-
Work with your IT team to authenticate a domain for sending.
- From Setup, in the Quick Find box, enter Authenticated Domains, and then select Email Authenticated Domains.
- Click Add Domain.
- Review the confirmation modal and click Continue.
- Enter the subdomain information that you want to use for sending, and then click Submit.
- (Optional) To customize the email address for sending, click Create New and edit the Display Name and Username fields.
- Configure your DNS records with your domain registrar.
- After you complete the configuration process, verify that you completed the DNS record upload and click Verify Domain.
-
Add or update the physical address. This is the address that's populated in your emails by
the Physical Address merge field.
To maintain regulatory compliance, all marketing and transactional emails must include a physical address.
- From Setup, in the Quick Find box, enter Company, and then select Company Information.
- In the Organization Detail section, review or edit the Address details.
- Save your changes.
To add more From addresses, check out Authenticate a From Address for Unified Messaging.
Set Up Reporting
After you finish setting up your email channel, your last task is to configure your reporting tools. First, install Marketing Performance Intelligence to get insights and dashboards powered by Tableau. Then, install the marketing analytics packages that include additional pre-configured dashboards and folders with reporting data about your marketing efforts. Finally, make sure users can access analytics folders.
-
Install Marketing Performance Intelligence.
Using the Marketing Performance Intelligence feature consumes Data 360 credits, which can increase your bill. Learn more about the billing impact of Data 360-powered features.
- From Setup, in the Quick Find box, enter Marketing and click Marketing Performance Intelligence.
- In the Install Marketing Performance Intelligence section, click Install.
- Assign the Tableau Next Included App Business User permission set to any users who require access to Marketing Performance Intelligence data.
- In the Marketing app, go to the Marketing Performance Intelligence tab to view the main dashboard and confirm that your install is complete.
-
Install the additional analytics packages.
- From Setup, in the Quick Find box, enter Reporting. Under Marketing Setup, click Reporting and Optimization.
- From the Analytics Packages section, install the Marketing Engagement Analytics package and Flow Reports Analytics Package for all users. To learn more about these packages, see Set Up Analytics Reports and Dashboards.
-
From the Marketing app, make folders available to users.
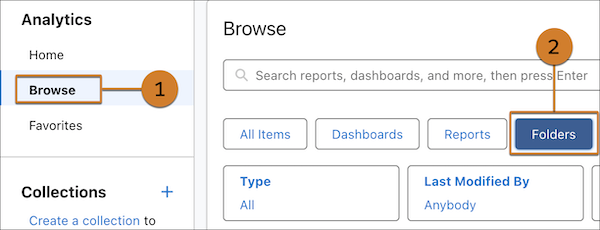
- On the Analytics tab, click Browse (1), and select Folders (2). For each report or dashboard folder, click and select Share.
-
For each report or dashboard folder, click
 and select Share.
- For Entire Organization, set the access to Viewer.
- To add other users or groups, such as Editors or Managers, search for them in the Name field, and then apply the correct role.
- Save your changes.
To learn more about reporting and dashboards, see Measure Success.
Next Steps: Optional Features, Channels, and Customization
Here are some features and common enhancements that you can implement alongside the streamlined recommendations in this Quick Start guide.
| Enhancement | Admin needed | Description |
|---|---|---|
| Enable AI features | Salesforce Admin | Salesforce Admin Use generative AI and predictive AI to save time and improve your KPIs. See Enable AI Features. |
| Set up personalization | Data Cloud Architect | Let users personalize their email with dynamic content blocks and cross-object merge fields. See Enable Personalization Features. |
| Manage reply emails | Salesforce Admin | Plan how to respond when email recipients reply to marketing messages. See Configure Reply Mail Management. |
| Add channels | Salesforce Admin | You can also send SMS and WhatsApp messages, publish landing pages, and embed forms on landing pages or your external site. See Manage Content. |
