
You are here:
Quick Start: Manage Your SMS Audience
After you’ve completed the setup prerequisites for SMS and requested your brand, campaign, and code, it’s time to create subscriptions to manage audiences and consent for your SMS messages.
Required Editions
| Available in: Salesforce Enterprise and Unlimited Editions with Marketing Cloud Next Growth or Advanced Edition and Salesforce Message Credits - SMS add-on |
| User permissions needed | |
|---|---|
| To manage settings in Salesforce Setup: | System Administrator profile AND Marketing Cloud Admin permission set |
| To manage settings in Data 360: | Data Cloud Architect permission set |
Included in this guide:
- Update Subscriptions
- Import Consent Data
- Add Consent to Lead and Contact Pages
Update a Communication Subscription
We preconfigured a standard communication subscription called Marketing and added it to your SMS Preference Center page by default. To add a new SMS code, you can edit this subscription or create a custom one.
Before you begin, make sure that your Marketing Cloud Admin has completed the required setup steps to send SMS messages in Marketing Cloud Next. See Quick Start: Set Up SMS Prerequisites and Quick Start: Request an SMS Brand, Campaign, and Code.
- In Setup, in the Quick Find box, enter Consent.
- Under Preference Pages and Subscriptions, select a subscription from the dropdown, and then click Edit.
- Select a SMS Sender Code to relate to the selected subscription, and save your work.
- Click Update.
If you wish to create an SMS-specific subscription, see Create a Communication Subscription.
Import Consent Data
Unified Messaging manages SMS consent via communication subscriptions. An SMS code can be mapped to one or more communication subscriptions.
Before you import consent data, make sure the contact points exist in Marketing Cloud Next.
-
Prepare in import CSV.
- The file must include a column for phone numbers and a separate column for recording the date of consent.
- For each entry, you must include a country code and the complete phone number. Phone numbers are validated based on ITU E.164 standards, such as +1-555-555-5555.
- Spaces, dashes, underscores, and parentheses are automatically removed from phone numbers.
- Phone numbers can’t include letters or special characters.
- From Setup, in the Quick Find box, enter Consent.
- Under Unified Messaging, select Consent Imports.
- Click Import.
- Select the SMS channel, a communication subscription, and a sender code.
- Select a consent status to apply to all of the imported contacts, and then click Next.
- Upload your CSV, and then click Next.
- Preview the import fields, and then click Import.
Add Consent to Lead and Contact Pages
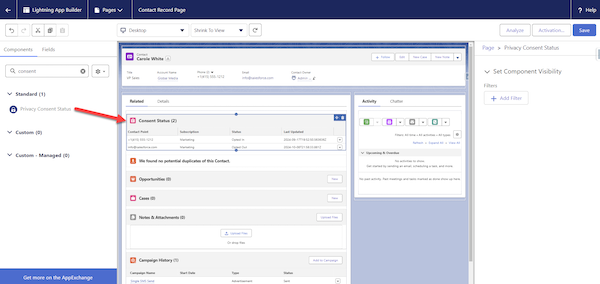
To review the consent data, add the consent component to lead and contact page layouts.
- Open a Contact or Lead page.
- To open the Lightning App Builder, click the profile icon in the toolbar, and then select Edit Page.
-
Drag the Privacy Consent Status component to the related list tab on the page layout.
- Save your work.
Here are some features and common enhancements that you can implement alongside the recommendations in this Quick Start guide.
| enhancement | Admin Needed | description |
|---|---|---|
| Set up a URL-shortening domain | Salesforce Admin | Enhance your brand recognition by using a custom domain for links shortened with the Marketing Cloud Engagement shortener. See Create a Branded Domain for Unified Messaging. |
| Manage reply SMS messages | Salesforce Admin | Plan how to respond when recipients reply to marketing messages. See Set Up an SMS Conversation in Unified Messaging. |
