
You are here:
Create an Email in Code View in Marketing Cloud Next
In code view, view and edit message HTML and CSS for custom control over your email design. Also, advanced users can use Handlebars templating language to add scripting and conditional logic and perform data lookups. As you author, code view provides syntax validation, inline coding assistance, and search. Preview and test the email and publish it for use with a campaign. To change a published email or prevent it from sending in a campaign, you can unpublish it.
Required Editions
| Available in: Salesforce Enterprise and Unlimited Editions with Marketing Cloud Next Growth or Advanced Edition, and in Starter and Pro Suite Editions. Your edition determines the options that you have. |
| User Permissions Needed | |
|---|---|
| To create or edit content: | Marketing Cloud Manager permission set AND any CMS workspace contributor role |
| To publish or unpublish content: | Marketing Cloud Manager permission set AND a CMS workspace contributor role of content admin or content manager |
Create an Email in Code View
-
Create or open an email for editing.
- From the Campaigns tab, open a campaign or create one. Then, on the campaign record, next to the email that you want to work with, click Edit.
- From the Content tab, open a marketing workspace, and open an email for editing.
- From the Content tab, to create an email, click Add | Content | Email. Then, select Create with HTML.
- From a flow, open a Send Email Message element, and edit the related email.
- In the editor, give your email a title for internal use.
- In the Settings tab, select an optional brand and add a subject for your message.
- Set the Message Purpose to Promotional or Transactional.
- Add content to your email.
-
If you’re converting an email that is component-based, click the Code
View icon
 at the top of the builder to preview the HTML in the Code View tab. Then, click
Convert to Code and make your edits.
After you convert an email to code, you can’t use drag-and-drop components or apply styling from the Style tab. The conversion also removes dynamic content, including repeaters, conditional logic, and content variants from an email. You can’t undo this action.
at the top of the builder to preview the HTML in the Code View tab. Then, click
Convert to Code and make your edits.
After you convert an email to code, you can’t use drag-and-drop components or apply styling from the Style tab. The conversion also removes dynamic content, including repeaters, conditional logic, and content variants from an email. You can’t undo this action. - To attach a document to the email, in the Settings tab under File Attachment, click Add Document, and select a PDF file (up to 5 MB) from Salesforce CMS.
-
To add a placeholder for personalized data, click Add Merge
Field.
Depending on the data sources added to the email, you can insert data graph attributes, saved expressions for data graph attributes, recipient unified profile values, offers, or event data, such as order confirmations. For more information, see Personalize Content with Merge Fields in Marketing Cloud Next
- In promotional emails, to comply with consent and privacy regulations include your organization’s address and an opt-out link.
- Save your work.
To make an email available to send in a campaign, publish it. You can’t activate a campaign flow that contains an email until the email is published.
Create a Plain Text Version of an Email
Add a plain text version of your email to make sure that it can be delivered to recipients whose email clients don't render HTML. Plain text emails don't support formatting, font styles, colors, or inline images. When you manually edit the plain text version, it's no longer in sync with the original version of the email. Also, future changes to the original version aren't included in the plain text version.
- In the email editor, click the Plain Text View icon in the main toolbar.
- Click Edit.
- To add a placeholder for personalized data, click Add Merge Field.
- To discard your plain text edits and restore the content to the original version, click Restore.
- Save your work.
Preview and Test an Email
To make sure that your customers get the best experience from your content, preview and test your email. Before you can preview and test, publish at least one segment. You can preview and test an email in any status. Test sends count toward message credits.
-
Open the preview window.
- When editing your email, in the main toolbar, click Preview.
- From the email content detail page, click Preview.
-
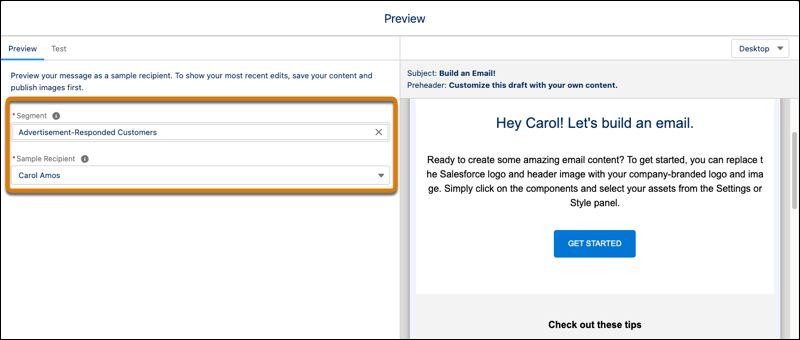
Select a segment and a sample recipient.
- To configure a test send, open the Test tab.
- In the Test Send Email Address field, enter up to five email addresses that you can easily access, separated by a comma.
- To change the email address that sends the test, update the From Name and Address field with a From name from an authenticated domain.
- To send a test email, click Send Test.
-
Check the inbox and verify that the test email appears as expected.
- Make sure that merge fields appear properly.
- Test any links and buttons, especially the opt-out links.
- When you’re ready to use an email with a campaign, publish it.
Unpublish an Email
To change your email back to draft status and prevent it from sending in an email campaign, unpublish your email.
-
From your marketing workspace, open the email that you want to unpublish.
- From the content detail page, click Unpublish.
- When you’re editing your email, from the main toolbar, click Unpublish.
- Review the list of related flows and content and determine if any other changes are needed.
- To unpublish the email immediately, click Unpublish Now.
- To unpublish the email at a later date, click Schedule Unpublish, and schedule a date and time to unpublish it.
