Loading
Salesforce now sends email only from verified domains. Read More
Ongoing maintenance for Salesforce HelpRead More
Automate Your Business Processes
Table of Contents
Select Filters

          No results
          No results
          Here are some search tips

          Check the spelling of your keywords.
          Use more general search terms.
          Select fewer filters to broaden your search.

          Search all of Salesforce Help
          Add Recall Actions to a Flow Approval Process

          Add Recall Actions to a Flow Approval Process

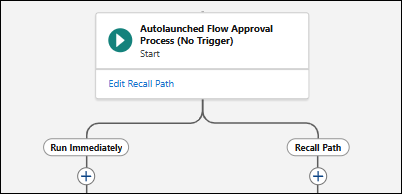
          To run steps when an in-progress flow approval process is recalled, add a Recall path. A recall path can contain a single stage with background steps. When the submission is recalled, the stage that was in-progress and all of its steps that haven’t been completed are canceled. Open approval work items are also canceled. The stage in the recall path then runs. When the stage in the recall path is completed, the approval submission is recalled.

          Required Editions

          View supported editions for Flow Approval Processes.
          User Permissions Needed
          To open, edit, or create a flow approval process in Flow Builder: Manage Flow

          You can add a recall path to both autolaunched and record-triggered flow approval processes.

          If Add Recall Path (Optional) isn’t visible in the start element in your flow approval process, click the Start element on the canvas.

          1. On the Start element, click Add Recall Path (Optional).
            The Configure Start panel opens.
          2. Click Add Recall Path.
            A start element in an autolaunched flow approval process with paths labeled Run Immediately and Recall Path.
            The flow approval process now has two paths: Run Immediately and Recall Path.
          3. In the Recall Path, click Add element, and then select Stage.
          4. Enter a label, API name, and description.
          5. (Optional) Under Select When to Complete the Stage, select a condition.
            • To complete the stage when all its steps are completed, select When all steps have been marked Completed, the stage is marked Completed.
            • To specify up to 10 requirements to meet before the stage can be completed, select When the specified requirements are met, the stage is marked Completed. Then configure the requirements.
            • To use complex requirements to determine when the stage can be completed, select When the specified evaluation flow returns True, the stage is marked Completed. Then select an active evaluation flow.
          6. In the stage element, click + Add Step, and select Background Step.
          7. Enter a label, API name, and description.
          8. (Optional) Under Select When to Start the Step, select a condition.
            • To automatically start the step when the stage starts, select When the stage starts, the step starts.
            • To start the step after another step is completed, select When another step is marked Completed, the step starts. Then enter the name of the step to be completed first.
            • To specify up to 10 requirements to meet before the step can start, select When the specified requirements are met, the step starts. Then configure the requirements.
            • To use complex requirements to determine when the step starts, select When the specified evaluation flow returns True, the step starts. Then select an active evaluation flow.
          9. Under Select an Action to Run, select an active, autolaunched flow.
          10. Under Select Who to Run the Action As, select an option.
            • (Default) To run the step as the automated process user, select Automated Process User.
            • To run the step as a specific user, select A Selected User. Then select the user to run the step as.
            • To run the step as a user that’s determined at run time, select A User Specified by a Resource at Run Time. Then select the flow approval process text resource that contains the username of the person to run the step as at run time.
          11. Repeat steps 6 to 10 for each background step.
          12. Save your work.
           
          Loading
          Salesforce Help | Article