
You are here:
Create a Parent Flow to Run the Child Flow
Get the record that you want to clone. Then use a Subflow element to pass the record into a child flow that clones the record. To access the cloned record later in the flow, use the output from the Subflow element.
Required Editions
| View supported editions. |
| User Permissions Needed | |
|---|---|
| To open, edit, create, activate or deactivate a flow using all flow types, elements, and features available in Flow Builder, including Einstein and Agentforce for Flow: | Manage Flow |
Note When you select the Automatically store all fields option in a Get Records element, the
flow determines what fields you reference within that flow, and stores values only for the
referenced fields. Therefore, if you use a Create Records element within the parent flow to
clone the record, only the field values referenced within the flow are copied to the new record.
When you use a child flow to clone the record, flow copies all fields that the running user has
edit access to.
-
Open the Flows list view.
- From Setup, in the Quick Find box, enter Flows, and then select Flows.
- From the Automation app, select the Flows tab.
- From the Flows tab in any Lightning app, click the actions menu and select Open Flow.
-
Create the parent flow.
- From the Automation Lightning app, click New and then select the type of flow to create for your parent flow.
- In Setup, click New Flow and then select the type of flow to use for your parent flow.
For example, to use an autolaunched flow that can be called from other flows to clone an existing record, create an autolaunched flow. -
Determine how to get the record to clone.
- In an autolaunched flow, create a text variable named recordId that’s available as input to the flow. This value is passed into the autolaunched flow and used with a Get Records element to get the record to clone.
- In a screen flow, use a Screen element to allow the user running the flow to select a record. Use the ID of the selected record with a Get Records element to get the record to clone.
-
To use a record ID for an autolaunched flow, add an input variable to store the record ID
of the record to clone.
-
To open the Toolbox, click

- Click New Resource, and then select Variable.
- For API name, enter recordId.
- For Description, enter Stores the ID of the record to clone.
- For Data Type, select Text.
- For an autolaunched flow, for Availability Outside the Flow, select Available for input.
For example, create a text variable that’s available as input to the autolaunched flow.Field Value Resource Type Variable API Name recordId Description Stores the ID of the record to clone and is passed into the flow. Data Type Text Availability Outside the Flow Available for input -
To open the Toolbox, click
-
To get the record to clone from the running user in a screen flow, add a Get Records
element to determine which records to show the user.
-
Click
 , and select Get Records.
- Enter a label, API name, and description for the element.
- For Object, select the object of the record to clone.
- For Condition Requirements, select how to evaluate the conditions.
- To limit the number of records to show the running user, specify at least 1 field, operator, and value. For example, to get cases that aren’t new, for Field, select Status, for Operator, select Does Not Equal, and then for Value, select New.
- To sort the results, for Sort Order select a value and for Sort By select the field to sort by. For example, to list newest records first, for Sort Order, select Descending, and for Sort By, select CreatedDate.
- For How Many Records to Store, select All records.
- For How to Store Record Data, select Automatically store all fields.
-
Click
-
To get the record to clone from the running user in a screen flow, next add a Screen
element that contains a data table,
-
Click , and select Screen.
- Enter a label, API name, and description for the element.
- From the Components tab, click Data Table..
- Enter an API name for the component.
- Enter a label to use as the title of the table and select Use Label as the table title. For example, enter Select a case to clone. Then select Use Label as the table title.
- For Source Collection, select the automatic output for the Get Records element from step 5.
- Under Configure Rows, for Row Selection Mode, select Single, and then select Require user to make a selection.
- For Unique Identifier, select Id.
- Under Configure Columns, select at least 1 field to use as a column in the data table. For each other field to use as a column in the data table, click Add column and select a field.
- Click Done.
-
Click
-
To get the record to clone, add a Get Records element.
-
Click , and select Get Records.
- Enter a label, API name, and description for the element.
- For Object, select the object of the record to clone.
- For Field, select the field on the object that contains the record ID of the record to clone. For example, Case ID.
- For Operator, select Equals.
- For Value, select the variable or automatic output that contains a record ID. For example, in an autolaunched flow, select recordId. Or in a screen flow, select the entire resource of the data table component from step 6.
- For How Many Records to Store, select Only the first record.
- For How to Store Record Data, select Automatically store all fields.
For example, to clone a case record in an autolaunched flow, add a Get Records element and set its fields.Field Value Label Get Record to Clone API Name GetRecordToClone Description Gets the case with an ID that matches recordId and stores the result in Case from Get Record to Clone. Object Case Field Case ID Operator Equals Value recordId How Many Record to Store Only the first record How to Store Record Data Automatically store all fields -
Click
-
Add a Subflow element that calls the flow created in Create a Child Flow to Clone a Record.
-
Click , and select Subflow.
- In the search box, enter the name of the flow that clones a record, and then select it from the list.
- Enter a label, API name, and description for the element.
-
Under Set Input Values, set the input variable that contains the record to clone to
Included.
When you pass a variable to a subflow input, the variable API name can be up to 40 characters long.
- For the input variable that contains the record to clone, select the automatic output created by the Get Records element from step 7.
For example, to create a copy of the case from step 7, add a Subflow element and reference the example autolaunched flow created in Create a Child Flow to Clone a Record..Field Value Search Flows Clone Record with All Fields Label Clone Record API Name CloneRecord Description Calls the Clone Record with All Fields flow to create a copy of the case record with a case ID matching recordId. Stores outputs from the referenced flow in Outputs from Clone Record. caseToClone Set to Included, select Case from Get Record to Clone, and then select Entire Resource. 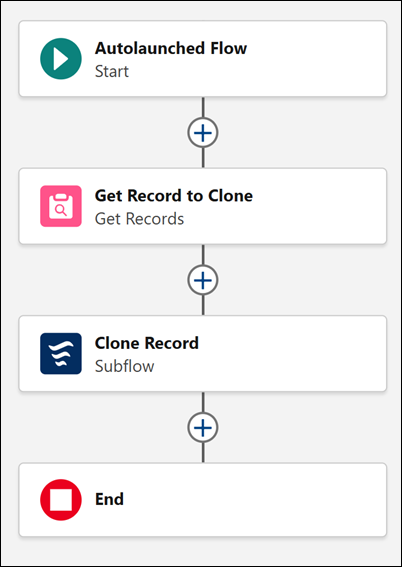
-
Click
-
Optional. To access the new record later in the flow, use the automatic output from step
8’s Subflow element in a Get Records element.
-
Click , and select Get Records.
- Enter a label, API name, and description for the element.
- For Object, select the object of the new record.
- For Field, select the field on the object that contains the new record’s ID.
- For Operator, select Equals.
- For Value, select the automatic output that contains the new record’s ID.
- For How Many Records to Store, select Only the first record.
- For How to Store Record Data, select Automatically store all fields.
For example, to get the new case record returned by the Subflow element, add a Get Records element and set its fields.Field Value Label Get New Record API Name GetNewRecord Description Gets the case with an ID that matches the case ID of the record returned in Outputs from Clone Record. Stores the result in the Case from Get New Record record variable. Object Case Field Case ID Operator Equals Value Outputs from Get New Record > newRecord > Case ID How Many Record to Store Only the first record How to Store Record Data Automatically store all fields -
Click
- Save the flow.
- Test the flow to make sure that it works as expected. Then activate it.
Did this article solve your issue?
Let us know so we can improve!