You are here:
Keep Users Informed With a Message Screen Component
Use a screen flow to collect contact and company information, then call an autolaunched flow to create account and contact records. Show a message to the running user about the new records by using a Message screen component. Then send the contact an email.
Required Editions
| View supported editions. |
| User Permissions Needed | |
|---|---|
| To open, edit, create, activate or deactivate a flow using all flow types, elements, and features available in Flow Builder, including Einstein and Agentforce for Flow: | Manage Flow |
Create an Autolaunched Flow to Create an Account and Contact
Create an autolaunched flow that accepts contact and company information as input, creates an account record, and then creates a related contact record.
-
Open the Flows list view.
- From Setup, in the Quick Find box, enter Flows, and then select Flows.
- From the Automation app, select the Flows tab.
- From the Flows tab in any Lightning app, click the actions menu and select Open Flow.
-
Create an autolaunched flow.
- From the Automation app, click New | Autolaunched Automations | Autolaunched Flow (No Trigger).
- From Setup, click New Flow | Autolaunched Automations | Autolaunched Flow (No Trigger)
The new autolaunched flow opens in Flow Builder. -
Create input variables to store the contact and company information collected from the
screen flow.
-
To open the Toolbox, click
 .
.
- Click New Resource, and then select Variable.
- For API Name, enter firstName.
- For Data Type, select Text.
- Select Available for input.
- Click Done.
- Repeat steps 3 through 6 to create the following additional input variables with Data Type Text: lastName, email, phone, and company.
-
To open the Toolbox, click
-
Create output variables to store the new contact’s ID to send back to the screen
flow.
-
To open the Toolbox, click .
- Click New Resource, and then select Variable.
- For API Name, enter contactId.
- For Data Type, select Text.
- Select Available for output.
- Click Done.
-
To open the Toolbox, click
-
Create the account record with a Create Records element.
-
On the canvas, click
 , and select Create Records.
The Create Records panel opens.
, and select Create Records.
The Create Records panel opens. -
For Label, enter Create Account.
The API name auto-fills.
- For Description, enter Creates a new account record using the Company input variable.
- For How to set record field values, select Manually.
-
For Object, select Account.
The Account Name field is added to the Set Field Values for the Account.
- For Value, select the company variable.
-
On the canvas, click
-
Create the contact record with a Create Records element.
-
Click , and select Create Records.
The Create Records panel opens.
-
For Label, enter Create Contact.
The API name auto-fills.
- For Description, enter Creates a new contact record associated with the newly created account.
- For How to set record field values, select Manually.
-
For Object, select Contact.
The Last Name field is added to the Set Field Values for the Contact.
- For Value, select the lastName variable.
- Click + Add Field.
- For Field, select First Name.
- For Value, select the firstName variable.
- Click + Add Field.
- For Field, select Email.
- For Value, select the email variable.
- Click + Add Field.
- For Field, select Mobile Phone.
- For Value, select the phone variable.
- Click + Add Field.
- For Field, select Account ID.
- For Value, select the accountId variable.
- Select Manually assign variables (advanced).
-
In the Store Contact ID in Variable section, for variable, select
contactId.
This stores the ID of the new contact in the contactId variable.
-
Click
-
Save the autolaunched flow.
- Click Save.
-
For Flow Label, enter Create Account and Contact.
The Flow API name auto-fills.
- For Description, enter Creates an account and an associated contact from input variables.
- Click Save.
-
Test the flow.
- Click Debug.
- Enter test data for company, email, first name, and last name.
- Click Run.
- Expand the details for each element and check that the flow works as expected.
-
Activate the flow.
- Click Activate.
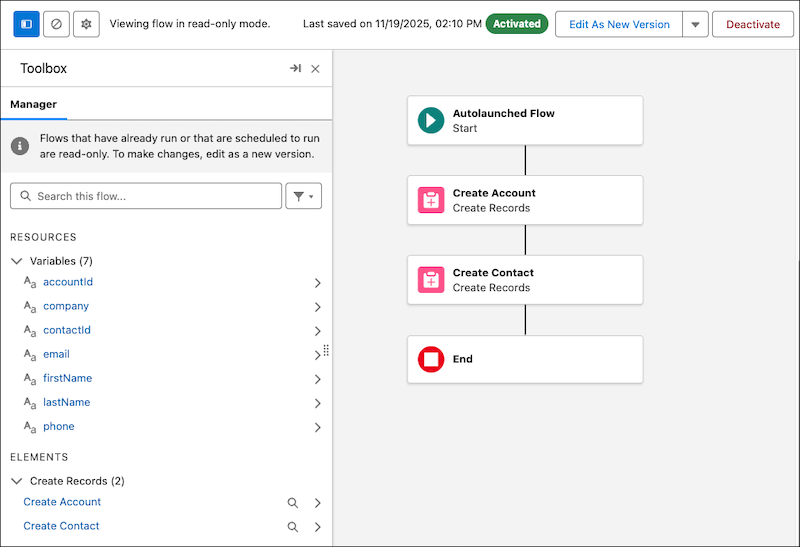
Create a Screen Flow With an Action Button to Call the Autolaunched Flow
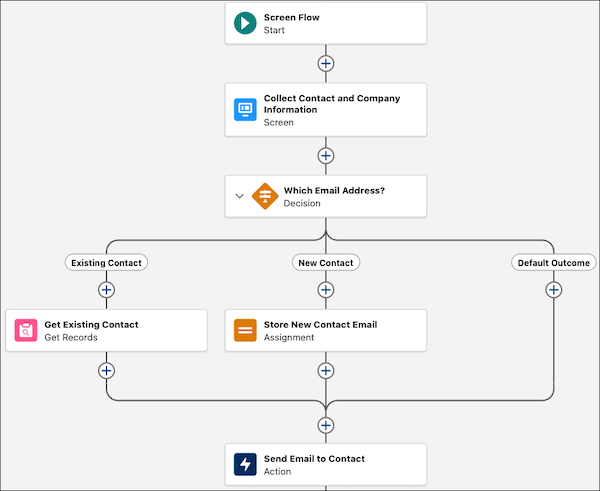
Create a screen flow with a Lookup component, input fields, and an Action Button that triggers a screen action to call the Create Account and Contact autolaunched flow. The user searches for an existing contact, and if they don't find one, they can create a contact and associated account.
-
Open the Flows list view.
- From Setup, in the Quick Find box, enter Flows, and then select Flows.
- From the Automation app, select the Flows tab.
- From the Flows tab in any Lightning app, click the actions menu and select Open Flow.
-
Create a screen flow.
- From the Automation app, click New | Screen Automations | Screen Flow.
- From Setup, click New Flow | Screen Automations | Screen Flow
The new screen flow opens in Flow Builder. -
Add a Screen element.
-
On the canvas, click , and select Screen.
The Screen panel opens.
-
For Label, enter Collect Contact and Company Information.
The API name auto-fills.
- Open the Configure Footer section.
- For Next or Finish Button, select Use custom label.
- For Next or Finish Button Label, enter Done.
- Click Done.
-
On the canvas, click
-
Add a Lookup component to the screen.
-
In the Components list, click Lookup.
The Lookup component is added to the screen.
- For Field API Name, enter ContactId.
- For API Name, enter ContactLookup.
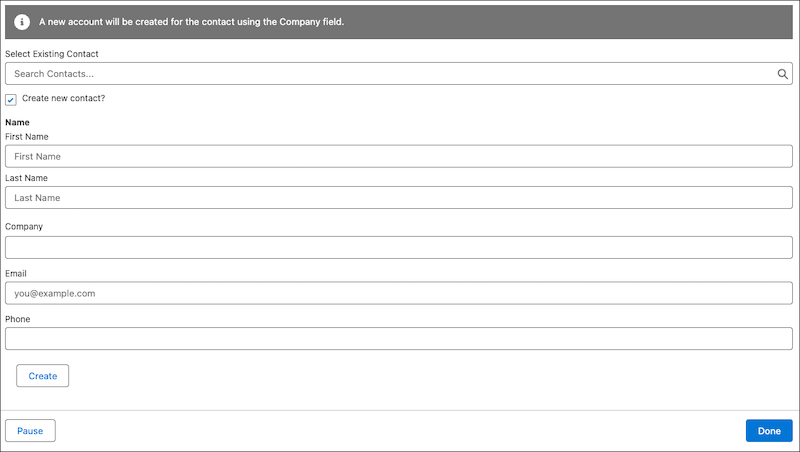
- For Label, enter Select Existing Contact.
-
For Object API Name, enter Case.
Lookup components mimic a lookup field on an object that you specify. We’re using the Case object here because this flow's org has a lookup field to the Contact object on the Case object.
-
In the Components list, click Lookup.
-
Add a Checkbox component to the screen.
- In the Components list click Checkbox.
-
For Label, enter Create new contact?.
The API name auto-fills.
-
Add a Name component to the screen.
- In the Components list, click Name.
- For API Name, enter Name.
- Open the Set Component Visibility section.
-
For When to Display Component, select All Conditions Are Met
(AND).
A condition window opens.
- For Resource, click Collect Contact and Company Information | Create new contact.
- For Operator, select Equals.
-
For Value, select True.
This sets the component to only show when the Create new contact? checkbox is selected.
-
Add a Text component to the screen to collect the contact's company.
- In the Components menu, click Text.
-
For Label, enter Company.
The API Name autofills.
- Open the Set Component Visibility section.
-
For When to Display Component, select All Conditions Are Met
(AND).
A condition window opens.
- For Resource, click Collect Contact and Company Information | Create new contact.
- For Operator, select Equals.
- For Value, select True.
-
Add an Email component to the screen.
- In the Components list, click Email.
- For API Name, enter Email.
- Open the Set Component Visibility section.
-
For When to Display Component, select All Conditions Are Met
(AND).
A condition window opens.
- For Resource, click Collect Contact and Company Information | Create new contact.
- For Operator, select Equals.
- For Value, select True.
-
Add a Phone component to the screen.
- In the Components list, click Phone.
- For API Name, enter Phone.
- Open the Set Component Visibility section.
-
For When to Display Component, select All Conditions Are Met
(AND).
A condition window opens.
- For Resource, click Collect Contact and Company Information | Create new contact.
- For Operator, select Equals.
- For Value, select True.
-
Add an Action Button component to the screen that the user can click to run the screen
action that calls the autolaunched flow that creates a new account and contact.
- In the Components list, click Action Button.
- For Label, enter Create.
- For API Name, enter CreateNewAccountContact.
-
For Flow, select Create Account and Contact.
This flow is the autolaunched flow you created.The Configure Screen Action panel opens.
- If the API Name doesn't auto-fill, for API Name, enter Create_Account_and_Contact
-
Configure the screen action inputs to pass the values from the screen components to the
autolaunched flow.
- In the Set Input Values section, click the buttons to include all of the inputs.
- For company, click Collect Contact and Company Information | Company.
- For email, click Collect Contact and Company Information | Email | Value.
- For firstName, click Collect Contact and Company Information | Name | First Name.
- For lastName, click Collect Contact and Company Information | Name | Last Name.
- For phone, click Collect Contact and Company Information | Phone | Value.
- Open the Set Component Visibility section.
-
For When to Display Component, select All Conditions Are Met
(AND).
A condition window opens.
- For Resource, click Collect Contact and Company Information and then click Create new contact?.
- For Operator, select Equals.
-
For Value, select True.
This sets the action button to show only when the user has indicated that they want to create a contact.
The Action Button is now configured to call the autolaunched flow when clicked, passing the values from the screen input components. -
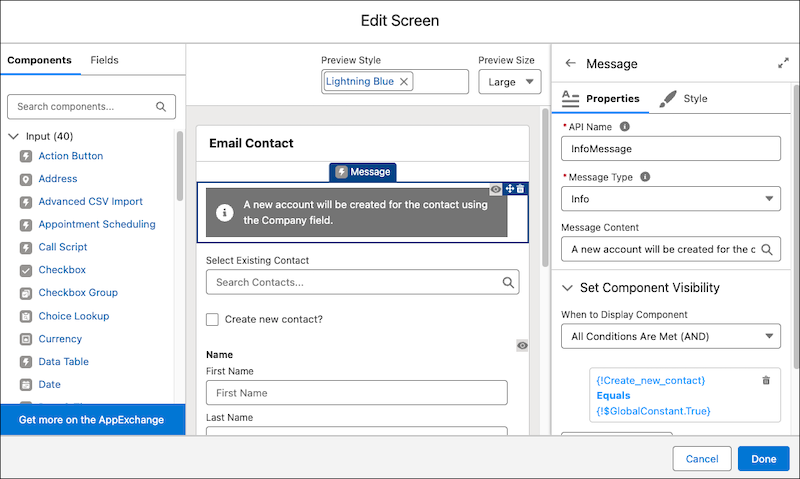
Add a Message component to the screen to notify the user that an account will be created
in addition to the new contact.
- In the Components list, click Message.
- Drag the Message component to the top of the screen.
- For API Name, enter InfoMessage.
- For Message Type, select Informational.
- For Message Content, enter A new account will be created for the contact using the Company field.
- Open the Set Component Visibility section.
-
For When to Display Component, select All Conditions Are Met
(AND).
A condition window opens.
- For Resource, click Collect Contact and Company Information | Create new contact
- For Operator, select Equals.
-
For Value, select True.
This sets the message component to show only when the Create new contact? checkbox is selected.
- Click + Add Condition
- For Resource, click Collect Contact and Company Information | Create Account and Contact (screen action) | Results | contactId.
- For Operator, select Is Null.
-
For Value, select True.
This sets the message component to also show only if the screen action hasn’t run and doesn’t have results.
- Click + Add Condition
- For Resource, click Collect Contact and Company Information | Create Account and Contact (screen action) | In Progress.
- For Operator, select Equals.
-
For Value, select False.
This sets the message component to also show only if the screen action isn’t currently running.
-
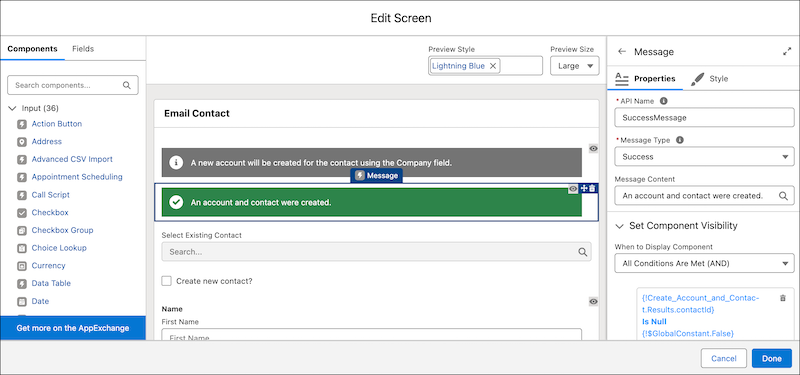
Add another Message component to the screen to notify the user that the records were
created.
- In the Components list, click Message.
- Drag the Message component to the top of the screen.
- For API Name, enter SuccessMessage.
- For Message Type, select Success.
- For Message Content, enter An account and contact were created.
- Open the Set Component Visibility section.
-
For When to Display Component, select All Conditions Are Met
(AND).
A condition window opens.
- For Resource, click Collect Contact and Company Information | Create Account and Contact (screen action) | Results | contactId.
- For Operator, select Is Null.
-
For Value, select False.
This sets the message component to show only when the screen action was successful, created the records, and stored the contact ID in the contactId variable.
- Click Done.
Configure Screen Flow to Email Contact
Add a Send Email action element to the screen flow and email either the contact selected in the lookup component, or the new contact.
-
Create a Text variable to hold the email address of the contact to send an email to.
-
To open the Toolbox, click .
- Click New Resource, and then select Variable.
- For API Name, enter ContactEmail.
- For Description, enter Stores the email address of the contact to send an email to.
- For Data Type, select Text.
- Click Done.
-
To open the Toolbox, click
-
Add a Decision element to determine which email address to use.
-
On the canvas, click , and select Decision.
The decision panel opens.
-
For Label, enter Which Email Address?.
The API name auto-fills.
- For Description, enter Determines whether to use the email from an existing contact or a new contact.
-
For Outcome Label, enter Lookup Contact Has Email.
The Outcome API Name auto-fills.
- In the Condition Requirements to Execute Outcome section, for Execute Outcome When, select All Conditions Are Met (AND).
- For Resource, click Collect Contact and Company Information | Select Existing Contact | Record ID.
- For Operator, select Is Null.
-
For Value, select False.
This outcome runs when the lookup component has a record ID value.
-
In OUTCOME ORDER, Click
 to add another outcome.
-
For Outcome Label, enter New Contact.
The Outcome API Name auto-fills.
- In the Condition Requirements to Execute Outcome section, for Execute Outcome When, select All Conditions Are Met (AND).
- For Resource, click Collect Contact and Company Information | Email | Value.
- For Operator, select Is Null.
-
For Value, select True.
This outcome runs when the new contact email component has a value.
-
On the canvas, click
-
If there’s an existing contact, add a Get Records element to get the existing contact
record and store their email address in the ContactEmail variable.
-
On the Existing Contact outcome path, click , and select Get Records.
The Get Records panel opens.
-
For Label, enter Get Existing Contact.
The API name auto-fills.
- For Description, enter Get the contact selected in the lookup screen component.
- For Object, select Contact.
- In Filter Contact Records, for Field, select Contact ID.
- For Operator, select Equals.
- For Value, click Collect Contact and Company Information | Select Existing Contact | Record ID.
- For How Many Records to Store, select Only the first record.
- For How to Store Record Data, select Choose fields and assign variables (advanced).
- For Where to Store Field Values, select In separate variables.
- For Field, select Email.
-
For Variable, select the ContactEmail variable.
This stores the existing contact's email in the ContactEmail variable.
-
On the Existing Contact outcome path, click
-
If there’s a new contact, Add an Assignment element to store the new contact's email in
the ContactEmail variable.
-
On the New Contact outcome path, click , and select Assignment.
The Assignment panel opens.
-
For Label, enter Store New Contact Email.
The API name auto-fills.
- For Description, enter Assigns the email entered in the Email screen component to the ContactEmail variable.
- For Variable, select the ContactEmail variable.
- For Operator, select Equals.
- For Value, click Collect Contact and Company Information | Email | Value.
- Click Done.
-
On the New Contact outcome path, click
-
After the flow paths meet, add a Send Email action element to send an email to the
contact.
-
Click the that's right before the End element, and search for and select Send
Email.
The Send Email panel opens.
-
For Label, enter Send Email to Contact
The API name auto-fills.
- For Description, enter Send an email to the existing or new contact.
- In the Configure Recipient Details section, For Recipient Addresses, select the ContactEmail variable.
- In the Configure Email Contact section, For Subject, enter We value your feedback!
- For Body, enter You recently worked with one of our agents. Please visit our website and let us know how it went. Thank you for your business!
-
Click the
-
Save the screen flow.
- Click Save.
-
For Flow Label, enter Email New or Existing Contact.
The Flow API Name auto-fills.
- For Description, enter Look up an existing contact, or create a new account and contact, then send the contact an email.
- Click Save.
-
Test the flow.
- Click Debug and then Run.
- Click the Create new contact? checkbox and enter test data.
- Click Run.
- Expand the details for each element and check that the flow works as expected.
-
Activate the flow.
- Click Activate.
The screen flow at runtime.