
You are here:
Create Multiple Records with a Repeater Screen Component Example
This example creates screen flows that use Repeater components to collect information for multiple related items and perform bulk actions on that data. Use Repeater components when you need to gather the same type of information for multiple records, such as collecting product information for multiple items. The flow can then automatically create and link related records based on the collected information.
Required Editions
| View supported editions. |
| User Permissions Needed | |
|---|---|
| To open, edit, create, activate or deactivate a flow using all flow types, elements, and features available in Flow Builder, including Einstein and Agentforce for Flow: | Manage Flow |
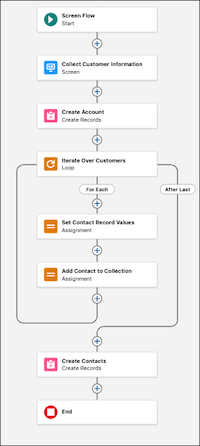
This example configures a screen that collects a first name, last name, and email address for each person that's added. The user can add as many family members as needed. After the information is collected, the flow automatically creates a customer account and a contact record for each person entered, all connected to that same account.
Create a Screen Flow
Create a screen flow to collect information from your customers.
-
Open the Flows list view.
- From Setup, in the Quick Find box, enter Flows, and then select Flows.
- From the Automation app, select the Flows tab.
- From the Flows tab in any Lightning app, click the actions menu and select Open Flow.
-
Create a screen flow.
- From the Automation app, click New | Screen Automations | Screen Flow.
- From Setup, click New Flow | Screen Automations | Screen Flow
The new screen flow opens in Flow Builder.
Add and Configure a Screen Element
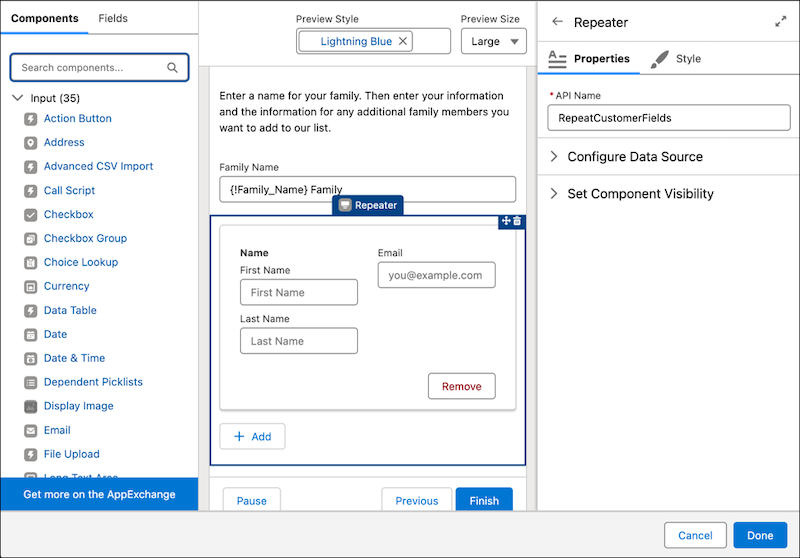
Add a screen element that contains instructions and a Text component to collect a family name. The family name is used as the account name when we create the account. Then add a Repeater component to show a set of contact fields multiple times on the screen. Because we're collecting first names, last names, and email addresses, add a Name component and an Email component within the Repeater component.
- Add a Screen element.
-
Add instructions and a Text component to hold the family's name.
- Add a Display Text component. From the Components list, in the Display section, click Display Text. For API Name enter DisplayInstructions. For the text box, enter Enter a name for your family. Then enter your information and the information for any additional family members you want to add to our list.
- Add a Text component. From the Components list, click Text. For Label, enter Family Name. The API name autofills.
-
Add a Repeater component and child screen components to go in the Repeater component.
- In the Components List, in the Display section, click Repeater.
- For API Name, enter RepeatCustomerFields.
- Add a Name component. From the Components list, drag and drop a Name component into the Repeater component. For API Name enter CustomerName
- Style the Name component. Click the Style tab. For Width, select 6 of 12 (Half Width).
- Add an Email component. From the Components list, drag and drop an Email component into the Repeater component. For API Name enter CustomerEmail
- Style the Email component. Click the Style tab. For Width, select 6 of 12 (Half Width).
- Move the Email component to other half of the Repeater component.
-
Add a default value for the Family Name component to give users an example of what
information to enter. The default value is shown in the screen component until the user enters
a value.
- Click on the Family Name component.
- For Default Value, click the Family_Name screen component, and then enter Family. The full default value is {!Family_Name} Family.
-
Click Done.
Add and Configure a Create Records Element for the Account
Add and configure a Create Records element to create the account record that's related to the new contacts.
-
Click
 , and select Create Records.
-
For Label, enter Create Account.
The API name autofills.
- For How to set record field values, select Manually.
- For Object, select Account.
-
For the Account Name value, select the Collect Customer Information
screen, and then select Family Name.
This step selects the family name that the user entered as the name of the new account.
Add and Configure a Loop Element
Add and configure a Loop element to process the information gathered from the screen element, one family member at a time.
-
Click , and select Loop.
-
For Label, enter Iterate Over Customers.
The API name autofills.
-
For Collection Variable, click the Collect Customer Information
screen, then the RepeatCustomerFields screen component, and then the
AllItems output.
This step selects the information entered into the Repeater component as the items to loop through.
Add and Configure a Contact Record Variable
Add and configure a Record Variable resource to hold contact record field values. The Repeater component doesn't know what kind of information it's collecting, so map the Repeater output to a placeholder contact record for each family member that we loop through.
-
Click
 and then click New Resource.
- For Resource Type, select Variable.
- For API Name, enter ContactRecord.
- For Data Type, select Record.
- For Object, select Contact.
- Click Done.
Add and Configure a Contact Record Collection
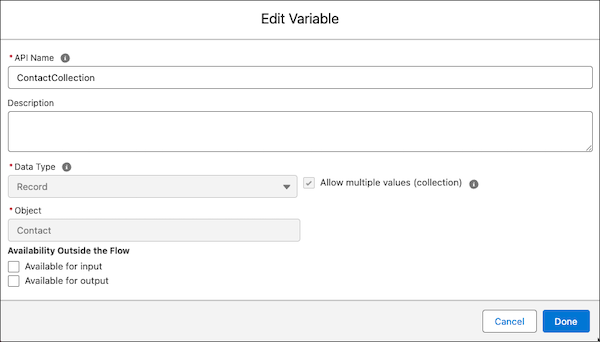
Because we're creating multiple contacts at one time, we need a Record Collection Variable resource to hold the information about all the contacts as a group.
-
Click and then click New Resource.
- For Resource Type, select Variable.
- For API Name, enter ContactCollection.
- For Data Type, select Record.
- For Object, select Contact.
-
Select Allow multiple values (collection).
This step makes the variable a collection variable that can hold multiple items, like records.
-
Click Done.
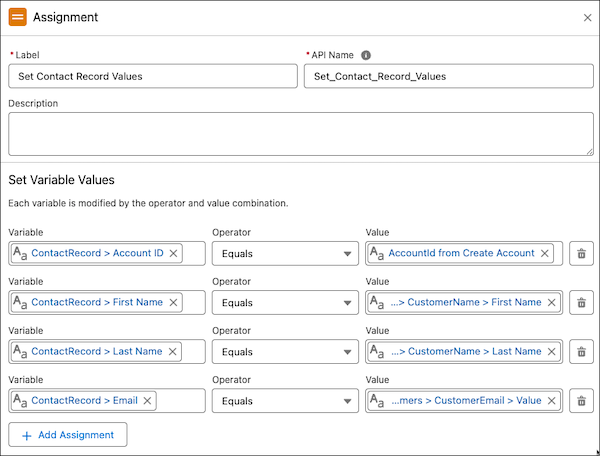
Add and Configure an Assignment Element to Set Contact Record Values
Add and configure an Assignment element in the loop path to set contact field values for each family member in the loop.
-
After For Each, click , and select Assignment.
-
For Label, enter Set Contact Record Values.
The API name autofills.
- For Variable, click the ContactRecord record variable and then click the Account ID field.
- For Operator, select Equals.
-
For Value, select AccountId from Create Account.
This step sets the contact's account to the one that we created.
- Click Add Assignment.
- For Variable, select ContactRecord, and then select First Name.
- For Operator, select Equals.
-
For Value, click Current Item from Loop, click the
CustomerName screen component, and then click the First
Name output.
This step sets the contact's first name to the first name the customer enters in the screen.
-
Repeat steps 6 through 9 for the customer's last name and email. When selecting the value
for the email, click Current Item from Loop | CustomerEmail | Value | .
Add and Configure an Assignment Element to Add the Contact to the Collection
Add and configure another Assignment element in the Loop path to store the contact field values for each family member in the contact record collection variable. After the contact record values are saved, the contact record variable can be used to store the next family member's information.
-
After the Set Contact Record Values Assignment element, click , and select Assignment.
-
For Label, enter Add Contact to Collection.
The API name autofills.
- For Variable, click the ContactCollection record collection variable.
- For Operator, select Add.
-
For Value, select the ContactRecord record variable that we just
populated the fields for.
This step adds the contact that's in the loop to the contact record collection. Now that those field values are saved in ContactCollection, the ContactRecord record variable is ready to be reused for the next contact's information.
Add and Configure a Create Records Element to Create the Contacts
Add and configure a Create Records element to create all of the contacts at once. Because we stored all of the contacts in the record collection variable, we can ask the Create Records element to create records for everything in that collection.
-
After the Loop and Assignment elements, outside of the loop, click , and select Create Records.
-
For Label, enter Create Contacts.
The API name autofills.
- For How to set record field values, select From a Record Variable.
- For How Many Records to Create, select Multiple.
- In the Select Values to Create Multiple Records section, for Record Collection, select ContactCollection.
- Save your flow and give it a descriptive name. For this example, Create an Account and Contact Records for a Family using an Online Form.
- Test your flow by using sample data and different scenarios.
- When you're ready to activate your flow, click Activate.
The flow is ready to collect information about multiple customers and create an account and multiple related contacts with that information.