
You are here:
Use an Online Form to Create a Record Example
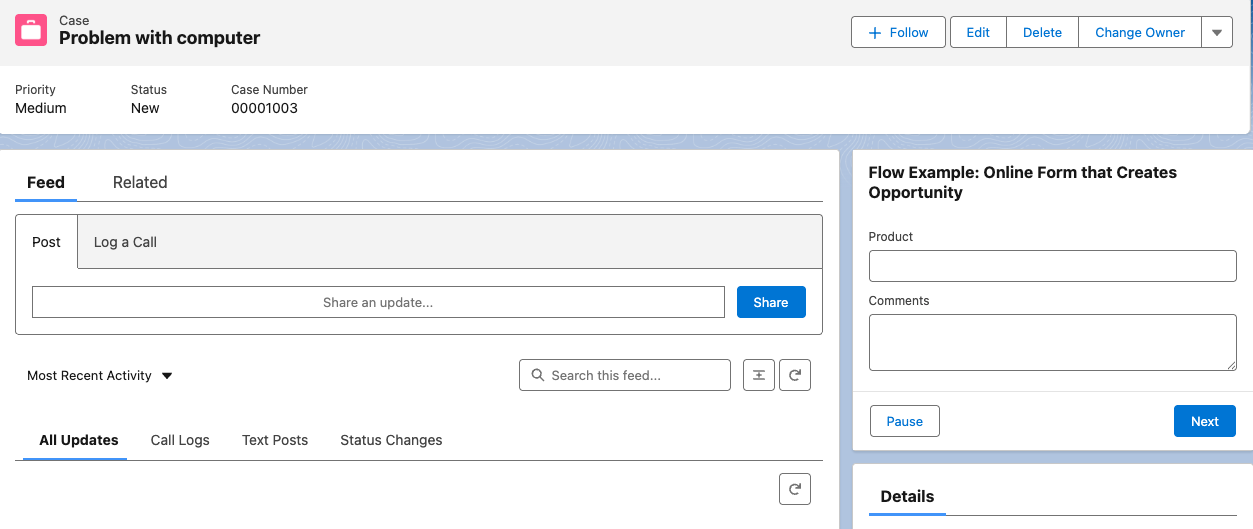
Create a screen flow that collects information about a new opportunity and then automatically creates an opportunity record. For example, on customer calls, your reps scramble to capture notes about customer interest in new products. They often use sticky notes, which are hard to read or get lost. Create an online form embedded on the case record page so they can quickly capture and confirm basic information. When they submit the form, the screen flow creates a new opportunity on the Account record that’s related to the case.
Required Editions
| View supported editions. |
| User Permissions Needed | |
|---|---|
| To open, edit, create, activate or deactivate a flow using all flow types, elements, and features available in Flow Builder, including Einstein and Agentforce for Flow: | Manage Flow |
View this video in a separate tab.
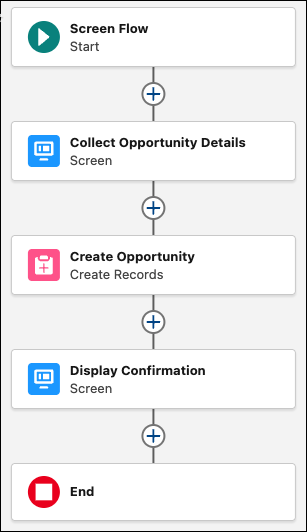
Create the Flow
Create the online form that collects the information using a screen element, and configure the flow to create an opportunity.
-
Open the Flows list view.
- From Setup, in the Quick Find box, enter Flows, and then select Flows.
- From the Automation app, select the Flows tab.
- From the Flows tab in any Lightning app, click the actions menu and select Open Flow.
-
Create a screen flow.
- From the Automation app, click New | Screen Automations | Screen Flow.
- From Setup, click New Flow | Screen Automations | Screen Flow
The new screen flow opens in Flow Builder. -
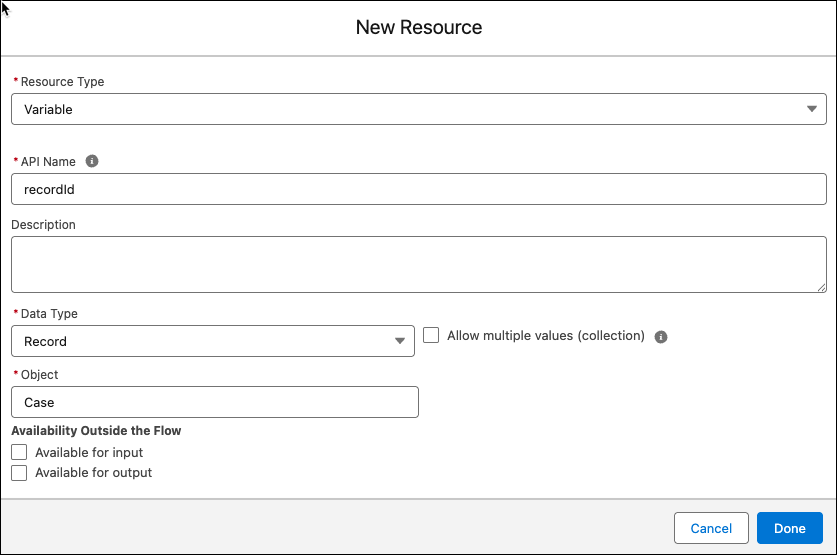
Create the resource that holds the case record the rep is working on.
Capture the case so the flow can find the account that's related to the case and the new opportunity. After you add the flow to the Case record page in Lightning App Builder, the record page can send the open case record to the flow so the flow can find the right case.
-
Open the Toolbox by clicking

- Click New Resource.
- For Resource Type, click Variable.
- For API Name, enter recordId.
- For Data Type, select Record.
- For Object, select Case.
-
For Availability Outside the Flow, select Available for
input.
Since the variable is available for input, the record page can send the case to the flow and the flow can store the record.
- Save your work.
-
Open the Toolbox by clicking
-
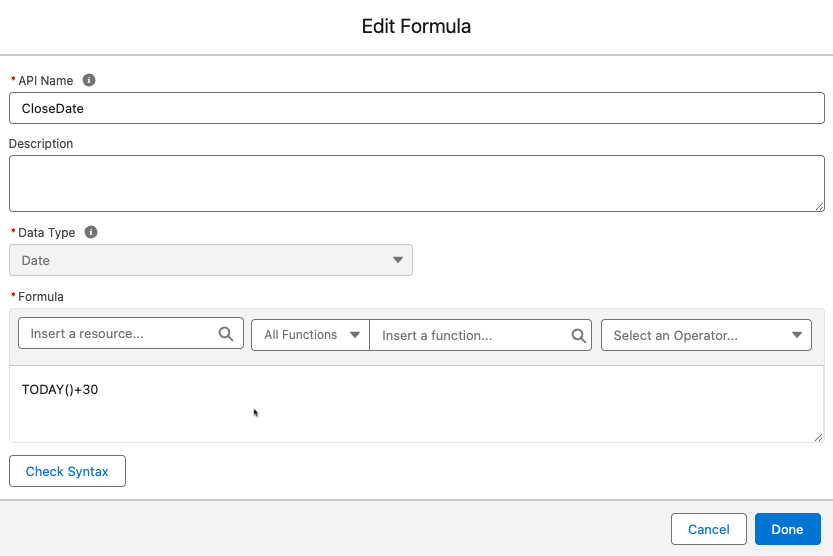
Create the resource that holds the close date for the new opportunity.
-
Open the Toolbox by clicking
- Click New Resource.
- For Resource Type, click Formula.
- For API Name, enter CloseDate.
- For Data Type, select Date.
- For Formula, enter TODAY()+30.
- Save your work.
-
Open the Toolbox by clicking
-
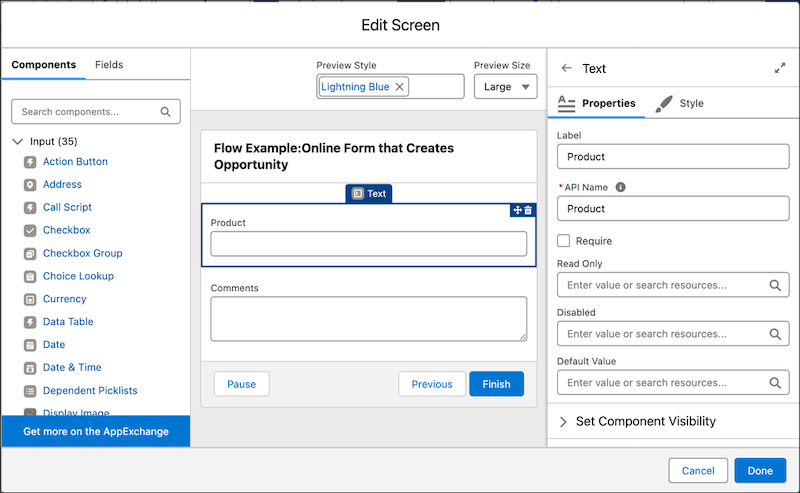
Add and configure a screen element.
This step collects information from the user that's used to create the opportunity.
-
Click
 , and select Screen.
- For Label, enter Collect Opportunity Details and use the default API name: Collect_Opportunity_Details.
- In the Components list, click Text to add a text component to the screen. For Label, enter Product. Use the default API name.
- In the Components list, click Long Text Area to add a long text area component to the screen. For Label, enter Comments. Use the default API name.
- Click Done.
-
Click
-
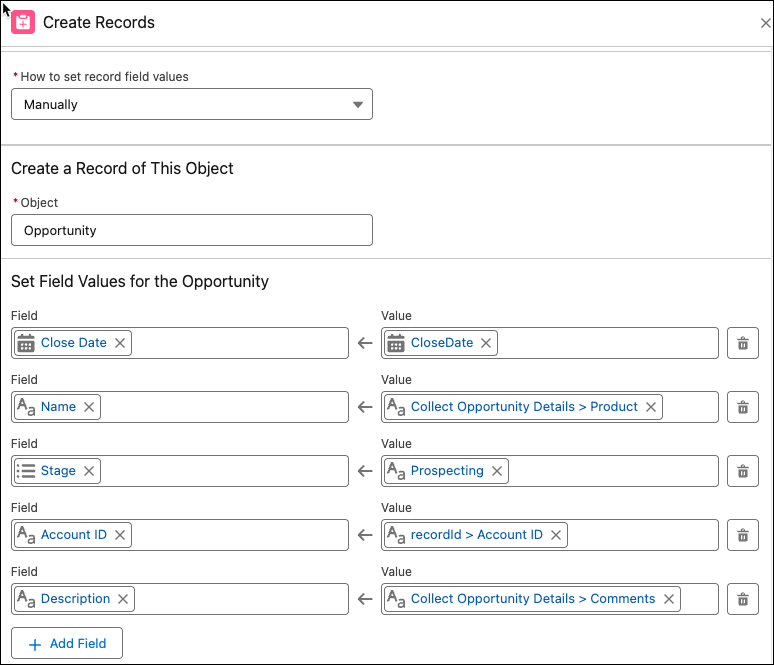
Add and configure Create Records element after the Collect Opportunity Details
screen.
This step creates the opportunity using field values we specify.
-
Click , and select Create Records.
- For Label, enter Create Opportunity and use the default API name: Create_Opportunity.
-
For How to set record field values, select Manually.
Select Manually so you can set the new record's field values one by one.
-
For Object, search for and select Opportunity.
Select Opportunity so the flow creates an opportunity record. Next, you'll add the values for the new record. Every org is different. When setting field values, include all of that record's required fields. For this example, Close Date, Name, and Stage are required fields and are automatically added to the list of fields to add.
-
For Close Date, select the CloseDate formula resource you
created.
This sets the value of the close date to 30 days after the day the opportunity is created.
-
For Name, select the Collect Opportunity Details screen and
then select the Product screen component.
This associates the opportunity name's value to the product the rep enters in the screen flow.
- For Stage, select Prospecting, which is the first stage in this example's opportunity process.
- Click Add Field.
-
For Field, select Description and for Value, select the
Collect Opportunity Details screen and then the
Comments screen component.
This sets the value of the opportunity's description to the comments that the rep enters into the screen flow.
-
Click
-
Add and configure another Screen element.
This step lets the rep know that the record was created successfully.
-
Click , and select Screen.
- For Label, enter Display Confirmation and use the default API name: Display_Confirmation.
- In the Components list, click Display Text. For API Name, enter ConfirmationMessage.
-
In the text box, in the Insert a resource field, select the
Product screen component.
A merge field with the name of the opportunity is added to the text box.
- After the merge field, enter opportunity was created.
- Click Done.
- Save your work.
-
Click
-
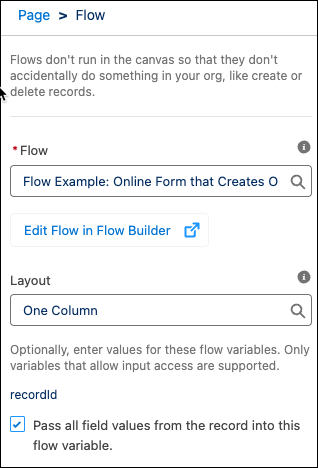
Save the flow and give it a label and an API name.
For this example, the label is Flow Example: Online Form that Creates an Opportunity.
- To test your flow, click Run and enter sample information.
-
To activate your flow, click Activate.
Add the Flow to the Case Record Page
Add the screen flow to the case record page.
-
Open Lightning App Builder and edit the case record page.
-
From Setup, in the Quick Find box, enter Lightning App Builder,
and then select it.
Lightning App Builder opens.
-
For the Case Record Page, click Edit.
The Components Panel opens listing all of the standard and custom components available for the Case Record Page.
-
From Setup, in the Quick Find box, enter Lightning App Builder,
and then select it.
-
Add a flow component to the page.
-
From the list of components, drag the Flow component onto the
page.
The flow component configuration panel opens.
-
For Flow, click the name of the active screen flow to add to the page. For this example,
select Flow Example: Online Form that Creates an Opportunity.
The recordId variable resource you created in the flow shows in the panel and is ready for a value to pass to the flow.
-
Select Pass all field values from the record into this flow
variable.
The value for recordId populates with the case that the rep has open on the page.
-
Save your work.
The flow is on the case record page and is ready to create opportunities.
-
From the list of components, drag the Flow component onto the
page.