
You are here:
Getting Started with Screen Flows
Create interactive screen flows that guide users through processes by using screen elements, screen components, and other elements to process data.
Required Editions
| View supported editions. |
What Makes Screen Flows Unique
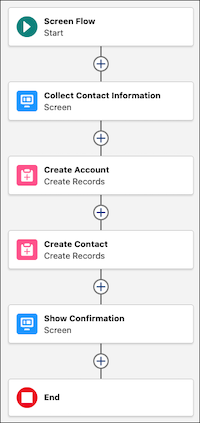
Screen flows are like interactive forms that guide users through a process, one step at a time. Think of them as a conversation with your user where you ask questions, collect information, and help them complete a task. For example, create a screen flow to help someone register for an event, submit a support ticket, or order products.
When you build a screen flow, you typically include multiple screens, with each screen focusing on one step or task. Each screen element represents one screen and can include different components, such as name, email, phone, and address.
Unlike other types of flows that run in the background, users can view and interact with screen flows by entering information, making selections, and clicking buttons.
Understanding Screen Elements
Screen elements are only found in screen flows. When you add a screen element to your flow, you're creating a screen or page that users can view and interact with. Each screen is made up of screen components including individual fields, buttons, and text.
Screen elements collect information from users, or display information. They don't process data on their own. Use other elements or flows to process data. For example, a screen element collects contact information, and then a Create Records element uses that entered data to create a contact record.
A Screen element is like a blank canvas. You add components to this canvas to build the interface for your users. Here's the basic structure:
- Screen Element
- The container that holds everything contained on one screen of your flow. Learn more about screen elements in Screen Element.
- Screen Components
- The individual pieces, such as text boxes and buttons, that you add to the screen.
- Navigation Buttons
- The footer buttons that users click to move through or pause their instance of the screen flow.
- Record Fields (Advanced)
- Show or edit fields directly from Salesforce records on your screen. Record fields require that you create a record variable to use fields and then process that record later in the flow. Learn more about record fields in Adding Record Fields to Flow Screens.
- Screen Actions (Advanced)
- Run other flows from within your screen, so users can trigger additional processes without leaving the screen. Learn more about screen actions in Get or Process Data Within a Screen Element with Screen Actions.
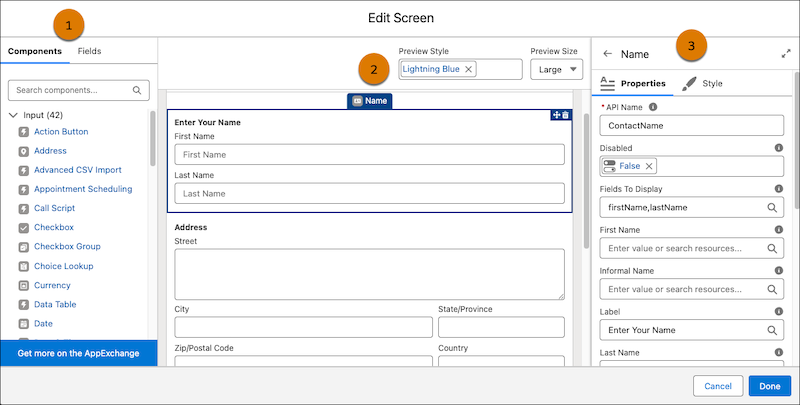
Anatomy of a Screen Element
A screen element has three parts.
- The list of available screen components or fields you can add to the screen (1).
- A preview of the screen with the screen components and record fields on it (2).
- The configuration panel (3). If you have the screen element selected, the configuration panel shows the screen properties that control the entire screen. If you have a screen component or record field selected, the configuration panel shows the component's or field's properties.
Learn about configuring a screen element in Configuring Screen Elements.
Common Screen Components for Beginners
Screen components are the building blocks of your screens. Here are the most common components for beginners:
- Address
- A comprehensive component that collects complete addresses with separate fields for street, city, state/province, postal code, and country. This ensures addresses are captured in a structured format.
- Checkboxes
- Allows users to answer a true or false question. For example, have a checkbox named Married? and the user can click the checkbox if that's true.
- Date and Date/Time
- Provides a calendar picker for users to select dates or dates with times. Perfect for scheduling or birthdate fields.
- Display Text
- Shows information to the user. It can show information that you've collected or calculated earlier in the flow, such as a summary of their selections or a confirmation number.
- Picklist (Dropdown)
- Shows a list of options that users can select from. You can mimic a picklist field on an object, or create your own picklist by using choices.
- Collects an email address with built-in validation to make sure that users enter a properly formatted email address (like name@company.com).
- Long Text Area
- Perfect for collecting longer responses like comments, descriptions, or feedback. Users can type multiple lines of text.
- Name
- A specialized component for collecting names with separate fields for first name, last name, and optionally middle name and salutation. This ensures consistent name formatting.
- Number
- Allows users to enter numeric values. You can set minimum and maximum values to ensure valid input.
- Phone
- Collects phone numbers with a pattern that you set up.
- Radio Buttons
- Users select just one option from a list. For example, a radio button named What Do You Want For Lunch? with choices of Salad, Sandwich, or Soup.
- Text
- Allows users to enter a text value. This component is versatile and can be used when the data you want to collect doesn't fit with the other components.
For a complete list of all available standard screen components and their properties, see Standard Flow Screen Components.
Learn about using choices in screen components in Choosing Which Choice Resource to Use in Screen Components.
How to Plan Your Screen Flow
Before building a screen flow, think about the experience from your user's perspective. Ask yourself these simple questions:
- Who uses this screen flow? Are they comfortable with technology, or do they need extra guidance?
- What information do you want to collect from users? List everything you want to collect, such as names, dates, or preferences.
- What information should you show? Think about what instructions or details users need to complete each step.
- How many steps are in your process? Break your process into logical steps. Each screen should focus on one task or related group of questions.
- What can go wrong? Plan for mistakes, like users entering invalid data or skipping required fields.
Tips for Designing Your Screen Flow
- Present one step at a time. Don't overwhelm users with too many questions on one screen. Break your process into small, manageable steps.
- Give clear instructions. Use Display Text components to explain what users do on each screen. Write in simple, friendly language.
- Make your screen intuitive for users by organizing the layout of screen components. Learn more in Customize Screen Style and Layout in a Screen Flow and Preview Screen Layout and Styles
- Show users where they are in the flow by using stages and a progress indicator. Learn more in Showing Users Their Progress in a Screen Flow.
- Make important information required. If some of the information you're collecting is required for your business process, make it required. If a screen element has required components on it, the user can't move on to the next step until they complete those components.
- Show each component at the right time. Learn more in Conditionally Show Screen Components
- Show a summary. Before completing the flow, show users a summary screen where they can review what they entered. This helps prevent mistakes and improves data quality.
- Provide helpful error messages. If users enter something incorrectly, show them a clear message explaining what went wrong and how to fix it. Learn more in Improve Data Quality by Validating User Input.
- Let users go back. Enable the Previous button so users can go back and change their answers if needed.
Screen Flow Examples
Next Steps
Now that you have a basic understand screen elements and components, you're ready to start building your first screen flow. The best approach is to:
- Start simple with just 2 or 3 screens
- Use the most common components (Name, Phone, Email, Address)
- Test your flow as a user to make sure that it makes sense
- Add more complexity gradually as you become comfortable
The key to a successful screen flow is putting yourself in your user's position. If it's easy for you to understand and complete, it will be easy for them, too.