
You are here:
Create the Autolaunched Flow and Setup the Action
Create and activate the autolaunched flow that you want to be triggered by a screen action. You want to create the autolaunched flow before configuring the screen action because you select the active autolaunched flow when you set up the screen action.
- From the Automation app, click New.
- Click Autolaunched.
- Click Autolaunched Flow (No Trigger).
-
Click Create.
The new autolaunched flow opens in Flow Builder
-
Create input variables to collect any needed information from the screen flow and make them
available for input.
When you pass a variable to a subflow input, the variable API name can be up to 40 characters long.
- Open Toolbox.
- Click New Resource.
- Select the type of resource.
- Configure the resource.
- For Availability Outside the Flow, select Available for input.
- Click Done.
-
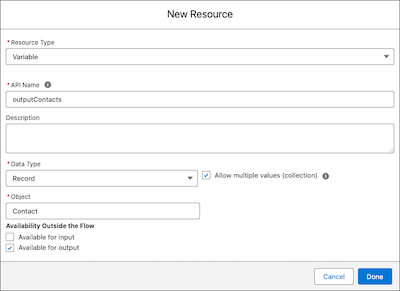
Create output variables to send back to the screen flow and make them available for
output.
- Open Toolbox.
- Click New Resource.
- Select the type of resource.
- Configure the resource.
- For Availability Outside the Flow, select Available for output.
- Click Done.
- Configure the autolaunched flow to get or process data.
- Use data from your input variables to get or process data. For example, use a Get Records element to get cases for an account with an ID passed into the flow and stored in a text input variable.
- Populate your output variables to send back to the screen flow. For example, store the case records you retrieved in a record collection variable.
- Save, test, and activate your flow.

Create Inputs for the Screen Action to Send to the Autolaunched Flow
Create the inputs for the screen action to send to the associated autolaunched flow, so that the autolaunched flow can get or process relevant data.
- From the Automation app, click New.
- Click Screen.
- Click Screen Flow.
-
Click Create.
The new screen flow opens in Flow Builder
-
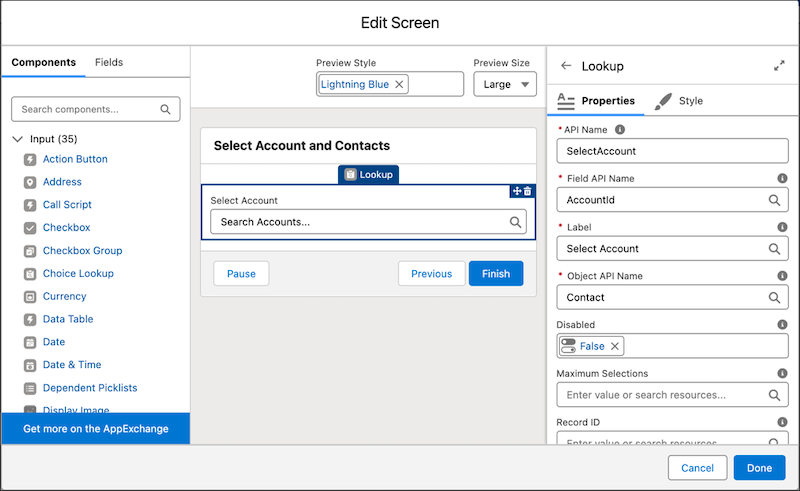
Add a Screen element.
- Click the plus icon and select Screen
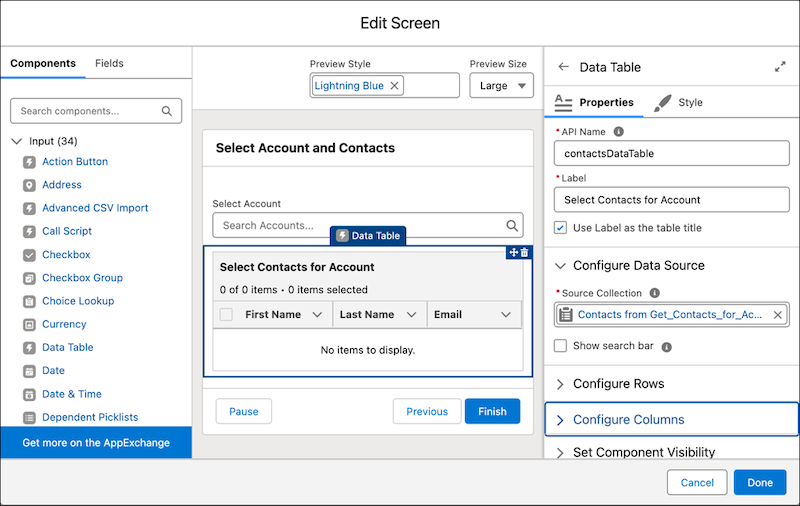
- Add components from the Components menu to collect input data from running users. For example, add a Lookup component to allow a user to find and select an account record.
Set Up the Screen Action
Set up the screen action on a screen element so that it triggers the autolaunched flow and sends in the input data. Before setting up the screen action, decide how you want to trigger the screen action. The user can trigger it by clicking a button, or it can automatically trigger when the inputs change. For example, when the running user enters a value into the input that you set up on the screen.
- Open the screen element that you want to use the screen action with.
-
Add a screen action.
- To add a screen action that’s triggered automatically when screen events happen, in Screen Properties, click Configure Screen Actions. For Flow, select the associated autolaunched flow.
- To add a screen action that’s triggered when a button is clicked, in the Components menu, click Action Button. For Flow, select the associated autolaunched flow.
The Configure Screen Action panel opens. - Enter a label and API name for the screen action.
-
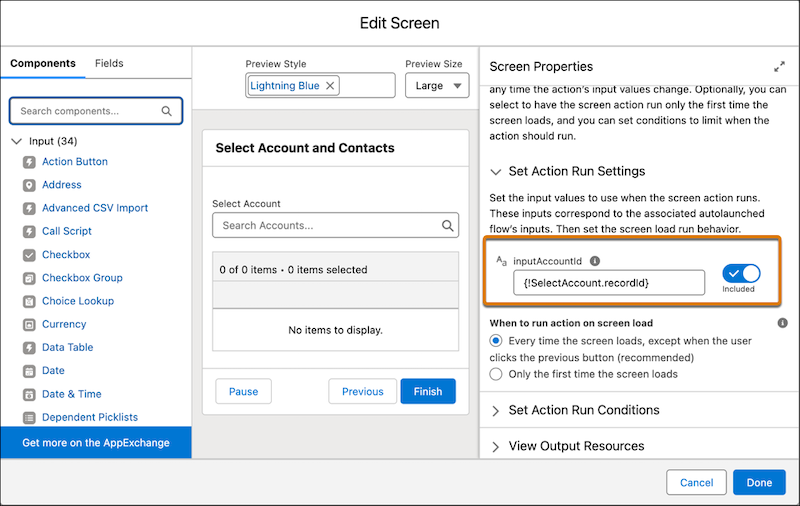
Set input values to send to the associated autolaunched flow.
- In the Set Action Run Settings section, click the switch to include the inputs that you want to send.
- For each input, select a resource that contains the values to use when sending inputs to the associated autolaunched flow.
-
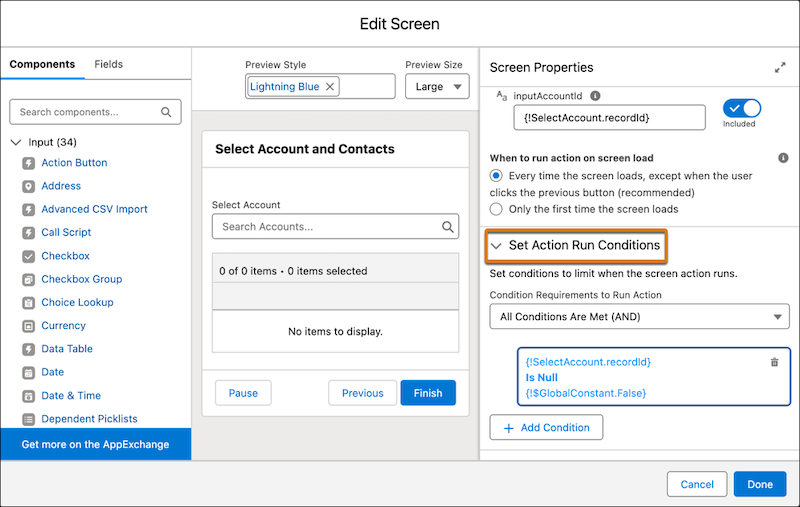
For automatically triggered screen actions, optionally set additional run settings and
conditions.
- To run the screen action only the first time that the screen loads, click Only the first time the screen loads.
- To set conditions to limit when the screen action runs, open the Set Action Run Conditions section. Then add your conditions.
Use Autolaunched Flow Data in Screen Flows
Show and work with autolaunched flow data in your screen flow components for a seamless user experience.
- Open the screen element where the screen action is triggered.
- From the Components menu, add a component to use or show the data from the autolaunched flow.
- For the value that you want to use the autolaunched flow data for, click the screen action’s API name, then click Results, and then click the autolaunched flow’s output variable’s API name.
Screen Action Considerations
When using screen actions, keep these considerations in mind.
Providing the Best User Experience
- If too much data is sent to the screen flow, loading times are slower. To reduce loading times, limit the data sent back to the screen flow to only the information that you need. For example, limit the number of records retrieved or the number of fields stored in a Get Records element. Or only store the fields you need for the screen action. For more information about data security in screen flows, see Data Safety When Running Screen and Autolaunched Flows in System Context
- Error messages help users fix problems with their screen flow entries. Error messages are automatically displayed for screen actions triggered by an action button. To display error messages for automatically triggered screen actions, create a fault path in your autolaunched flow that sets a text variable to the $Flow.FaultMessage global variable. Then, add the $Flow.FaultMessage global variable to a Display Text component’s text box in your screen flow.
Other Considerations
- The autolaunched flow associated with the screen action doesn't inhert the permissions of the screen flow that calls it. Set the permissions on the autolaunched flow separately.
- Screen actions don't run if the screen is revisted by the user clicking the Previous button on the next screen.
- If a screen action’s outputs are configured in a way that triggers the same screen action to run again, or any change on the screen causes a screen action to run again, the flow prevents the screen action from running again to save flow resources.
- If a new flow transaction starts while a screen action's autolaunched flow is running, the autolaunched flow is paused.
- At run time, screen actions are subject to the client payload data limit described in Lightning Aura Components Developer Guide. If you exceed this limit, the flow returns a generic error message. For example, if you send too much data back to the screen flow, the flow fails. To avoid a flow failure, only send the information that you need from the autolaunched flow to the screen flow.
- We don't support using Blob fields in elements such as Get Records elements and Apex action elements in the associated autolaunched flow. For example, you can’t use the VersionData field to filter ContentVersion records in a Get Records element. For more information about Blob objects, see Insert or Update Blob Data.