
You are here:
Send an Email with an Attachment in an Autolaunched Flow Example
Use the Send Email action to send an email with an attachment to all employees living in a city. For example, you want to send an important update to all employees living in San Francisco and add attachments to your email.
Required Editions
| View supported editions. |
| User Permissions Needed | |
|---|---|
| To view Files tab: | Read on files |
| To upload new files: | Create on files |
| To replace files: | Edit on files |
| To edit process automation settings: | Customize Application |
| To open, edit, create, activate or deactivate a flow using all flow types, elements, and features available in Flow Builder, including Einstein and Agentforce for Flow: | Manage Flow |
Note If you're following along in an existing flow, make sure the Send Email action
version is set to 1.0.1.
Important To send email from Salesforce, the Send
Email action in Salesforce Flow requires domain-level and user-level email verification.
Email delivery fails if either the user's email address or the email-sending domain is
unverified. See Requirements to Send Email from Salesforce.
Upload a File and Create an Autolaunched Flow
- In the App Launcher, search for and select Files.
- To upload a file, click Upload Files, choose the file, and then click Open.
- Click Done.
-
Open the Flows list view.
- From Setup, in the Quick Find box, enter Flows, and then select Flows.
- From the Automation app, select the Flows tab.
- From the Flows tab in any Lightning app, click the actions menu and select Open Flow.
-
Create an autolaunched flow.
- From the Automation app, click , then click New | Autolaunched | Autolaunched Flow (No Trigger).
- From Setup, click New Flow | Autolaunched | Autolaunched Flow (No Trigger).
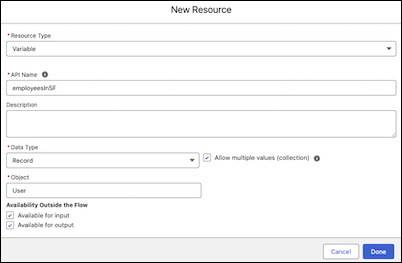
Create and Configure a Record Collection Variable
- In the Toolbox, in Manager, click New Resource.
- From the Resource Type dropdown, select Variable.
- For API Name, enter employeesInSF.
- For Data Type, select Record and select Allow multiple values (collection).
- For Object, enter user and select User.
-
For Availability Outside the Flow, select both Available for input
and Available for output.
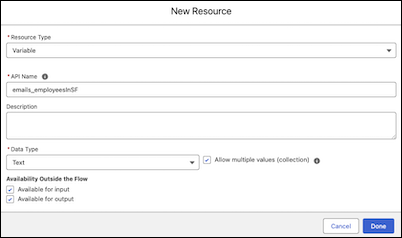
Create and Configure a Text Collection Variable
- In the Toolbox, in Manager, click New Resource.
- From the Resource Type dropdown, select Variable.
- For API Name, enter email_employeesInSF.
- For Data Type, select Text and select Allow multiple values (collection).
-
For Availability Outside the Flow, select both Available for input
and Available for output.
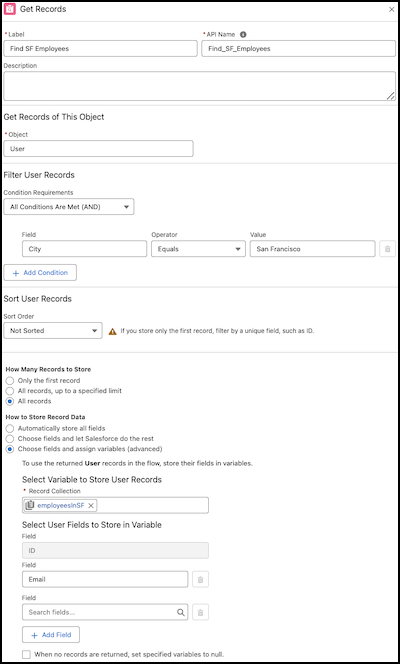
Add a Get Records Element
-
Click
 , and select Get Records.
- For Label, enter Find SF Employees.
- For Object, select User.
- For Condition Requirements, select All Conditions Are Met (AND).
- For Field, click City. For Operator, click Equals. For Value, enter San Francisco.
- For How Many Records to Store, select All Records.
- For How to Store Record Data, select Choose fields and assign variables (advanced).
- For Record Collection, select the employeesInSF record collection variable.
-
For Field, select Email.
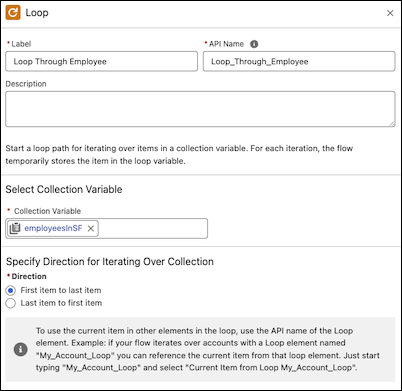
Add and Configure Loop and Assignment Elements
-
After the Get Records element, add and configure a Loop element.
-
Click , and select Loop.
- For Label, enter Loop Through Employee.
- For Collection Variable, click employeesInSF.
If you have a large number of items in your collection variable, you may experience performance issues when processing the collection. For example, processing 20,000 records in a record collection using a Loop element can significantly delay the flow run. To enhance efficiency, configure your flow to handle fewer items at a time. You can achieve this by splitting a large collection into two collection variables or by narrowing the filter criteria for adding records to the collection variable. -
Click
-
After the For Each node of the Loop element, add and configure an Assignment
element.
-
Click , and select Assignment.
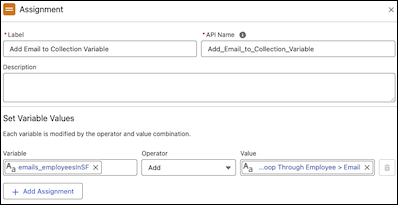
- For Label, enter Add Email to Collection Variable.
- In Set Variable Values, for Variable, click email_employeesInSF. For Operator, click Add. For Value, click Loop Through Employee and then click Email.
-
Click
Add and Configure Send Email Action
-
Click , and select Action.
A list of available actions opens.
-
In the search bar, enter Send Email, and then click Send
Email.
For more information about the Send Email action, see Flow Core Action: Send Email.
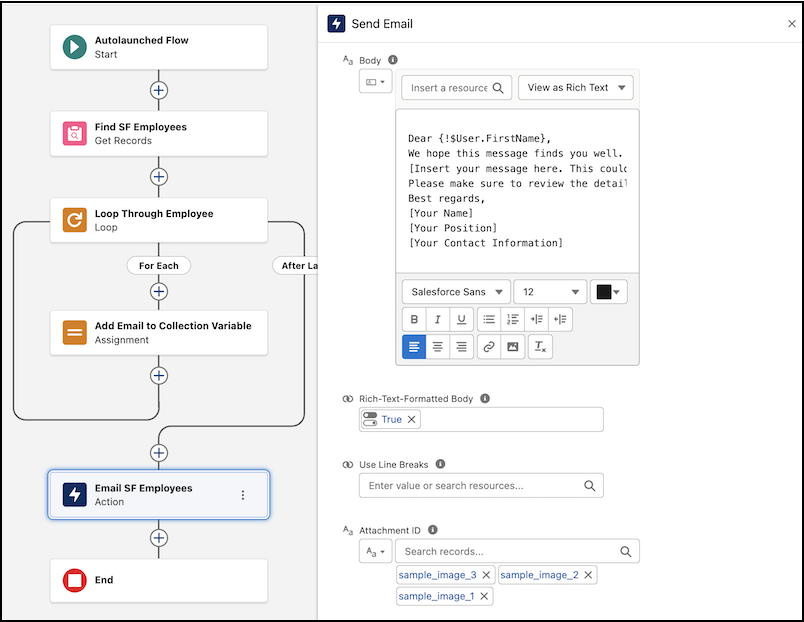
- For Label, enter Email SF Employees and use the default API name, Email_SF_Employees.
- For Recipient Addresses, click email_employeeInSF.
- Click Compose Email Content.
- For Subject, enter the text Important Update for San Francisco Employees.
- For Body, enter the rich text Dear. Then, to insert the User's First Name, click Insert a resource... | Running User | First Name.
-
Enter the remaining email body content as:
We hope this message finds you well. We have an important update for all employees based in San Francisco. [Insert your message here. This could be about a new policy, an upcoming event, or any other relevant information.] Please make sure to review the details and reach out if you have any questions or need further assistance. Best regards, [Your Name] [Your Position] [Your Contact Information] - For the Rich-Text-Formatted Body value, click True.
- For the Attachment ID, search for and click the files that you previously uploaded.
Troubleshoot the Flow
- To troubleshoot the flow for errors, save the flow, and then click Debug.
-
Click Run.
The debug details for the run appear in a panel.
- To make sure that the attached files you uploaded are included, verify the email.
When you're confident that your flow is working as expected, activate and distribute the version that you tested.
Important After migrating flows, always review and reconfigure
the Send Email action to reference the new record IDs in the target Salesforce org. This
step is crucial to avoid broken references and to make sure that email delivery functions
correctly.
Did this article solve your issue?
Let us know so we can improve!