You are here:
Send an Email from a Flow Using an Existing Email Template
Use an existing email template with the Send Email action to send consistent, reusable email content from any flow type. Email templates support merge fields from the recipient, their organization, and sender records, and can be reused across multiple flows.
Required Editions
| View supported editions. |

Note If you want to send an email to a recipient by adding your
email content directly in the Send Email action see Send an Email from a
Flow.
Before you begin, create the email template you want to use. To learn about creating email templates, see Create an Email Template in Lightning Experience

Important To send email from Salesforce, the Send
Email action in Salesforce Flow requires domain-level and user-level email verification.
Email delivery fails if either the user's email address or the email-sending domain is
unverified. See Requirements to Send Email from Salesforce.
Note If you're following along in an existing flow, make sure the Send Email action version is set
to 1.0.1. To prevent broken email template ID references when you deploy a flow from one org to
another, use the Email Template Name instead of the Email Template ID. To use an Email Template
Name, change the Action Version in the Send Email action to 3.0.1 or later.
After you create your email template, add a Send Email action to your flow and configure it to use that template.
-
Open the Flows list view.
- From the Automation app, select the Flows tab.
- From the Flows tab in any Lightning app, click the actions menu and select Open Flow.
- From Setup, in the Quick Find box, enter Flows, and then select Flows.
Note that the Automation app and Flows tab options don't require Setup access. -
Create the type of flow that you want to use.
- From the Automation app, click New, then click the category, and then the flow type. For example, to create a record-triggered flow, click Triggered | Record-Triggered Flow.
- From Setup, click New Flow, then click the category, and then the flow type. For example, to create a screen flow, click Screens | Screen Flow..
- Configure the Start element if needed for the flow type.
-
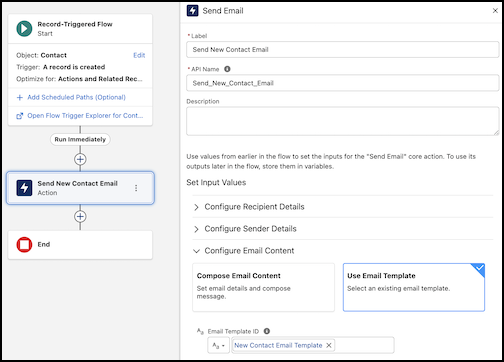
Add and configure a Send Email action element.
-
Click
 , and search for and click Send Email.
- For Label, enter a name for your Send Email element. For example, Send New Contact Email. Let the API name autofill.
- Configure the recipient information by entering a value or selecting a resource for Recipient Addresses or Recipient ID. For example, in Recipient Addresses, click Triggering Contact, and then search for and click Email.
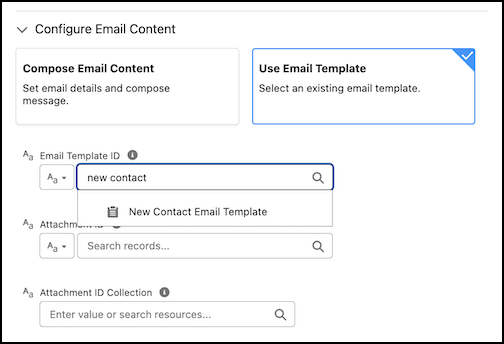
- Add your email template. Click Use Email Template.
- To use an Email Template Name, set the Action Version for the Send Email action to 3.0.1 or later, and select Your Email Template Name from the Email Template Name field.
-
If you are on action version 2.0.1 or lower, search for and select Your Email Template Name
in the Email Template ID field.
-
Optionally, add functionality to your email such as logging the email to a record or
sending an attachment.
For all options and more information, see Flow Core Action: Send Email.
-
Click
- Save and name the flow.
- To make sure that the flow works as expected, debug and test it by using different scenarios.
- To start sending emails, activate the flow.
- Send Follow-Up Email Using an Email Template Example
Walk through a complete example of a record-triggered flow that automatically sends a follow-up email to a case contact when a case is closed. This example uses the Send Email action with an existing email template that includes recipient merge fields.
Did this article solve your issue?
Let us know so we can improve!
