
You are here:
Run a Flow from a Custom List View Button
Add a custom button to a list view that starts an active autolaunched flow or screen flow. Send the IDs of the selected list view records to the flow. Use the flow's web address (URL) to set up the button.
Required Editions
| View supported editions. |
| User Permissions Needed | |
|---|---|
| To open, edit, create, activate or deactivate a flow using all flow types, elements, and features available in Flow Builder, including Einstein and Agentforce for Flow: | Manage Flow |
If you have a collection variable in your flow that's named "ids" and is available for input, the list view automatically sends the IDs of selected records to the flow. You can use those IDs to perform actions on those records. Use the flow's web address (URL) to set up the button.
Create the Flow
Create an autolaunched flow or screen flow to launch from the button. Optionally, you can send the IDs of the selected records to the flow. To send the record IDs to the flow, so the flow knows what records to work on, create a flow collection variable called ids to hold the IDs.
-
Open the Flows list view.
- From Setup, in the Quick Find box, enter Flows, and then select Flows.
- From the Automation app, select the Flows tab.
- From the Flows tab in any Lightning app, click the actions menu and select Open Flow.
-
Create an autolaunched flow or a screen flow.
- From the Automation app, click New. Then select Autolaunched Flow (No Trigger) or Screen Flow.
- From Setup, click New Flow. Then select Autolaunched Flow (No Trigger) or Screen Flow.
Flow Builder opens. -
Optionally, add an input variable to your flow to pass selected record IDs from the list
view to the flow.
-
Click
 , and then click New Resource.
- For the Resource Type, select Variable.
-
For API Name, enter ids.
The variable must be named "ids" for it to work.
- For Description, enter Stores the IDs of the records selected in the list view that are passed into the flow.
- For Data Type, select Text.
- Click the box to select Allow multiple values (collection).
- For Availability Outside the Flow, select Available for input.
- Click Done.
-
Click
- Optionally, add more variables to store additional input values that are sent to the flow when it runs. Learn about adding input values, in addition to the record IDs, to the URL in Send Variable Values to a Flow Using the Flow's URL.
-
Add elements to your flow to perform the actions you want.
For example, if the flow has the IDs of the contacts sent into the flow, you can use other elements to update those records or send emails.
- Save the flow.
- Test the flow by clicking Debug and using test data.
-
Activate the flow.
- Click Activate.
Get Your Flow's URL
- From Setup, in the Quick Find box, enter Flows, and then select Flows.
-
For the flow that you want to run, click
 , and select View Details and Versions.
-
Copy the flow's URL.
The format of the URL is /flow/My_Flow.
Create a Custom List Button
- From Setup, click Object Manager.
-
Click the object that you want to add a list view button to. For example,
Contact.
The object window opens.
- Click Buttons, Links, and Actions.
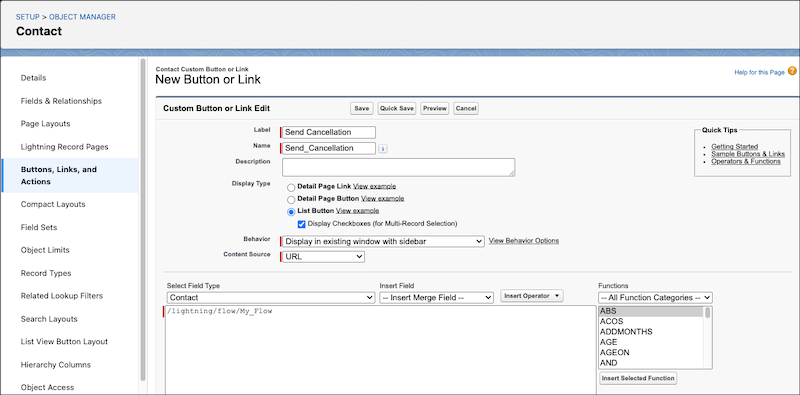
- Click New Button or Link.
- Give the button a label and name.
- For Display Type, select List Button.
- Leave the default values for the remaining fields.
-
In the large text box, enter your flow's URL, and then add
/lightning to the start of the URL.
The full text looks like
/lightning/flow/My_Flow. - Save your work.
Add the Button to the List View Button Layout
- Click List View Button Layouts.
- Click the action dropdown for the layout that you want to add the button to, and click Edit.
- Under Custom Buttons, add your button to the Selected Buttons list.
- Save your work.
Now users can go to the object's list view, select records, and then click the button you created. The list view sends the selected record IDs to the flow and then the flow runs.