
You are here:
Manage External Inventory with HTTP Callout Action Example
This example reviews your store's inventory levels and make an HTTP callout to your supplier's API to place orders when inventory is low.
Required Editions
| Available in: Lightning Experience |
| View supported editions. |
| User Permissions Needed | |
|---|---|
| To open, edit, create, activate or deactivate a flow using all flow types, elements, and features available in Flow Builder, including Einstein and Agentforce for Flow: | Manage Flow |
| To create an external credential, a named credential, and an HTTP callout action: | Customize Application |
Let's say that you want to make managing your pet store's inventory easier by integrating with your supplier's ordering system so that you can place orders in real time. You want to create a flow that reviews your inventory levels and triggers a call to your supplier's API when they're low. When you click Submit Order, it prompts a real-time API call that automatically places your order.
Before you configure an HTTP callout action:
- Create an external credential and a named credential so that the external service can connect to the API. See Guidelines for Authenticating HTTP Callout Actions. In this example, the external credential is PetStore and the named credential is Acme Pet Supplies.
- Prepare a sample API response in JSON format. If a sample doesn't exist in the API's
documentation, you can use a third-party API platform to retrieve a response. In this
example, the sample API response used is:
{ "id": 0, "petId": 0, "quantity": 0, "shipDate": "2024-10-09T08:49:33.605Z", "status": "placed", "complete": true } - Start with an API that's well documented. If details such as field requirements or definitions are inaccurate or outdated, it can take time to debug.
-
Open the Flows list view.
- From Setup, in the Quick Find box, enter Flows, and then select Flows.
- From the Automation app, select the Flows tab.
- From the Flows tab in any Lightning app, click the actions menu and select Open Flow.
-
Create a screen flow.
- From the Automation app, click New | Screen | Screen Flow.
- From Setup, click New Flow | Screen | Screen Flow.
-
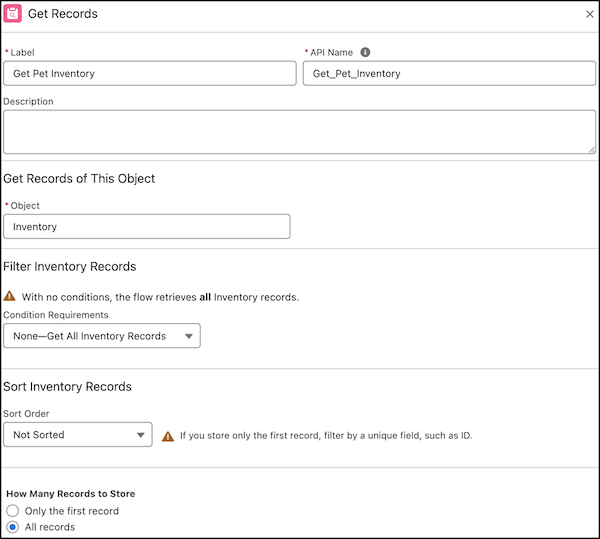
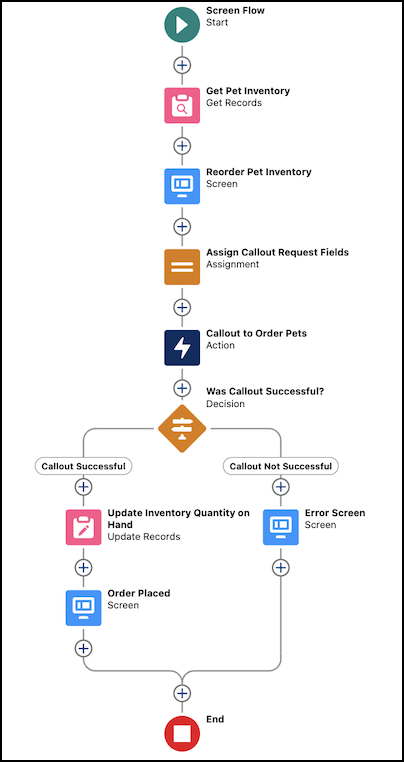
Add the Get Records element and configure it.
- For Label, enter Get Pet Inventory.
- For Object, select Inventory.
- For Condition Requirements, select None—Get All Inventory Records.
- For How Many Records to Store, select All Records.
-
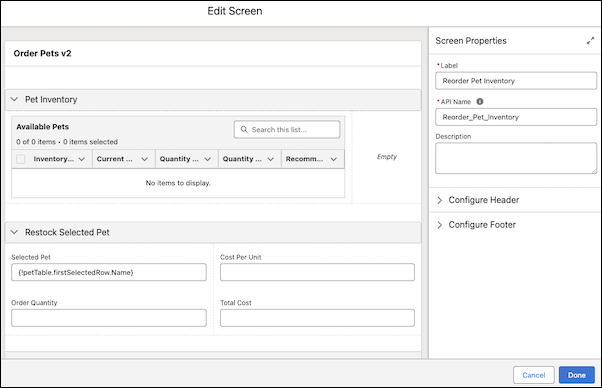
After the Get Pet Inventory element, add a Screen element and configure it.
- For Label, enter Reorder Pet Inventory.
- For API Name, enter Reorder_Pet_Inventory.
- Under Configure Header, enable Show Header.
- Under Configure Footer, enable Show Footer.
-
Add a Section component to the Reorder Pet Inventory screen and configure it.
- Enable Include Header.
- For Label, enter Pet Inventory.
- For API Name, enter Available_Pets.
- Under Configure columns, add the required columns, and set the width.
-
Add a Data Table component as a child of the Pet Inventory section and configure
it.
- For API Name, enter petTable.
- For Label, enter Available Pets.
- Enable Use Label as the table title.
- For Source Collection under Configure Data Source, enter {!Get_Pet_Inventory}.
- Enable Show search bar.
- Under Configure Columns, add required columns.
-
Add another Section component as a child of the Reorder Pet Inventory screen and
configure it.
- Enable Include Header.
- For Label, enter Restock Selected Pet.
- For API Name, enter Reorder_Information.
- Under Configure Columns, add the required columns, and set their width.
-
Add a Text component as a child of the Restock Selected Pet section and enter these
values.
- For Label, enter Selected Pet.
- For API Name, enter Selected_Pet.
- For Default Value, enter {!petTable.firstSelectedRow.Name}.
-
Add a Currency component as a child of the Restock Selected Pet section and enter these
values.
- For Label, enter Cost Per Unit.
- For API Name, enter Cost_Per_Unit.
- For Default Value, enter {!petTable.firstSelectedRow.Current_MSRP__c}.
-
Add a Number component as a child of the Restock Selected Pet section and enter these
values.
- For Label, enter Order Quantity.
- For API Name, enter Order_Quantity.
- For Decimal Places, enter 0.
-
Add another Number component as a child of the Restock Selected Pet section and enter
these values.
- For Label, enter Total Cost.
- For API Name, enter Total_Cost.
- For Default Value, enter {!formulaTotalCost}.
- For Decimal Places, enter 2.
-
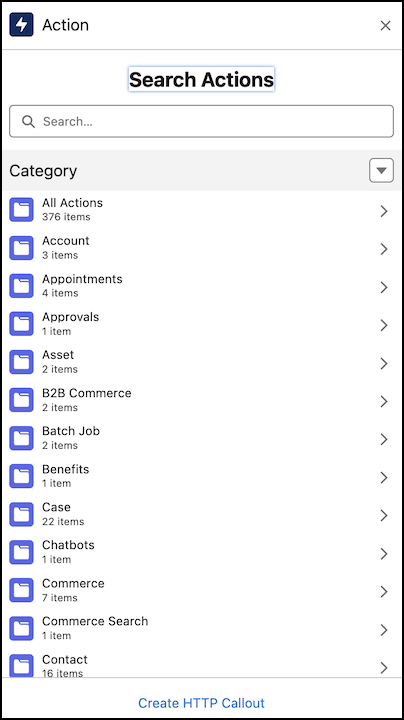
After the Screen element, add an Action element and configure it.
- Click Create HTTP Callout.
- In Create External Service, for Name, enter OrderPetTest.
-
For Named Credential, select Acme Pet Supplies.
The URL associated with the credential is autopopulated.
- Click Next.
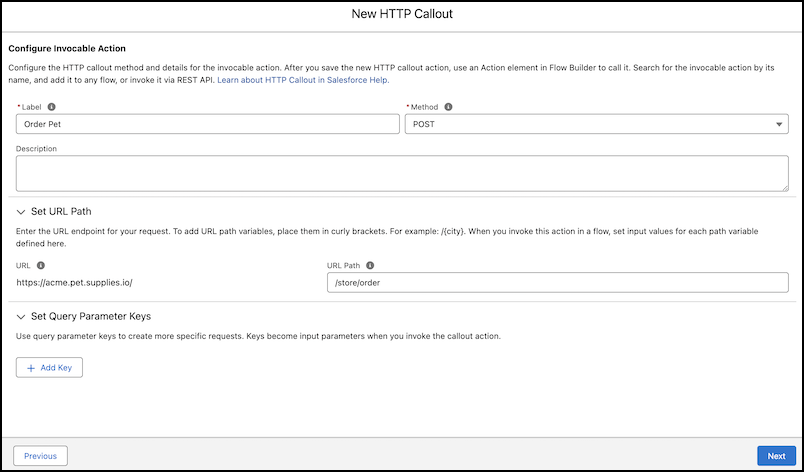
- In Configure Invocable Action, for Label, enter Order Pet.
- For Method, select POST.
- For URL Path, enter /store/order.
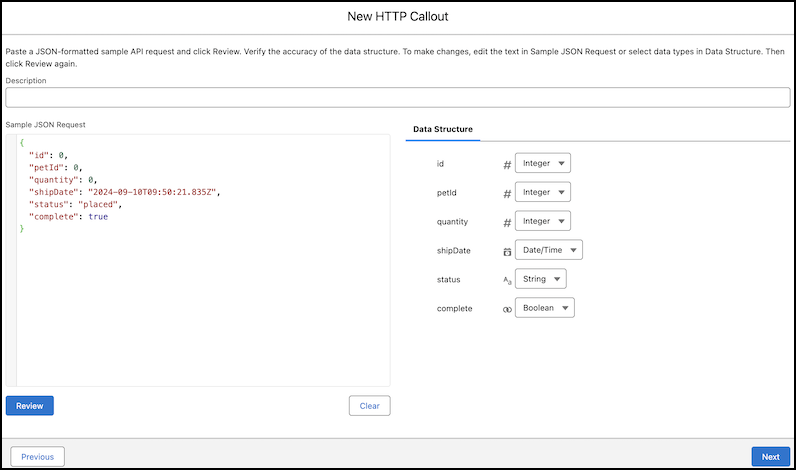
- Click Next.
- For Sample JSON Request, enter the JSON snippet required for this example.
- To confirm data structure parameters, click Review.
- In Select Sample Response Method, select Connect for Schema, and then click Next.
- Click Save.
- For Label, enter Callout to Order Pets.
- For API Name, enter Callout_to_Order_Pets.
- In Set Body Request, for Value, enter {!Order_Pet_Input_Test}.
-
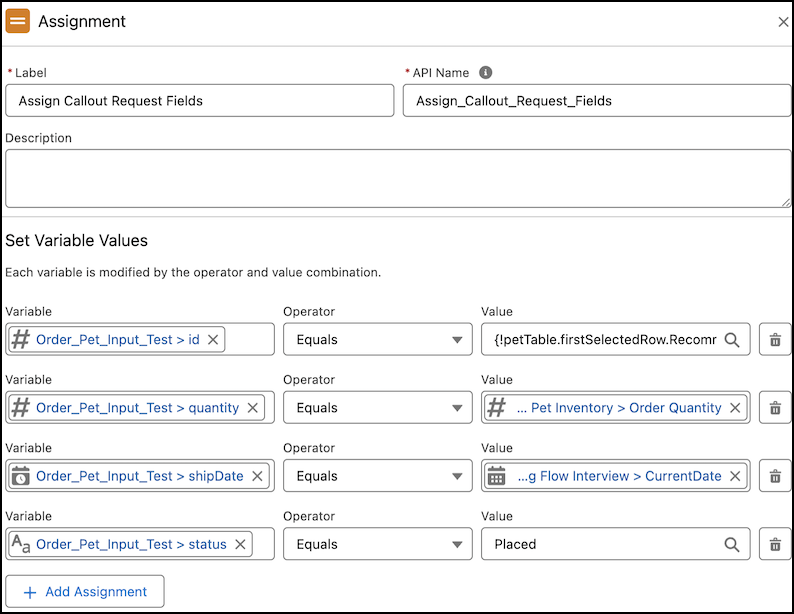
Before the Callout to Order Pets action, add an Assignment element and configure
it.
- For Label, enter Assign Callout Request Fields.
- For API Name, enter Assign_Callout_Request_Fields.
- For Set Variable Values, enter {!Order_Pet_Input_Test.id} Equals. {!petTable.firstSelectedRow.Recommended_Reorder_Quantity__c}.
- Click Add Assignment, and enter {!Order_Pet_Input_Test.quantity} Equals {!Order_Quantity}.
- Click Add Assignment, and enter {!Order_Pet_Input_Test.shipDate} Equals {!$Flow.CurrentDate}.
- Click Add Assignment, and enter {!Order_Pet_Input_Test.status} Equals Placed.
-
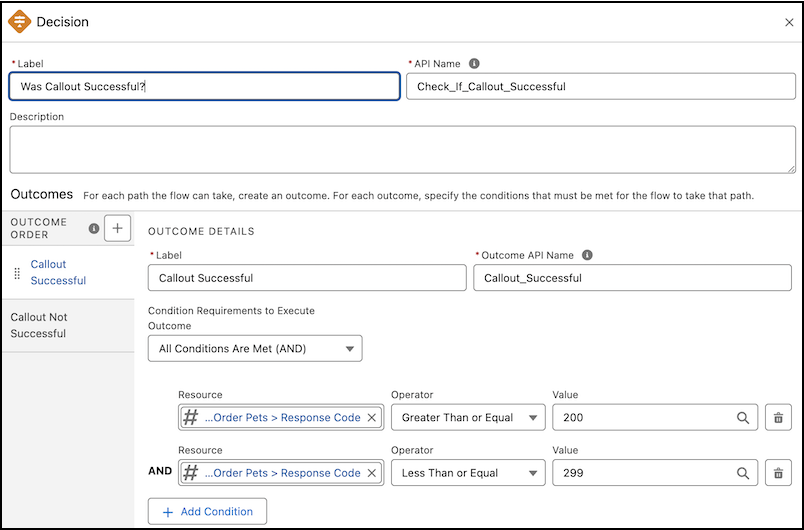
After the Callout to Order Pets action, add a Decision element and configure it.
- For Label, enter Was Callout Successful?.
- For API Name, enter Was_Callout_Successful.
- For Select Decision Logic, select Define Manually (Default).
- For the New Outcome label, enter Callout Successful.
- For Condition Requirements to Execute Outcome, select All Conditions Are Met (AND).
- For Resources, enter {!Callout_to_Order_Pets.responseCode}Greater Than or Equal 200.
- Click Add Resources, enter {!Callout_to_Order_Pets.responseCode} Lesser Than or Equal 200.
- Click Default Outcome.
- For Label, delete the text, and then enter Callout Not Successful.
-
On the Callout Not Successful outcome path, add a Screen element and configure
it.
- For Label, enter Error Screen.
- For API Name, enter Error_Screen.
- Under Configure Header, enable Show Header.
- Under Configure Footer, enable Show Footer.
-
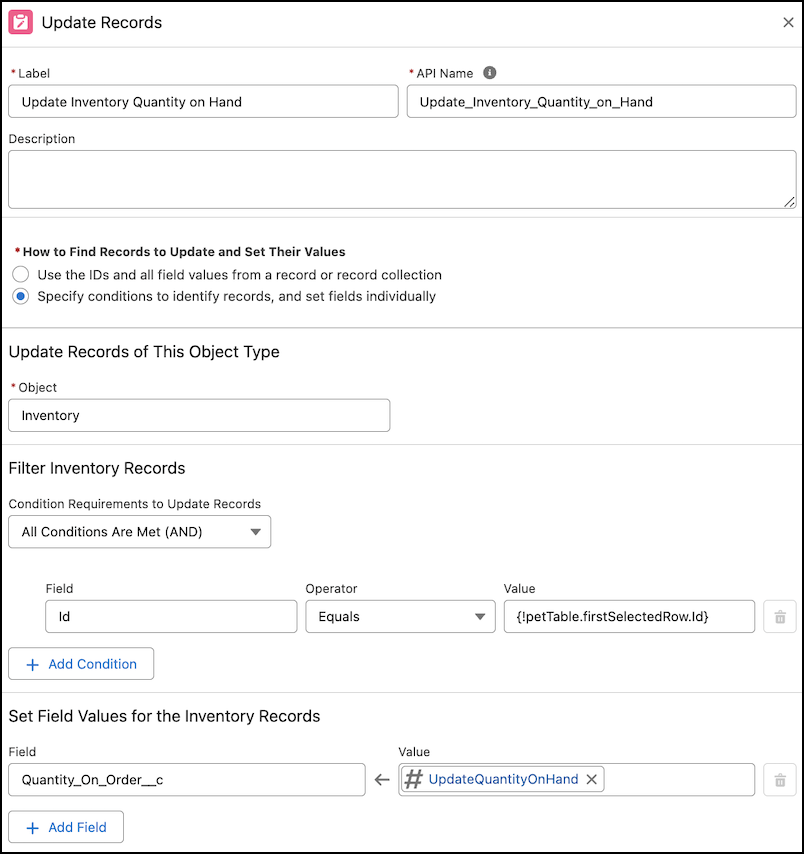
On the Callout Successful outcome path, add an Update Records element and configure
it.
- For Label, enter Update Inventory Quantity on Hand.
- For API Name, enter Update_Inventory_Quantity_on_Hand.
- For How to Find Records to Update and Set Their Values, select Specify conditions to identify records, and set fields individually.
- For Object, select Inventory.
- For Condition Requirements to Update Records in Filter Inventory Records, select All Conditions Are Met (AND).
- For Field, Operator, and Value, select Record ID Equals {!petTable.firstSelectedRow.Id}.
- In Set Field Values for the Inventory Records, for Field, select Quantity on Order.
- In Set Field Values for the Inventory Records, for Value, enter {!UpdateQuantityOnHand}.
-
On the Callout Successful outcome path, next to the Update Inventory Quantity on Hand
element, add a Screen element and configure it.
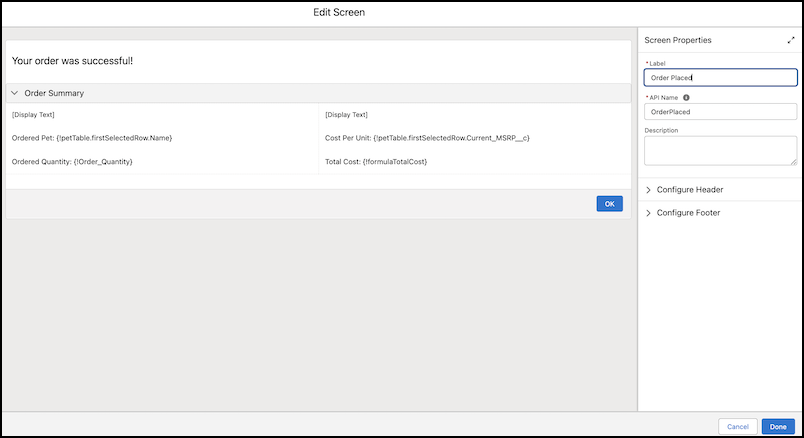
- For Label, enter Order Placed.
- For API Name, enter Order_Placed.
- Under Configure Footer, enable Show Footer.
- For Navigation, select Use a custom label.
- For Next or Finish Button Label, enter OK.
- Hide the Previous and Pause buttons.
- Add a Display component to the Screen element.
- For the API Name of the Display component, enter SuccessDisplayHeader.
- For Description of the Display component, enter Your order was successful!.
- Add a Section component to the Screen element.
- For Label of the Section component, enter Order Summary.
- For the API Name of the Section component, enter OrderSummary.
- Set the Column width based on the requirement.
- Add required Display components as children of the Section, and configure them based on the requirement.
- Save the flow, and then click Debug to troubleshoot the flow for any errors.
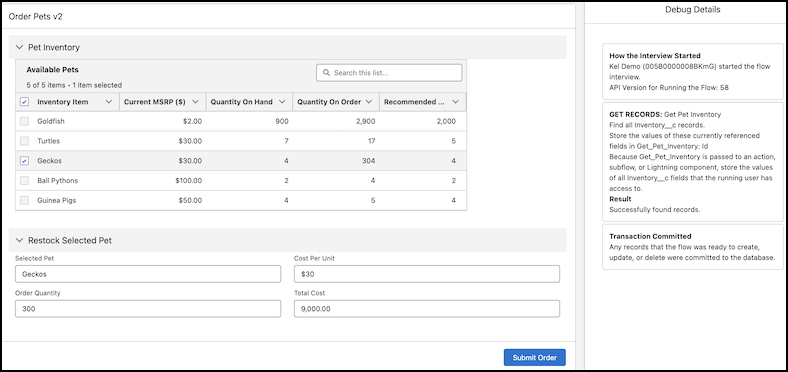
- Click Run.
- Select an inventory item that you want to order.
-
Enter an order quantity, and then click Submit Order.
The order is placed successfully. If the flow fails, troubleshoot the flow errors.
-
(Optional) To restart the flow by using the same or different values for the input
variables, click Change Inputs or Run Again.
You can't convert the debug run to a test in the screen flow.
Did this article solve your issue?
Let us know so we can improve!