
You are here:
Transform Data in a Flow
Automate how you transform data between Salesforce and an external system using the Transform element. You can create mappings between the source and target data, or set fixed values for the target data.
Required Editions
| View supported editions. |
| User Permissions Needed | |
|---|---|
| To open, edit, create, activate or deactivate a flow using all flow types, elements, and features available in Flow Builder, including Einstein and Agentforce for Flow: | Manage Flow |
Watch this demo (English only) of transforming data in Flow Builder.
For another viewing option, see Transform Your Data with Flow Builder (English Only).
Before you begin, understand the structure of your source and target data, such as whether the data contains multiple levels of collections within other collections. Mapping fields in a collection requires rules to preserve data integrity. See Transform Element.
-
Add the Transform element to your flow.
- Enter the label, API name, and description.
-
For Source Data, click the Add Resource button
 and select the flow resource to transform the
data.
and select the flow resource to transform the
data.
-
For Target Data, click the Add Resource button and select the data type.
- If the target data is a collection, select Allow multiple values (collection).
-
If the data type is a record or Apex-defined, select the Apex class or object for
the target data that the Transform element generates.
For example, if you specified that the target data is a collection and that the record data type is the Account object, the Transform element generates an account collection. If you didn’t specify a collection, the target data is a single account.
-
Map the source and target data.
-
Hover over a source data field and click the Map button
 .
.
-
Next to a target data field, click the Map button .
If a target field doesn’t have the Map button, you can’t map to it.
-
To view a mapping tip next to a target field or collection that’s unavailable for
mapping, hover over the target field or collection, and then hover over the error
icon.
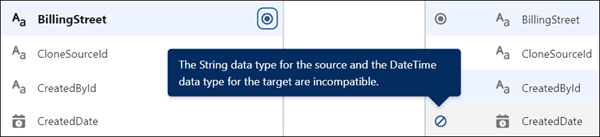
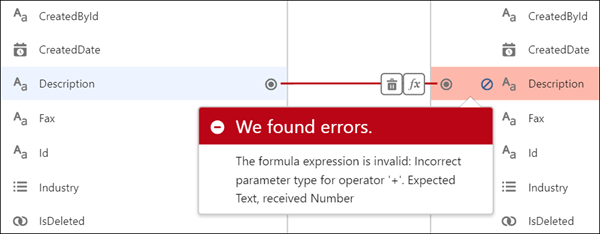
-
To view a mapping tip of a misconfiguration error, hover over the error icon
 shown next to a target data field or collection.
The Transform element adds a dashed line to indicate mappings within a collapsed object or collection. The Transform element adds dotted lines to identify the collections that contain the mapped fields so that you can easily view the collections in both resource data structures. When mapping fields in a collection, the source and target fields must be at the same hierarchical level in their respective resources. See Flow Element: Transform. -
Hover over a source data field and click the Map button
-
To transform data with a formula, click the mapped field name, and then click
 then
Formula.
then
Formula.
-
To delete a mapping, click the field name, and then click the Delete button
 .
.
After you finish transforming data, you can save the target data to Salesforce or to an external system.
To save the target data to Salesforce, add the Update Records element, and then configure it to reference the resource with the same name as the Transform element. For example, if the API name of the Transform element is Return_Order, select Return_Order for Record or Record Collection in the Update Records element.
To save the target data to an external system, create an HTTP callout action that uses a method like POST.
In the Transform element, the amount, customerId, and status source data fields are mapped to the target data fields.
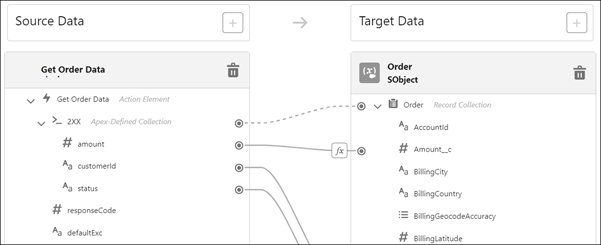
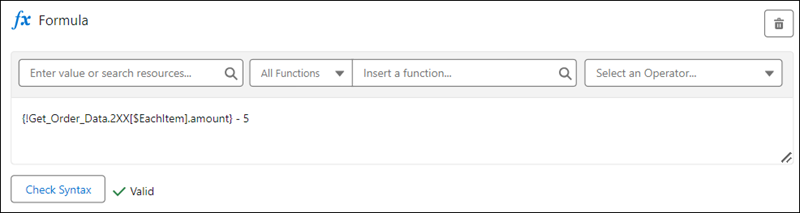
The mapping between the source data’s amount field and the target data’s Amount__c field uses a formula to transform the data.

The formula subtracts a fixed amount from the source data’s amount field for a restocking fee. The result of the formula is the transformed value for the target data’s Amount__c field. The formula shows the merge field syntax, where [$EachItem] represents each item in a collection. In this example, the merge field references a collection of 2XX, and each 2XX item has an amount field. For each amount field, the formula subtracts 5.
Next in the flow, the Update Records element saves the changes to the database. And finally, the Action element makes an HTTP callout to update the order status in the external system.