
You are here:
Make Your Screen Elements Dynamic with Reactivity
Use supported flow screen components, formulas, and screen actions to update screen components in real time without leaving the screen. With this reactivity, you can build screens that feel like single-page applications and reduce the number of screens that users have to navigate to complete tasks. This reactivity is supported with API version 59.0 and later.
Required Editions
| View supported editions. |
Before you create a reactive interaction on a screen, decide which screen component is the source of the interaction and which component reacts to changes in the source. For example, consider a screen with three components:
- Two Slider components that enable users to select values
- A Number component that displays the sum of the values that the user selects in the Slider components
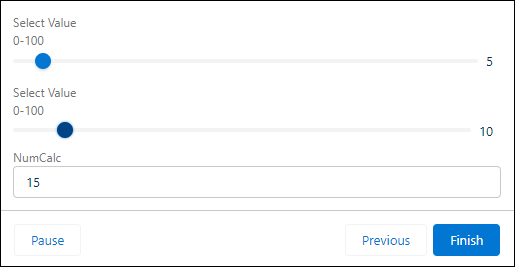
In this scenario, the Slider components are the sources of the reactive interaction and the Number component reacts to changes in the sources. Note that all three components in the reactive interaction produce values of the type number. For reactive interactions to work, the source and reactive values are required to be of the same type.
To build a reactive screen, it’s easiest to use a standard component. If you use custom flow components, ensure that you review the reactivity examples in the Lightning Web Components Developer Guide.
- Create a screen flow, and add a Screen element to it.
-
In the Screen element, add and configure the component that is the source for the reactive
interaction.
For example, add and configure a Data Table component that displays a list of names for the user to choose from.
-
Add and configure the component that reacts to changes in the source component.
For example, add a Name component and set the First Name field to DataTableAPIName.firstSelectedRow.FirstName. The Name component displays the First Name value of the first row that the user selects in the Data Table.
- Save and run the flow.
While adding reactivity to your screens, consider these behaviors:
- Manual outputs of components don’t support reactivity. If you manually set a component output, that variable doesn’t change on the same screen when referenced in other components.
- Help text and labels don't react to changes in other components. This consideration doesn’t apply to labels in custom Lightning Web Component that are configured to respond to events in other components.
- Data types are required to match when you’re mapping an output to another component’s input to support reactivity.
- If validation rules exist for custom components, reactive changes don't trigger validation.
- The global variable $Flow is reactive. All other global variables such as Custom Labels, Custom Settings, $Organization, $Profile, aren’t reactive.
- When mapping a
DateTimefield toTime, the value is converted to GMT and stays converted when navigating between screens. If mapped to aDateTimefield, the locale is preserved. For example, if the time value is 8:00 AM in your locale, the converted GMT time could be several hours off your time locale (such as 4:00 PM). Refer to A Note About Date/Time and Time Zones for information about Converting Between Date/Time and Text and Date/Time in time zones: Using Date, Date/Time, and Time Values in Formulas
- Get or Process Data Within a Screen Element with Screen Actions
Screen actions make your screen elements dynamic by using an autolaunched flow to retrieve or process data. Screen actions reduce the need for you to add elements between screens and reduce the need for users to switch between screens to observe data updates. Because users click though fewer screens, they can finish a screen flow faster. Also, users benefit from screens that react to their interactions, increasing their engagement. - Reactive Screen Flow Components
A subset of the screen flow components in Salesforce supports reactivity. - Reactive Screen Flow Formula Operators
A subset of the formula operators supported in screen flows support reactivity. - Recommendations for Building Reactive Screens
When you build screen flows with reactive components and formulas, keep these recommendations in mind. - Calculate and Display a Discount on One Screen Example
This example creates a single screen flow that uses reactive screen components to let sales reps instantly calculate and view product discounts. - Retrieve Opportunities for a Selected Account Example
This example creates a screen flow that lets users select an account, trigger a flow to retrieve related opportunities, and instantly display the results in a table—all within a single screen.