
You are here:
Show Stages in a Progress Indicator
After you create your stages and enable a progress indicator in your flow, it’s time to get them to work together. You can keep it simple and use the standard functionality to show the same progress indicator stages throughout your flow, and set the highlighted current stage on each screen element. Or you can get more advanced and add or remove the stages shown in the progress indicator, depending on what path the flow takes. You can also set the current stage between screens.
Required Editions
| View supported editions. |
| User Permissions Needed | |
|---|---|
| To open, edit, create, activate or deactivate a flow using all flow types, elements, and features available in Flow Builder, including Einstein and Agentforce for Flow: | Manage Flow |
Use Standard Functionality with Your Stages and Progress Indicator
If you want to show the same stages throughout your screen flow and assign a highlighted current stage to each screen element, you can do so directly from the screen element.
-
Make all of the stages that you want to show in the progress indicator active by
default.
- In a screen flow in Flow Builder, open Toolbox.
- Open a stage resource.
- Click Active by default.
- Click Done.
-
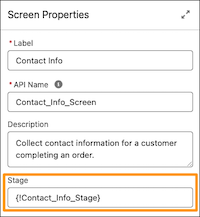
Assign a stage resource for each screen element in your flow.
- In a screen flow in Flow Builder, open a screen element.
- Click the screen element’s header to show the screen properties.
- For Stage, select the stage resource that you want highlighted in the progress indicator when the user gets to that screen.
- Click Done.
Add and Remove Stages from the Standard Progress Indicator
If you want to show different stages in the progress indicator at different times, add and remove stages from the progress indicator.
The $Flow.ActiveStages global variable identifies the stages that are
relevant to the flow’s current path and represents all the stages that appear in the progress
indicator. You can manually update the $Flow.ActiveStages global variable
with an Assignment or Subflow element to add or remove stages.
Add a Stage to the End Automatically
To automatically add a stage to the end of the progress indicator, assign the stage
to the screen element where you want it to show in the progress indicator. When the screen
element loads, if a stage is associated with it, the flow checks the
$Flow.ActiveStages global variable to see if the associated stage is in
there. If it isn’t, the flow automatically adds the associated stage to the end of the
$Flow.ActiveStages global variable.
- In a screen flow in Flow Builder, open a screen element.
-
For Stage, select the stage you want to add to the end of the progress
indicator.
The selected stage starts showing in the progress indicator when the running user reaches that screen element.
- Click Done.
Add a Stage in Between Two Stages
Add a stage in between two other stages in the progress indicator by using a Subflow element to define a stage with an order number in between the order number of the two stages. Then use an Assignment element to set the highlighted current stage.
-
Create an autolaunched flow.
- From the Automation app, click New.
- Click Autolaunched.
- Click Autolaunched Flow (No Trigger).
- Click Create.
The new autolaunched flow opens in Flow Builder. -
Create the stage resource you want to add to the progress indicator.
- In the autolaunched flow, open Toolbox.
- Click New Resource and select Stage for Resource Type.
- Enter the stage’s label and API name.
- For Order, specify where you want the stage to show in the progress indicator. For example, if you want the stage to be added in between stage 3 and stage 5, enter 4.
- Select Active by default.
- Click Done.
-
Add an element to the autolaunched flow so you can save it.
Because you can't save and activate the autolaunched flow unless it has at least one element in it, add an element that doesn't impact anything outside of the flow. For example, add an Assignment element and set a variable that isn't available for input or output.
- Click New Resource and select Variable for Resource Type.
- For API Name enter HoursInDay, and for Data Type, select Number.
- Click the plus icon and select Assignment.
- Enter a Label and API name for the element.
- For Variable, select HoursInDay, For Operator select Equals, and for Value enter 24.
- Save, name, and activate the flow.
The assignment element setting the value of the HoursInDay variable has no impact on the autolaunched flow or the screen flow. -
Add a Subflow element in the screen flow where you want the stage to start showing
up.
- Click the plus icon and select Subflow.
- Select the autolaunched flow you created.
- Enter a Label and API Name for the element.
The referenced autolaunched flow adds the new stage to the active stages in the parent screen flow, in the order specified on the stage resource. -
Add an Assignment element to the screen flow after the subflow element.
- Click the plus icon and select Assignment.
- Enter a Label and API name for the element.
-
For Variable, enter CurrentStage and then click
CurrentStage. For Operator select
Equals, and for Value enter
AutolaunchedFlowAPIName:StageToAddAPIName. For example if
you named your autolaunched flow Add_a_Stage and you named the stage to add
BillingAddress, enter Add_a_Stage:BillingAddress.
The current stage is set so the added stage is highlighted in the progress indicator in the next screen.
-
In the screen flow, where you want the stage to start showing up, add a Screen
element.
- Set up the screen element to fit your needs.
- Leave the Stage field blank.
- Click Done.
Add a Stage to the Beginning or End Automatically
To manually add a stage to the beginning or the end of the progress indicator after
the flow starts, use an Assignment element to add the stage to the
$Flow.ActiveStages global variable.
- In a screen flow in Flow Builder, add an Assignment element where you want to add a stage.
- Enter a Label and API name for the element.
- For Variable, enter ActiveStages and then click ActiveStages
-
Select a value for Operator.
- To add a stage to the beginning, select Add At Start.
- To add a stage to the end, select Add.
- For Value, select the stage to add.
Remove Stages
If you want to remove stages from the progress indicator after the flow starts, use
an Assignment element to remove the stages from the $Flow.ActiveStages
global variable.
- In a screen flow in Flow Builder, add an Assignment element where you want to remove a stage.
- Enter a Label and API name for the element.
- For Variable, enter ActiveStages and then click ActiveStages.
-
Select a value for Operator and Value.
- To remove the stage specified in the Value field, select Remove First. Then, For Value, select the specified stage.
- To remove all stages before the stage specified in the Value field, select Remove Before First. Then, For Value, select the specified stage.
- To remove all stages after the stage specified in the Value field, select Remove After First. Then, For Value, select the specified stage.
- To remove all the stages, select Remove All. Then, For Value, enter ActiveStages and then click ActiveStages.
Update a Flow’s Current Stage Manually
If you don’t want the highlighted current stage in the progress indicator to correspond to a specific screen element, you can set the current stage manually.
The $Flow.CurrentStage global variable identifies which stage the flow is
in. This stage is the one that’s highlighted in the progress indicator. You can update the
value of $Flow.CurrentStage with an Assignment element.
- In a screen flow in Flow Builder, add an Assignment element where you want to set the current stage.
- Enter a label and API name such as Set Current Stage and Set_Current_Stage.
- For Variable, enter CurrentStage and then click CurrentStage.
- Set Operator to Equals.
- Set Value to the stage that you want highlighted in the progress indicator.