
You are here:
Run a Screen Flow From a Quick Action
Add a button to a Lightning record page that starts an active screen flow. Send the entire record or the record ID to the flow. Use a quick action to setup the button.
Required Editions
| Available in: Lightning Experience |
| View supported editions. |
| User Permissions Needed | |
|---|---|
| To create actions: | Customize Application |
| To create flows: | Manage Flow |
Create a screen flow, and optionally, have the record page send the record ID or the whole record to the flow for context. Then create a quick action on an object and configure it to run the screen flow. Then add the quick action to the Lightning record page layout.
Create the Screen Flow
Create the screen flow that will collect information from your users.
-
Open the Flows list view.
- From Setup, in the Quick Find box, enter Flows, and then select Flows.
- From the Automation app, select the Flows tab.
- From the Flows tab in any Lightning app, click the actions menu and select Open Flow.
-
Create a screen flow.
- From the Automation app, click New | Screen Automations | Screen Flow.
- From Setup, click New Flow | Screen Automations | Screen Flow.
-
Optionally, create a variable to hold the record ID or the whole record of the record
page where the user clicked the button.
The quick action automatically sends the record ID or whole record to the flow if the flow has a variable named recordId. Create the recordId variable if you want to reference the record where the user clicked the button in the flow. For example, if the quick action button is on a contact record page and you want to send an email to the contact in the flow, you need to give the flow the contact's record so the flow knows who to email.
-
Open the Toolbox by clicking

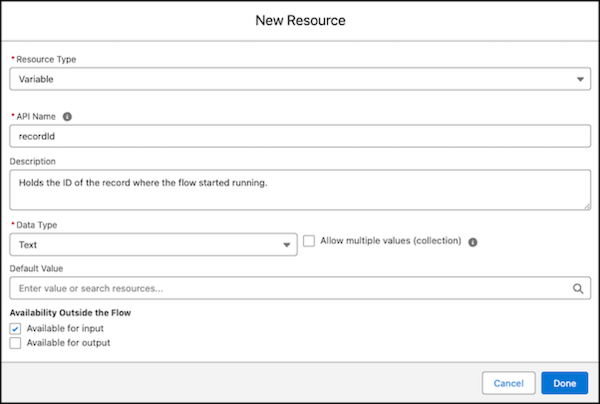
- Click New Resource.
- For Resource Type, select Variable.
-
For API Name, enter recordId.
The variable API name must match this name exactly for the record ID or whole record to be sent to the flow from the record page.
-
Set the data type and object.
To send the whole record to the flow, for Data Type, select Record and for Object, select the object of the record.
To send the record ID to the flow, for Data Type, select Text. -
For Availability Outside the Flow, select Available for
input.
Making the variable available for input let's the quick action send the record ID or whole record to this variable.
- Save your work.
-
Open the Toolbox by clicking
-
Add and configure a Screen element.
-
Click
 , and select Screen.
The Screen configuration window opens.
, and select Screen.
The Screen configuration window opens. - Enter a label and let the API name autofill. For example, enter Collect Lead Details, and let the API name autofill as Collect_Lead_Details.
- Add screen components by dragging them from the Components list onto the screen and configuring them. For example, drag a Name screen component onto the screen to collect a first name and a last name. For Label, enter Lead Name and let the API name autofill. Then, add an Email component to collect an email address.
- Save your work.
-
Click
-
Add more elements to your screen flow to complete more actions. For example, add a
Create Records element and use the inputs from the previous screen to create a
lead.
-
Click , and select Create Records.
The Create Records configuration panel opens.
- Enter a label and let the API name autofill. For example, enter Create Lead and let the API name autofill as Create_Lead.
- For How to set record field values, select Manually
- For How Many Records to Create, select One.
- For Object, search for and select Lead.
-
For the Last Name field value, click Collect Lead Details,
and then click Last Name.
This sets the value of the new lead's last name to the value that's entered into the Last Name screen component on the Collect New Lead Details screen.
- Click Add Field and add more screen component values to populate fields in your new record.
-
Click
- Save and activate your flow.
For more information about flows see Automate Tasks with Flows.
Create the Quick Action
Create the quick action that calls the flow when the button is clicked.
- In Setup, click Object Manager.
- Search for and select the object whose records you want the quick action button to show up on. For example, search for and click Contact.
- Click Buttons, Links, and Actions.
-
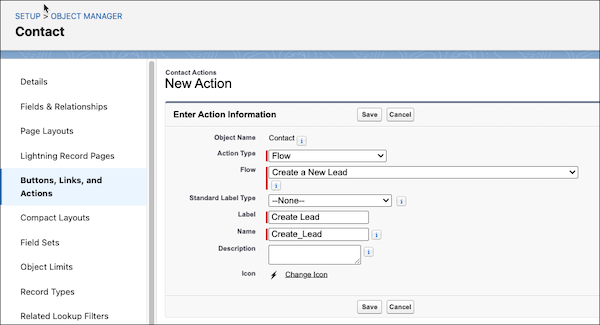
Click New Action.
The new action configuration page opens.
- For Action Type, click Flow.
-
For Flow, select the screen flow you created in the last section.
If you don't see the flow you created, check that the flow is activated. Only active screen flows show in the list of flows.
- For Label, enter the label you want to show on the button. For example, enter Create Lead and let the Name autofill.
-
Save your work.
Add the Quick Action to the Page Layout
Now that your quick action is configured, add it to the page layout of the same object you created the quick action for.
- In the object in Object Manager, click Page Layouts.
-
Click the name of the page layout where you want the quick action to button to
show.
The page layout opens.
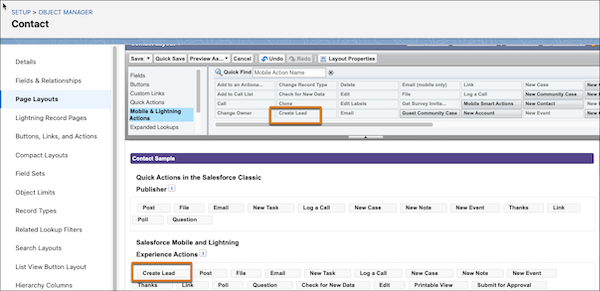
- Click Mobile & Lightning Actions.
-
Find your new quick action button and drag it to the Salesforce Mobile and Lightning
Experience Actions section.
The order of the buttons shown in this section is the order that's shown to the user on the record page.
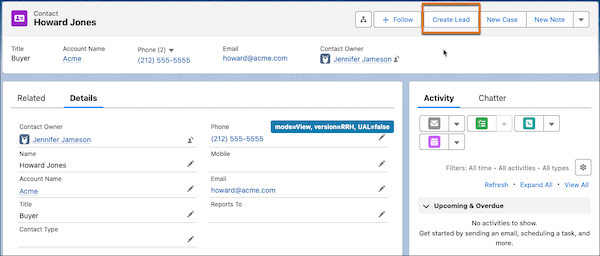
The quick action button shows on the record page. When a user clicks the button, the screen flow runs.
Considerations for Running Flows from Quick Actions
Keep these considerations in mind before running flows from quick actions.
- Only screen flows are supported.
- The flow must be active. If you later deactivate the flow, the action doesn’t appear at runtime.
- Quick actions running flows are available only as object-specific actions.
- The displayed title is the action’s label instead of its flow name. We recommend that you enter the flow name as the action label. When you run a flow from a quick action, the title is always displayed even if you configure the flow to hide the header.
- The quick action’s screen-level help text isn’t available for feed-based page layouts.