
You are here:
Add Records from User Input in Screens Using Repeaters Example
This example uses a screen flow with the Repeater component to gather information from users at run time. You can collect data for multiple items in a group. The Repeater component has one or more child components. The values in these components can be prepopulated on the screen at run time. Users can update, delete, and add values for the group. The changes from the user interaction can be also be committed to Salesforce records.
When the Repeater component uses a record collection data source, each item generates a repeater instance at run time. The displayed values depend on how you map them into the Repeater's child components. At run time, users can add up to 30 instances of the Repeater component to the screen.
For example, assume you have information about a few insurance policy beneficiaries, but the list isn't complete. You want the user to add the remaining beneficiaries and include details such as the beneficiary's name, address, and email address. You then want to store those details in the Salesforce database. At run time, prepopulate the beneficiary information that you already have. Users can add details for beneficiaries not listed. The flow then creates Salesforce beneficiary records for the beneficiaries that the user has added.
Create a Beneficiary Custom Object
- In Setup, select .
- Click Create and then select Custom Object.
-
On the New Custom Object page, specify these details:
- For the Label field, enter Beneficiary. The Object Name, Record Name, and Data Type fields populate automatically.
- For the Plural Label field, enter Beneficiaries.
- Click Save.
- From the object management settings for beneficiary, go to Fields and Relationships.
- Click New.
- On the Choose the field type page, under Data Type, select email, and click Next.
- On the Enter the details page, for Field Label, enter Email Address, and click Next.
- On the Establish field-level security page, accept the defaults, and click Next.
- On the Add to page layouts page, accept the defaults and click Save & New.
- On the Choose the field type page, select Text Area (Long), and click Next.
- On the Enter the details page, for Field Label, enter Address, and click Next.
- On the Establish field-level security page, accept the defaults, and click Next.
- On the Add to page layouts page, accept the defaults, and click Save.
Create a Custom Tab for the Beneficiary Object
- From Setup, in the Quick Find box, enter Tabs and select it.
- To create a custom tab for the Beneficiary object, under Custom Object Tabs, click New.
-
On the Enter the Details page, specify these details:
- Under Object, select Beneficiary.
- Under Tab Style, select People.
- Click Next.
- On the Add to Profiles page, accept the defaults, and click Next.
- On the Add to Custom Apps page, accept the defaults, and click Save.
- Refresh the webpage.
Create Beneficiary Records
- From the App Launcher, find and select Beneficiaries.
- To create a beneficiary from the Beneficiaries related list, click New.
- Add one or more beneficiaries.
- For every beneficiary, enter details such as their name, address, and email address.
Create a Screen Flow
Create a screen flow to collect beneficiary information from your users.
-
Open the Flows list view.
- From Setup, in the Quick Find box, enter Flows, and then select Flows.
- From the Automation app, select the Flows tab.
- From the Flows tab in any Lightning app, click the actions menu and select Open Flow.
-
Create a screen flow.
- From the Automation app, click New | Screen | Screen Flow.
- From Setup, click New Flow | Screen | Screen Flow
Add and Configure a Get Records Element
-
To add an element, click
 and search for and select Get Records.
-
For the Get Records element, specify this information:
- For the label field, enter Get Beneficiary Information.
- Under Object, search for and select Beneficiary.
- Under Condition Requirements, select None-Get All Beneficiary Records.
- Under How Many Records to Store, select All Records.
Add and Configure a Screen Element
-
To add a screen element, after the Get Records element, click and select Screen.
- In the screen properties editor, for the Label field, enter Add Beneficiaries. The API Name auto-populates.
Add and Configure a Repeater Component
The prepopulated items output in a Repeater support variables of only the record collection data type. For the Default Value or the Value field in the child components, use the variable that’s automatically created by the Get Records element.
The fields from the selected record collection variable are available to child components in the Repeater. The unique identifier for items is API name of the field. That field contains a unique identifier for each item in the collection. The field is automatically set to the object’s ID field.
In this example, we’ve used the Added Items output to collect information about newly added beneficiaries. You can expand this example and use All items, Prepopulated Items, and Removed Items. For more information, see Flow Screen Display Component: Repeater.
- To add a Repeater component to the screen element, drag the Repeater component to the screen canvas.
-
To configure the Repeater properties, specify these details:
- For API Name, enter BeneficiaryDetails.
- For the Collection for Prepopulated Items field under Configure Data Source, select Beneficiaries from Get_Beneficiary_Information (1).
-
For the Let Users Add or remove Items checkbox group, under Configure Display
Options, select Users can add items and Users can
remove prepopulated items (2).

-
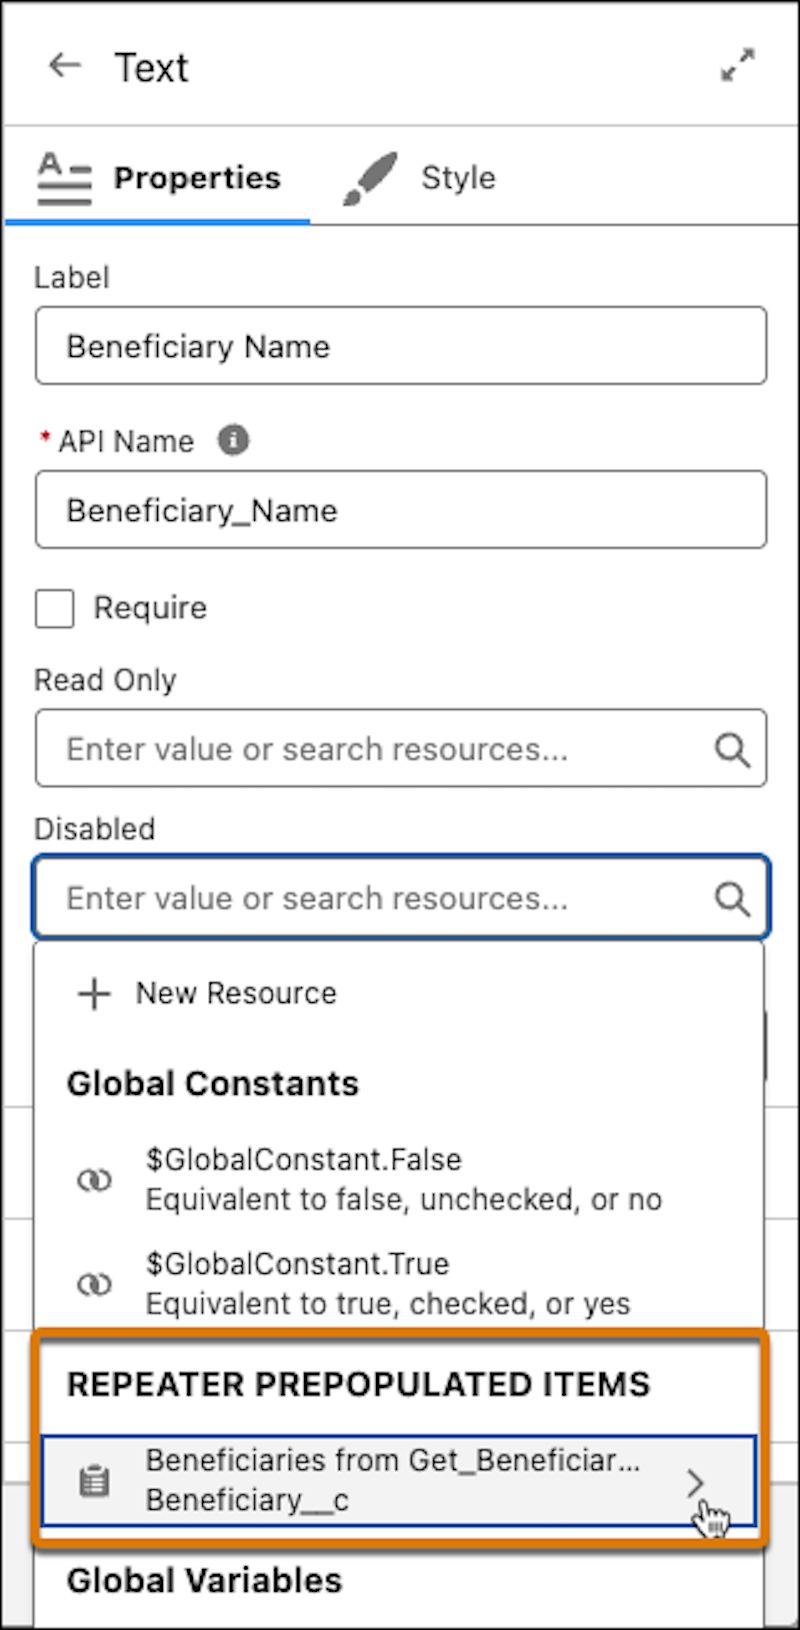
Drag a text component on the repeater and specify these details:
- For Label, enter Beneficiary Name. The API Name autopopulates.
-
For Default Value, under REPEATER PREPOPULATED ITEMS, select
Beneficiaries from Get_Beneficiary_Information >
Name.
- To reduce the width of the Text component, from the Style tab, change the Width to 6 of 12 (Half Width)
-
Drag the Email component on the repeater and specify these details:
- For the APIName enter EmailAddress.
- For the Label, enter Email Address.
- For the Value field, under REPEATER PREPOPULATED ITEMS, select Beneficiaries from Get_Beneficiary_Information > Email_Address__c
- To reduce the width of the Email component, from the Style tab, change the Width to 6 of 12 (Half Width).
-
Drag a long Text Area on the repeater and specify these details:
- For Label, enter Beneficiary Address.
- For Default Value, under REPEATER PREPOPULATED ITEMS, select Beneficiaries from Get_Beneficiary_Information > Address__c
- On the screen editor, click Done.
Create a Single Value Record Variable to Store Added Items
The single-value record variable addedBeneficiaryDetails stores the
field values for a beneficiary.
- Under Resource Type, select Variable.
- For API Name, enter addedBeneficiaryDetails.
- Under Data Type, select Record.
- Under Object, select Beneficiary.
- Click Done.
Create a Collection Variable to Store All Added Items
The values from the addedBeneficiaryDetails variable are iteratively
added to a record collection variable, beneficiaryCollection. The record
collection variable is then used to create beneficiary records.
- Under Resource Type, select Variable.
- For API Name, enter beneficiaryCollection.
- Under Data Type, select Record.
- Under Object, select Beneficiary.
- Select All multiple values (collection)
- Click Done.
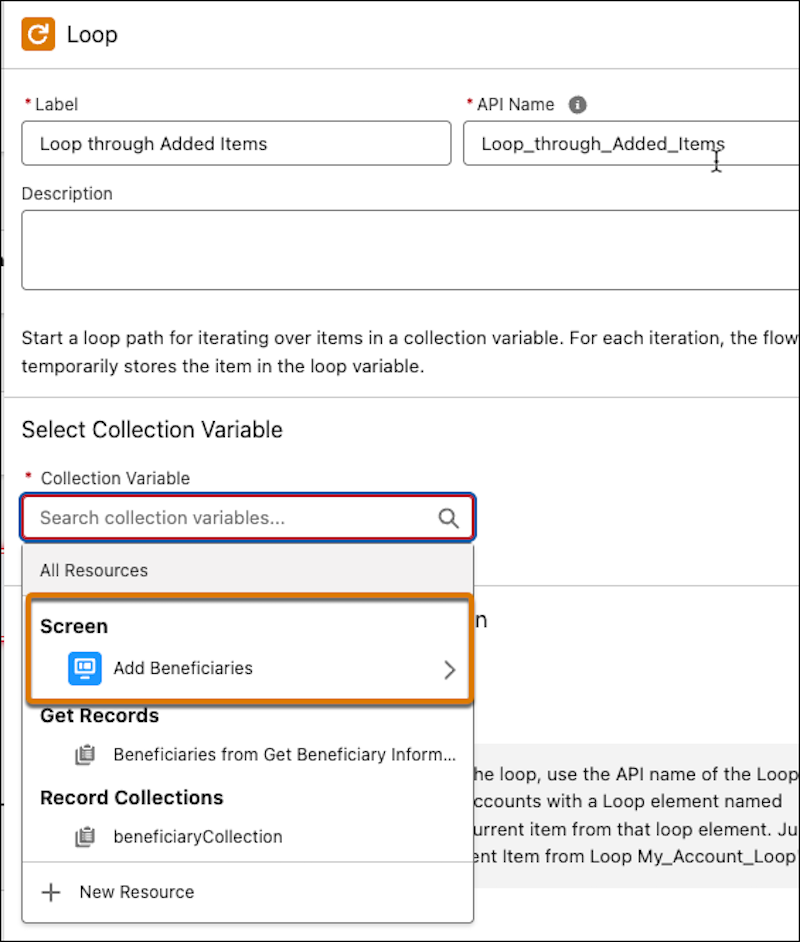
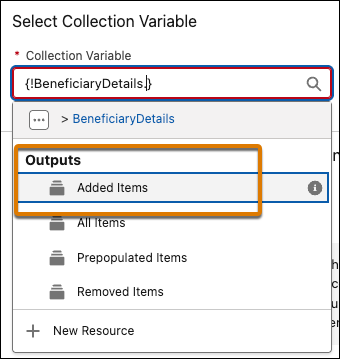
Add and Configure a Loop Element
To process the output of the Repeater add a loop element.
- For the Label, enter Loop through Added Items. The API Name autopopulates.
-
For the Collection Variable, under SCREEN, select Add
Beneficiaries > Beneficiary Details >
Added Items
Add and Configure an Assignment Element to Collect Beneficiary Details
For each added item, the assignment element assigns the fields from the single-value record variable to the record collection variable.
-
After For Each under the loop, click to add an Assignment element.
- For the Label, enter Add Beneficiary Details. The API Name autopopulates.
-
To set the values for the Beneficiary name, specify these values:
- For Variable, under Record Variables, select addedBeneficiaryDetails > Beneficiary Name
- For Operator, select Equals.
- For Value, under Loop, select Current Item from Loop Loop Through Added Items > Beneficiary Name
-
To set the values for email Address, enter these values:
- Click Add Assignment.
- For Variable, under Record Variables, select addedBeneficiaryDetails > Email address.
- For Operator, select Equals.
- For Value, under Loop, select Current Item from Loop Loop Through Added Items > Email Address.
-
To set the values for Address, enter these values:
- Click Add Assignment.
- For Variable, under Record Variables, select addedBeneficiaryDetails > Address
- For Operator, select Equals.
- For Value, under Loop, select Current Item from Loop Loop Through Added Items > Beneficiary Address
-
To add the beneficiary details to a record collection variable that'll be used in the
Create records element, enter these values:
- Click Add Assignment.
- For Variable, select beneficiaryCollection.
- For Operator, select Add.
- For Value, select addedBeneficiaryDetails.
Add and Configure a Create Records element to Create Newly Added Beneficiaries
- After the Loop element, add a Create Records element.
-
To configure the Create Records element, specify these values:
- For Label, enter Add New Beneficiaries. The API Name autopopulates.
- For How Many Records to Create, select Multiple.
- Under Record Collection, select beneficiaryCollection.
- Save the flow.
- For the Flow Label, enter Add Beneficiary Information. The API name autopopulates.
-
Click Save.

Run the flow and add one or more beneficiaries. Go back to the Beneficiary Record page and see the newly added beneficiaries under the All Beneficiaries related list.