You are here:
Improve Data Quality by Validating User Input
Screen flows are great at reducing manual data entry but it's important that the data you collect is error-free. Make sure your screen flow users are entering information correctly by validating their input.
Required Editions
| View supported editions. |
| User Permissions Needed | |
|---|---|
| To open, edit, create, activate or deactivate a flow using all flow types, elements, and features available in Flow Builder, including Einstein and Agentforce for Flow: | Manage Flow |
Screen elements and screen components have some built-in user input validations for your screen flows at run-time. If you want to check for more than the standard validations, create custom validations for user input. To create a custom validation, use a Boolean formula to check the user input and a custom error message to guide the user.
Standard Validation for Screen Elements
If the user leaves a required field blank, the flow shows the default standard error message, even if you set a custom error message on that screen component.
Standard Validation for Screen Components
The standard validation varies, depending on the screen component. For example, the Number screen component allows only numbers. Review the standard validation for screen components. If a screen component isn’t in the table, it doesn’t have built-in validation.
| Screen component | Validation description |
|---|---|
| Currency | Only numbers allowed |
| Email format (test@email.com) | |
| Number | Only numbers allowed |
Custom User Input Validation
If the standard validation doesn’t work
for your situation, you can create a custom user input validation. The custom validation
uses a formula resource with a formula that checks for the user input in the format that you
want. The formula expression must return a Boolean value (true or
false). If the formula expression evaluates to true, the
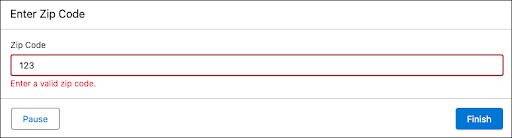
user input is valid. If the formula expression evaluates to false, the user
input is invalid and your custom error message appears below the component.
Learn more about creating custom validation in Create Custom User Input Validation
When a Custom Validation Error Message Displays
The validation can occur after the user clicks a button to move away from the screen, or as soon as the user enters something incorrect. The default is to validate when a navigation button is clicked.
To check the user's input right after they start typing something incorrectly, you can reference screen components on the same screen in the validation formula
Tips for Creating Custom Validations
- In regular expressions, use a double backslash to escape any characters that start with
a slash. For example,
\dbecomes\\d. - For a component to reference itself in the Validate Input section, you must click away from the component configuration pane after you add it to the screen. This saves its state before you attempt to reference it.
Custom Validation Considerations
- Validating record collections or Apex-defined type collections isn’t supported.
- Is Blank and Is Null operators aren’t supported in input validation formulas.
- At run time, if a user leaves a component blank, the component's value isn't validated for these components: Checkbox, Checkbox Group, Choice Lookup, Currency, Date, Date & Time, Long Text Area, Multi-Select Picklist, Number, Password, Picklist, Radio Buttons, Text.
- If the validation formula references a resource on the same screen element as the formula, some formula functions aren't supported. For example, REGEX. For a list of supported formula functions, see Reactive Screen Flow Formula Operators.
- If a validation formula references a resource on the same screen element as the formula, some validation functionality won't work as expected until the formula evaluates true and back to false.
Create Custom User Input Validation
Add input validation to a flow screen component in a screen flow.
-
Open the Flows list view.
- From Setup, in the Quick Find box, enter Flows, and then select Flows.
- From the Automation app, select the Flows tab.
- From the Flows tab in any Lightning app, click the actions menu and select Open Flow.
-
Create a screen flow.
- From the Automation app or the Flows tab, select New | Screen Automations | Screen Flow.
- From Setup, click New Flow | Screen Automations | Screen Flow.
-
Add a Screen element.
- Click [Add element plus icon], and select Screen.
-
For Label, enter a descriptive name. For example, Collect Contact Details.
The API name autofills.
- For Description, enter a helpful description of what the element does. For example, Collects information about the contact to create.
-
In the Validate Input section, define the values allowed for the component by entering a
Boolean formula. In the formula, reference the correct output for the component.
- If the component has one output, reference the component itself. For example, for a
Text component labeled Cancellation Reason, reference
{!Cancellation_Reason}. - If the component has multiple outputs, reference the specific output of the component.
For example, for an Email component labeled Contact Email, reference
{!Contact_Email.value}.
- If the component has one output, reference the component itself. For example, for a
Text component labeled Cancellation Reason, reference
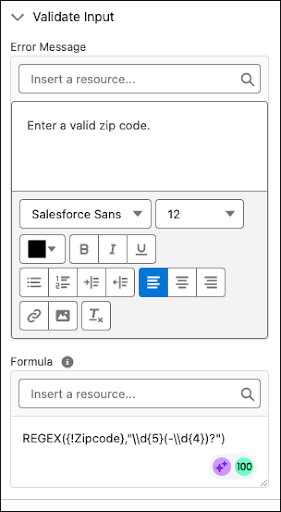
Example 1: This formula validates the format of a zipcode in a Text component.
REGEX({!Zipcode},"\\d{5}(-\\d{4})?")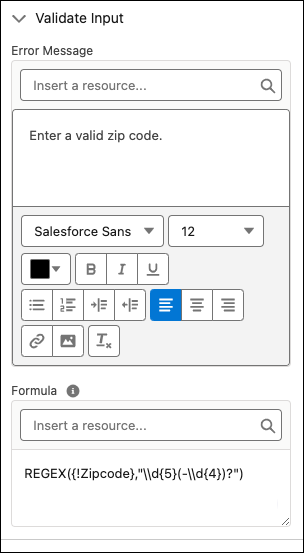

Example 2: This formula validates that a user uploaded at least one file in a File Upload component.
NOT({!fileUpload.contentDocIds} = "[]")