You are here:
Create a Named Credential for the Tooling API
To work correctly, the credential that you create must have the API name Tooling_API_Credential.
Required Editions
| Available in: all editions except Starter |
| User Permissions Needed | |
|---|---|
| To create named credentials | Customize Applications |
To complete this task, you need the value of the callback URL in the authentication provider created in the Create an Authentication Provider for the Tooling API task.
- From Setup, in the Quick Find box, enter Named Credentials, and then select it.
- Click the dropdown next to New and select New Legacy.
-
Enter the values:
- Label: Tooling API Credential
- Name: Auto-populates as Tooling_API_Credential
- URL: The domain from the callback URL that shows in the authentication provider. For example, if the callback URL is https://www.example.com/services/authcallback/PermhelperAuth, then the domain is https://www.example.com.
- Identity Type: Per User
- Authentication Protocol: OAuth 2.0
- Authentication Provider: The authentication provider created in the Create an Authentication Provider for the Tooling API task.
- Scope: refresh_token full
-
Select the Callout Options.
- Select the checkboxes for Generate Authorization Header and Allow Merge Fields in HTTP Body. Leave the other fields blank.
-
Save your changes.
You’re prompted to log into your org.
- Log in at the prompt.
-
At the connected app authorization screen, click Allow.
When you’re redirected back to the Named Credential screen, the Administration Authentication Status field shows Authenticated as (your login).

Example
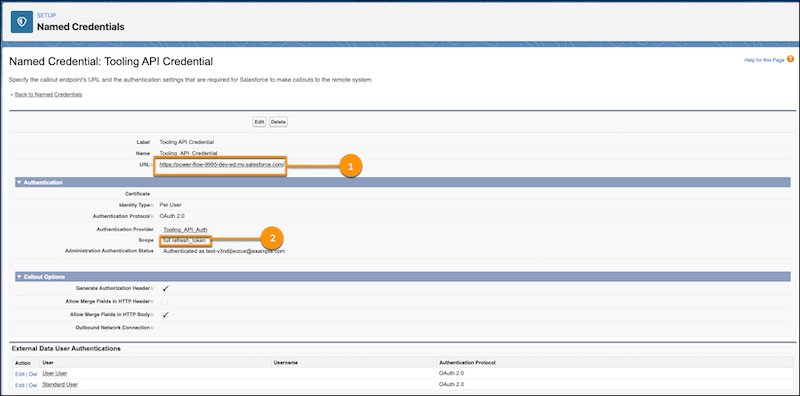
Named Credential Example with URL and Scope Highlighted
(1) The URL with the domain value. (2) The scope.
Continue to Create a Permission Set to Use the Named Credential.
Did this article solve your issue?
Let us know so we can improve!
