
Loading
Feature degradation | Gmail Email delivery failureRead More
Manage Your Billing Processes with Salesforce Billing
Table of Contents
Select Filters

          No results
          No results
          Here are some search tips

          Check the spelling of your keywords.
          Use more general search terms.
          Select fewer filters to broaden your search.

          Search all of Salesforce Help
          Correct Errors on Posted Debit Notes

          Correct Errors on Posted Debit Notes

          Salesforce Billing must retain a copy of all debit notes for legal and accounting purposes. To fix an error on a posted debit note, create a credit note of equal value and allocate it to each of the original debit note’s lines. The allocation reduces the erroneous debit note’s balance to zero. You can then create and post a debit note with the correct values. (Salesforce Billing Managed Package)

          Required Editions

          Available in: All Salesforce Billing editions

          Salesforce Billing follows Generally Accepted Accounting Principles. The principles require that users must always be able to track the posting of credits, debits, payments, and refunds through a series of allocations back to a business’s general ledger. To ensure that these records are always available for legal and accounting purposes, Salesforce Billing doesn’t allow you to delete credit notes, debit notes, payments, or refunds. If you make an error, offset the erroneous record by reducing its balance to zero, and then creating a record with the correct values.

          1. If the debit note has any allocated lines, unallocate them first.
          2. Create a credit note with one credit note line for each of the erroneous debit note’s debit note lines.
            1. From the affected account’s Credit Notes related list, click New Credit Note.
            2. Set your credit note date to the current date, then save your changes.
            3. Go to the credit note’s Credit Note Lines related list and click New Credit Note Line.
            4. Set the credit note line’s product to the same value as the debit note line’s product.
            5. Set the credit note line’s subtotal to the same value as the debit note line’s balance, then save your changes.
              We also recommend adding a note explaining that you created this credit note line to offset a debit note line created in error.
            6. Repeat Steps A through E for each of the debit note’s debit note lines.
            7. Change your credit note’s status to Posted.
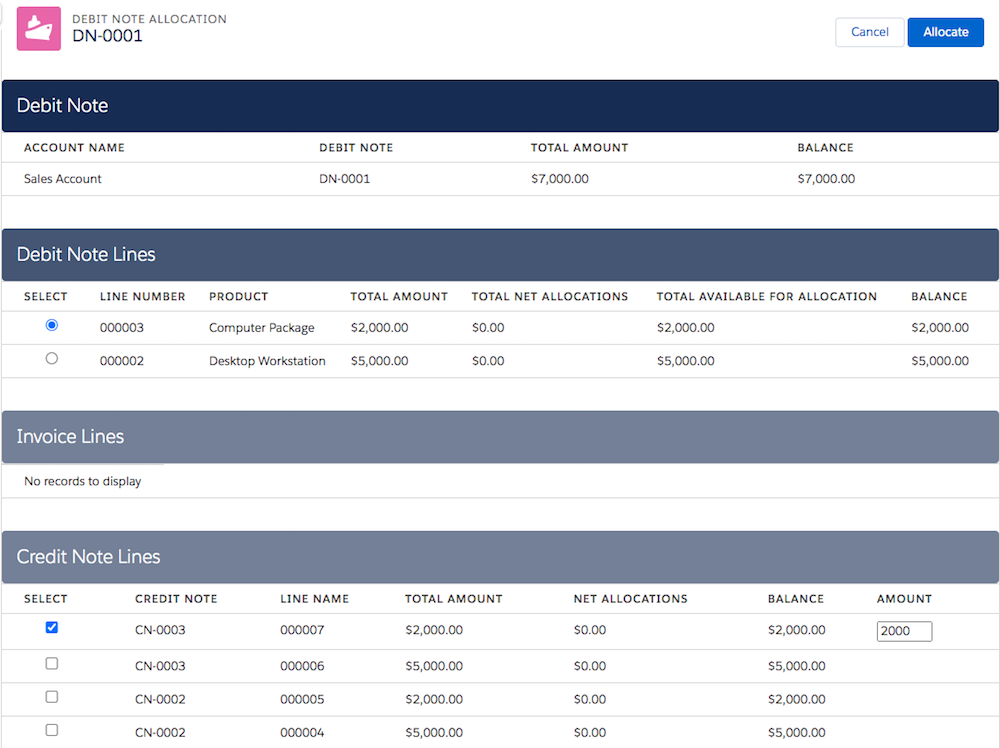
          3. Go to the debit note that you want to cancel and click Allocate.
          4. Allocate each of your credit note lines to the equivalent debit note line.
            1. Select the debit note line that you want to cancel.
            2. Select the credit note line that you created with an equivalent balance.
            3. On the credit note line, enter an amount equal to the debit note line’s balance, then click Allocate.
            4. Repeat steps A through C for each of the erroneous debit note’s debit note lines.
              When you finish offsetting all the debit note lines, the debit note has a balance of 0.
          5. To return to your credit note detail page, click Cancel.
            Clicking Cancel doesn’t cancel any of the allocations that you made.
          Example
          Example In this example, a user must offset an erroneous debit note containing two debit note lines. They have created credit note CN-003, which contains two credit note lines that each match the balance of the debit note lines. They will first allocate credit note line 7 to debit note line 3, and then allocate credit note line 6 to debit note line 2. In this example, a user must offset an erroneous debit note containing two debit note lines. They have created credit note CN-003, which contains two credit note lines that each match the balance of the debit note lines. They will first allocate credit note line 7 to debit note line 3, and then allocate credit note line 6 to debit note line 2.
           
          Loading
          Salesforce Help | Article