
You are here:
Upload Team Assignments in Salesforce Spiff
Manage large updates to your team assignments in Salesforce Spiff by bulk-uploading team assignment records.
Required Editions
| Available in: both Salesforce Classic (not available in all orgs) and Lightning Experience |
| Available in: Enterprise, Unlimited, and Developer Editions |
| Available for an additional cost in: Professional Edition with Web Services API Enabled |
| User Permissions Needed | |
|---|---|
| To upload team assignments: | A Spiff user role with these permissions turned on.
|
Teams must be created before uploading team assignments. The team assignment template contains six fields. Three fields are required for import.
| Field | Required? | Description |
|---|---|---|
| user_id | Required | The external ID of the user being assigned to a team. This value can be found in the Users table in the User External Id column. |
| effective_as_of | Optional | Determines the start date of the team assignment. Dates must be in the YYYY-MM-DD format. This value can be updated in the UI after upload. |
| effective_until | Optional | Determines the end date of the team assignment. Dates must be in the YYYY-MM-DD format. This value can be updated in the UI after upload. |
| is_manager | Required | A Boolean field indicating if the user should be assigned as a team lead (TRUE) or team member (FALSE). |
| external_id | Optional | The unique identifier for each team assignment, since a user can be assigned to multiple teams. Duplicate entries overwrite the existing team assignment. The same ID must be used when updating team assignments or creating a new record. This value can be updated in the UI after upload. |
| team_name | Required | The name of the team to which the rep is assigned. The team must already exist in the system or the record will error. |
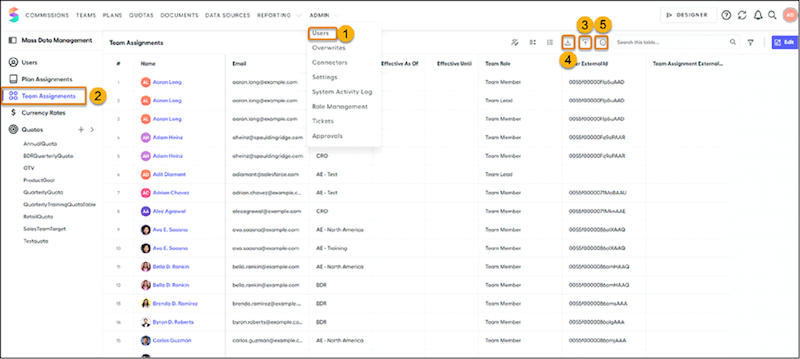
- In the Admin menu, select Users (1).
-
Select Team Assignments in the left panel (2).
-
Download the example template.
- Click the upload button near the top-right corner of the screen (3).
- Then click Download the example file on the modal.
-
Add new team assignment records to the file.
- To edit the file manually, open the example .csv file in a text editor, and add the new team assignment records to the file.
- If you use a spreadsheet program like Microsoft Excel to add your team assignment information, apply the correct date formatting. Because date formats change when the .csv file is opened in Excel, revert the format to the correct YYYY-MM-DD format by placing a ' mark at the front of the date. For example, the 1/1/2025 date can be updated to the correct format by entering '2025-01-01 in the cell.
When you edit the file, don't edit the field headers on the template. Make sure that the three required fields are specified for each record. Delete the example records or they’ll be uploaded to the system. Although the field isn’t required, we highly recommend creating a unique external_id for each plan assignment record. This ensures a smooth process if you anticipate updating records by bulk upload. Use the same external_id for records you attempt to update through upload. -
(Optional) Edit existing plan assignment records.
- Download the Team Assignment table. Click the download icon in the top right of the table (3) to export a .csv file of all existing team assignment records.
- For any record that needs changing, edit the Effective As Of or Effective Until entries. Remember to use the YYYY-MM-DD format.
- Copy the updated records from this table and paste them into the example file.
-
Upload the file.
- Click the upload button near the top-right corner of the screen (3).
-
Click Browse your computer or drag and drop the
file.
A notification appears indicating the upload is in progress.
- Click the link to navigate to the File Import Status page. You can access this page by clicking the "i" indicator on the table settings (5).
The File Import Status Table provides details about each upload, including important information like Status (Complete or Imported with Errors), Validation Alerts that link to the error message, and timestamps of the imports. If a file contains errors, only the records with errors are rejected.
Did this article solve your issue?
Let us know so we can improve!
