
You are here:
Options for Salesforce Synced Objects and Fields in Salesforce Spiff
After you set up a Salesforce connector and sync data into Salesforce Spiff, manage the synced objects and fields for better system performance and data coverage. On the Salesforce connector card, click the three dots, and select Synced Objects and Fields.
Required Editions
| Available in: both Salesforce Classic (not available in all orgs) and Lightning Experience |
| Available in: Enterprise, Unlimited, and Developer Editions |
| Available for an additional cost in: Professional Edition with Web Services API Enabled |
Turn Object Sync On or Off
If you previously set up data mapping for an object but you no longer need it, improve data flow performance by turning off sync for the object.
Click the eye icon next to the Salesforce connector name. In the window that opens, turn sync on or off for each object.
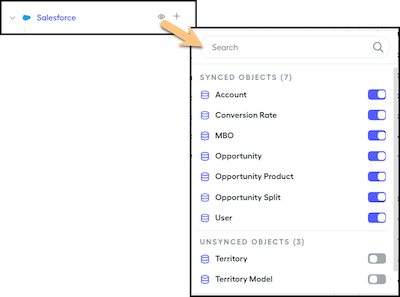
- To turn sync off, toggle the switch for a synced object.
- To turn sync on, toggle the switch for an unsynced object.
When sync is turned off for an object, the object appears in the Unsynced Objects section at the bottom of the list. Data isn't updated for any unsynced object during a subsequent sync.
Turn Field Sync On or Off
When sync is turned on for an object, you can turn sync on or off for the each of the object's mapped fields.
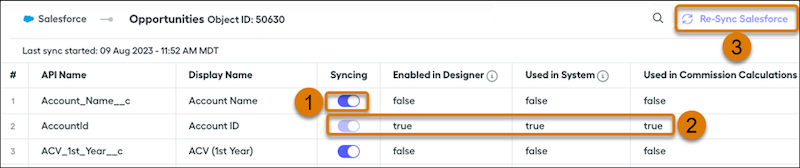
Select an object from the left panel and toggle the switch in a specific field’s Syncing column (1).
You can't turn off syncing for a field if the field is enabled in Designer, used in the system, or used in commission calculations (2). Manage syncing for fields in Designer from the Syncing/Unsyncing Objects & Fields page.
For each field that's turned on, Spiff imports data during subsequent data syncs. To trigger a sync for all connector data, click Re-Sync Salesforce (3).
Sync Other Available Objects
Click the + icon and select an object from the menu. The object appears in the list of synced objects.
To start syncing the added object, click the three dots and select Re-Sync Object Now.
Rename an Object
Click the three dots next to an object name and select Rename Object. Renaming an object changes the object’s display name, but not the API name. Display names aren’t required to be unique.
Deactivate Unused Fields
To turn off sync for all unused fields in an object, click the three dots next to the object name and select De-Activate Unused Fields.
This action turns off sync for any field that isn’t enabled for use in Designer, used in the system, or used in calculations. Turning off sync significantly decreases the amount of data pulled into Spiff with each sync.
Back-Date Object Sync
When Spiff syncs Salesforce data nightly, or after you manually re-sync, Spiff requests only records that have a Last Modified Date since the sync's date and time. Sometimes, records are missed because the sync request didn't look far enough back in time. Or, maybe you selected a shorter time period for syncing data when you first set up the Salesforce connector, and now you want to select a longer time period.
To add records that weren’t already synced for the object, click the three dots next to the object name and select Back-Date Object Sync.
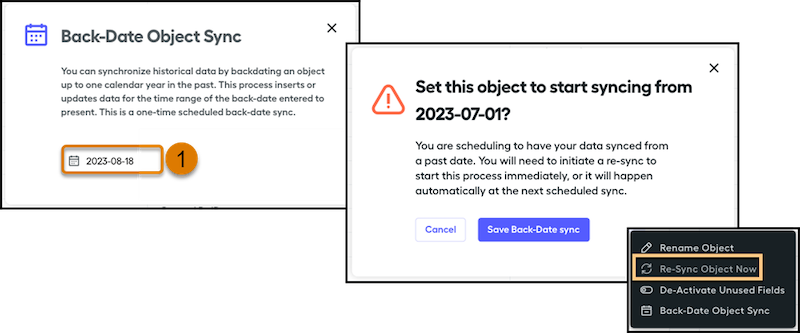
Select a date that you want to sync data from (1) and save. For the back-dating to take effect, select Re-Sync Object Now or wait for the nightly sync.
Keep these considerations in mind when back-dating the sync for Salesforce objects.
- You can select a back-sync date up to two years in the past, but be thoughtful about how far back you set this sync date. For large objects with millions of rows, setting the sync date back more than a couple of months can cause a timeout error. If you’re running into this problem, consider submitting a support case for an incremental sync instead.
- Back-dating syncs work only for Salesforce objects.
- If you back-date but aren’t seeing data that you expect, check that sync is turned on for the object or field, and check whether the object has a
WHEREclause that’s applied extra filtering.

Filter with WHERE Clause
To filter synced Salesforce records with custom logic, click the three dots next to the object name and select Filter With Where Clause.
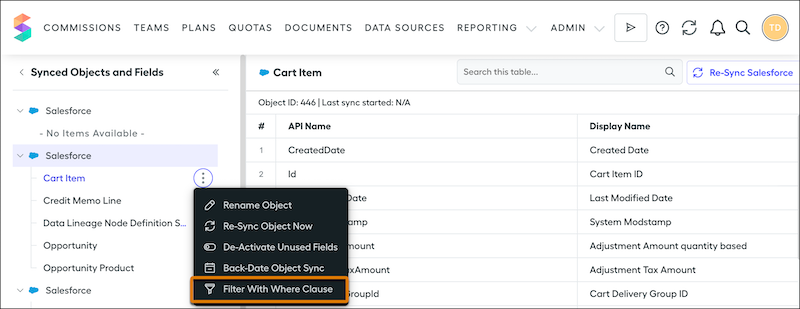
Enter a SOQL WHERE clause. For example, filter synced users, accounts, or opportunities to narrow and simplify the data that you work with in Spiff. See WHERE in SOQL and SOSL Reference.

WHERE
clause, but doesn’t validate that the clause returns any data. To test whether your
clause returns the results you expect, enter a clause, sync data, check your sync
logs for errors, and iterate if necessary. We recommend that only developers with
SOQL experience implement this filter. 