
You are here:
Set Up a Third-Party Connector in Salesforce Spiff
Salesforce Spiff REST API or a webhook processes all automated third-party data imported into Spiff. Send data to Spiff REST API or webhook endpoints directly or use an Integration Platform as a Service (iPaaS) tool, such as Workato. Workato provides a default Spiff connector that uses webhook endpoints for integrating third-party data with Spiff more easily. To purchase the Workato connector, contact your Salesforce account executive or sales partner. You can also use another iPaaS tool or design a custom solution.
Required Editions
| Available in: both Salesforce Classic (not available in all orgs) and Lightning Experience |
| Available in: Enterprise, Unlimited, and Developer Editions |
| Available for an additional cost in: Professional Edition with Web Services API Enabled |
| User Permissions Needed | |
|---|---|
| To manage a third-party connector: | Workato access AND A Spiff user role with these permissions turned on.
|

Create a Webhook in Spiff
A webhook provides an endpoint that Spiff uses to verify that the data source is legitimate and to request data from.
- From the Admin menu, select Settings.
- Scroll to the bottom of the left navigation panel and select Webhook Settings.
- Click Add Webhook.
- Make a note of the webhook ID and secret shown in the confirmation window.
The webhook ID and secret serve as your credentials for sending data to Spiff. If you close the window without copying these values, you can’t recover them. You can only generate new tokens. See Refresh Webhook Tokens in Salesforce Spiff.
The webhook appears in the list of active connectors on the Connectors page in the Admin menu.
Configure the Webhook Mapping
-
Go to the Synced Objects and Fields page.
- If you’re still on the Webhook Settings page, click the three dots next to the webhook and select Manage Mappings.
- From any other page in the app, go to the Admin menu, select Connectors, and then select Synced Objects & Fields.
-
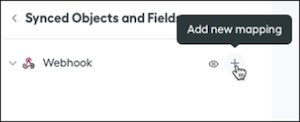
Hover over Webhook in the left panel and click the +
icon.
-
Complete the mapping form.
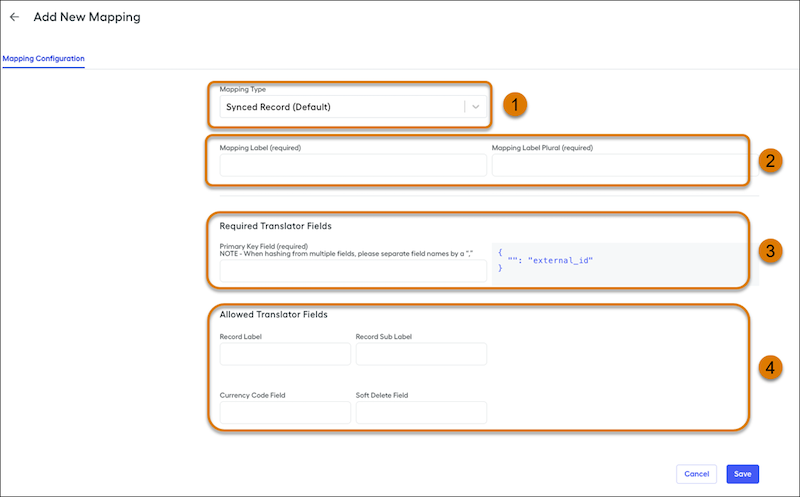
- Mapping Type (1) specifies the normalized mapping that determines how some other options behave. For custom objects, select Synced Record. You can’t change this value after you save.
- Mapping Label and Mapping Label Plural (2) specifies a name for the mapping.
- Required Translator Fields (3) specifies a JSON representation of the required fields. When you send data with a webhook, you send a JSON body with a list of structure objects. Every object type requires a unique external_id, and some normalized objects require other fields.
- Allowed Translator Fields (4) specifies the object’s other supported fields.
For example, if Mapping Type is User, each user has the fields name, email, and external_id. Include the field role or role_uuid depending on whether users have default Spiff roles or custom roles.
- If your users have default Spiff roles assigned, include the role field.
- If a Spiff admin created custom roles and your users have custom roles assigned, include the role_uuid field instead. Make sure that your data source specifies the custom role’s UUID. To find the UUID of a custom role, select the role on the Role Management page and copy the UUID from the page URL, such as
e9591490-cd7f-4309-84c7-061fdb6894e6.
- Save your changes.

Add Connector Fields
Because the data format for the connector is uncertain, create a connector field for each translator field that you specified in the mapping. For example, external_id is a required translator field and connector field for all objects.
-
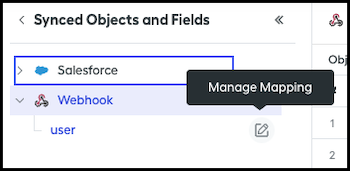
On the Synced Objects and Fields page, hover over the name of the mapping or object under the webhook, click the edit icon, and select Manage Mapping.
- Click the Connector Fields tab.
-
Click Add New Connector Field and add these values.
- For Name and Label, enter identical values.
- For Data Format, specify the data type for the field so that Spiff can parse and import the data correctly.
- Save your changes.
- Repeat these steps for other connector fields.
View or edit mappings and connector fields that you specified for a webhook on the Synced Objects and Fields page.

If you’re implementing a Workato integration, continue with the remaining steps.
If you’re implementing a custom integration with Spiff webhook endpoints, stop here and see Get Started with Salesforce Spiff Webhook API in the Salesforce Spiff Developer Guide for next steps.
Set Up Connections and Recipes in Workato
If you purchased the Spiff connector in Workato, other fields are available on the Webhook Settings page in Spiff. An embedded Workato window is also available.
- In Spiff, from the Admin menu, select Connectors and click Data Automation.
-
In the embedded Workato window, add the Spiff connection.
- Go to Projects | Connections.
- Search for Spiff and add the Spiff connection.
- Enter the webhook ID and secret that you saved when you created the webhook in Spiff.
-
Update the subdomain, depending on your region.
- If you’re in the US, use us1.
- If you’re in the EU, use eu1.
- Add another connection for the Inbound Data Source, such as BambooHR or Netsuite.
-
Configure Workato recipes.
- Go to Connectors From the Admin menu, click Data Automation, and then click Recipes.
-
Set up Workato recipes and connections to map your data to the correct fields in Spiff.
A recipe defines the components and rules for processing your data. For more information about working with Workato recipes, complete the Automation Pro I, Automation Pro II, and Automation Pro III certificate courses in Workato Academy. See Automation Pro Certificate Courses in Workato Academy.
-
Specify an email address for receiving connection or recipe error notifications.
- From the Admin menu, select Settings, and click Webhook Settings.
- Enter an email address and select a time zone.
- Save your changes.
Configure Salesforce Spiff to Sync with the Data Source
To make sure that the Global Sync option in Spiff also syncs Workato data, create a webhook-triggered recipe in Workato for importing your data. After you configure the webhook, Spiff sends a request to Workato that triggers your recipe.
- In Workato, create a webhook-triggered recipe. See Create a webhook with the wizard in Workato Docs.
- In Spiff, from the Admin menu, select Settings, and click Webhook Settings.
- Hover over the webhook, click the three dots, and select Edit Webhook.
- Enter the URL that Workato provided for the webhook-triggered recipe.
- Save your changes.
- Click the sync data icon in the top right corner of Spiff. Verify that the source system sends data to Workato and make sure that the data loads correctly in Spiff. Check all objects and resolve any errors in Workato.
- Complete user acceptance testing.
