
You are here:
Create a Data Filter in Salesforce Spiff
Create data filters in Salesforce Spiff without writing any code.
Required Editions
| Available in: both Salesforce Classic (not available in all orgs) and Lightning Experience |
| Available in: Enterprise, Unlimited, and Developer Editions |
| Available for an additional cost in: Professional Edition with Web Services API Enabled |
| User Permissions Needed | |
|---|---|
| To create a data filter: | A Spiff user role with this permission turned on. Designer Configuration: Manage |
Create a filter using Syntax, Simple Guided, or Nested Guided mode, depending on your preference. We recommend the Nested Guided mode when you have AND or OR statements.
- In Designer, navigate to Filters under Data.
-
Hover over the name of the object that contains the data you want to filter, click the three dots, and select New Filter.
The new filter appears in the Filters list and the Filter panel opens.
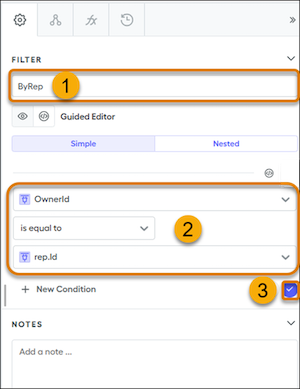
- Replace the default name (1) with a meaningiful name.
- Specify the criteria for your filter (2).
- To save your changes, click the blue check mark (3).
If you apply a filter in a datasheet, edit the filter from the right panel of the datasheet. Changes you make to a filter in a datasheet apply everywhere the filter is used and appear in the Filters view under Data.
To delete an unused data filter, right-click the filter in the navigation tree and select Delete Filter. Delete a filter only when you're sure that commission rules aren't referencing it.
