
You are here:
Upload Data in the Data Sources Page in Salesforce Spiff
To manually upload records into Salesforce Spiff, import .xlsx or .csv files that represent users, deals, accounts, or other objects.
Required Editions
| Available in: both Salesforce Classic (not available in all orgs) and Lightning Experience |
| Available in: Enterprise, Unlimited, and Developer Editions |
| Available for an additional cost in: Professional Edition with Web Services API Enabled |
| User Permissions Needed | |
|---|---|
| To import data: | A Spiff user role with this permission turned on. Data Sources: Edit |
Before you begin, review these important considerations for importing data.
- The maximum file size that Spiff can import is 5 MB. If your source file is larger, split the data into multiple files and upload them separately.
- Imported data is represented a table in Spiff. In your original file, each sheet represents an object in Spiff, and each column represents a field on the object.
- Name your import file for the table in Spiff that you want to map data to. If you name the file default, Spiff maps data to the table named
default. If you import different data later with a file that's also named default, Spiff can map that data to the wrong object and result in an error. - These column names are reserved and can’t be used in your import file:
company_id,created_at,CreatedAt,id,updated_at,UpdatedAt. - Field and object names can’t contain spaces. Double-check that field and object names and values have consistent spelling and capitalization. Avoid leading or trailing spaces, or replace spaces with underscores.
- Each object requires an External ID, which ensures that each field is unique. The field doesn't have to be named external_id. This ID also helps link data between different objects.
- Avoid calculated fields or formulas in source data. Sometimes, Spiff doesn’t import these values correctly.
- Spiff data filters can’t use normalized fields. If you upload users and then later you want to filter by name or ID, first copy the normalized fields in the upload file. After the upload is complete, go to Sync/Unsync Objects & Fields and turn on sync for the copied fields.
- If you use a .csv file for importing data, take these extra steps.
- Delete empty columns.
- Format all currencies and percentages as numbers, and exclude symbols. If your data includes currencies different from the Company Currency set under Company Settings From the Admin menu, include a field for the currency code. For example, maybe you have an ARR field and ARRCurrencyCode field, where ARR is 15000.00 and the ARRCurrencyCode is EUR.
- Click Data Sources, hover over Data Imports, click the + icon, and import your file.
-
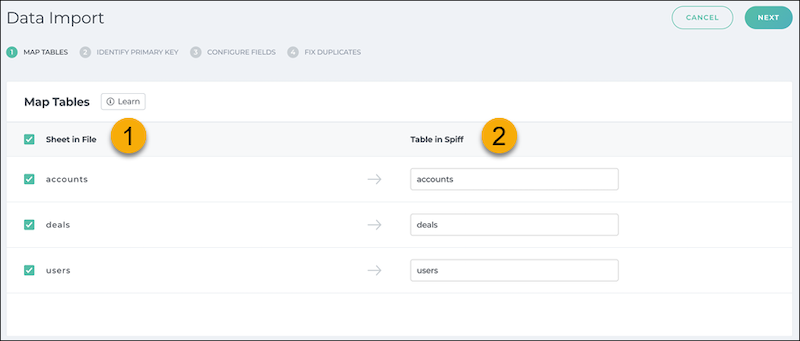
On the Map Tables step, verify that you're uploading data for the correct object.
-
Make sure that the sheet name in the upload file (1) is correct. Verify that the Table in Spiff value (2) is the name that you want to show for the data table in Spiff.
If you're importing new data for data that was previously imported, make sure that you use the same sheet and table names. If you use a different sheet name, the sheet shows a New Table tag. Consider modifying the name of the sheet in your import file to match the original sheet name so that the updated data maps to the correct object.
- Select the sheets that you want to import, and click Next.
-
Make sure that the sheet name in the upload file (1) is correct. Verify that the Table in Spiff value (2) is the name that you want to show for the data table in Spiff.
-
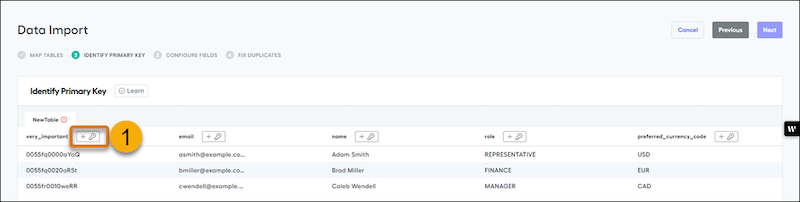
On the Identify Primary Key step, click the key icon (1) next to the field that want to use for the unique ID of the records you're importing.
-
On the Configure Fields step, verify that the column names from the imported sheet map to the correct Spiff fields.
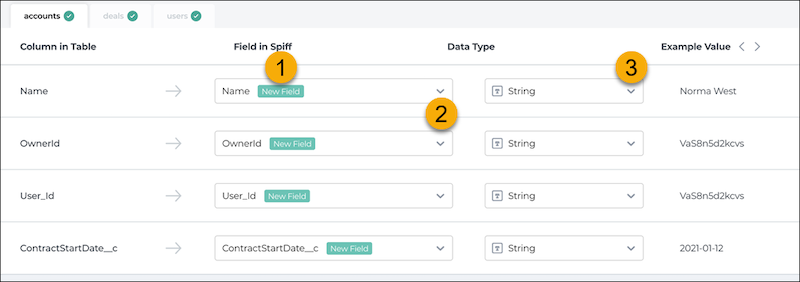
Spiff checks that each field name is valid and unique and doesn't contain special characters, spaces, or leading numbers.
If you're importing new data for data that was previously imported, make sure that you use the same column names for existing fields in Spiff. Otherwise, the row shows the New Field tag (1). To map to an existing field instead, select the field from the dropdown menu (2). If you intend to add a new field, you can edit the field name in this step.
If necessary, select a different data type (3) for each imported field.
 Important The data type that you select for each imported field must remain consistent when you import updated data later. Changing the data type for a field between imports can cause calculation errors. If you select an incorrect data type at first, reimport the data with the correct data type applied.
 -
On the Fix Duplicates step, specify how you want Specify to handle any duplicate records, which are records in the imported data that share a primary key value with another record.
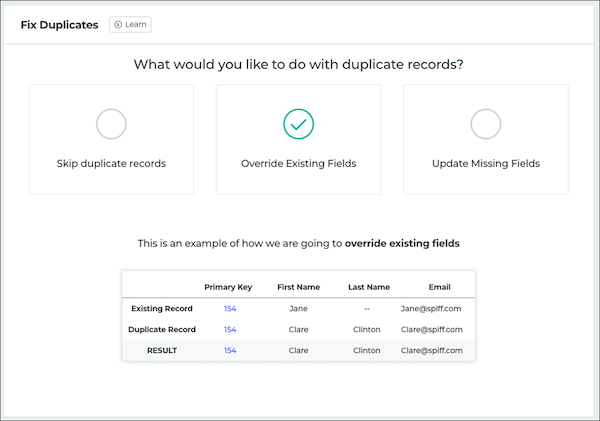
Skip duplicate records Spiff keeps data from the original record and ignores the new record. Override existing fields Spiff replaces data from the original record with data from the new record. Update missing fields Spiff updates data for fields that didn't exist on the original record, but ignores data for fields that already exist on the original record. This option is useful for adding fields.
After the import completes, Spiff shows the results.
- A green banner indicates that records were imported successfully.
- A purple banner indicates that at least one record was rejected.
- An orange banner indicates that all records were rejected.
