
You are here:
Import Users in Salesforce Spiff Manually
Admins can manually import users in Salesforce Spiff by downloading, modifying, and uploading a template .csv file. You can also add other admins.
Required Editions
| Available in: both Salesforce Classic (not available in all orgs) and Lightning Experience |
| Available in: Enterprise, Unlimited, and Developer Editions |
| Available for an additional cost in: Professional Edition with Web Services API Enabled |
| User Permissions Needed | |
|---|---|
| To import users: | A Spiff user role with these permissions turned on.
|

Download and Modify the Template
- From the Admin menu, select Users.
- Click Upload in the toolbar.
- Download and modify the template file with the users you want to add.
The template includes these columns.
| Column | Required? | Values |
|---|---|---|
| external_id | Required | Each entry must be unique. Duplicate entries overwrite the existing record. Use the same ID when updating users. |
| Required | Email of the user. You can modify this value after the upload is complete. | |
| name | Required | Name of the user. You can modify this value after the upload is complete. |
| role | Required for default roles | One of the default user roles in Spiff. You can modify this value from the Role Management page after the upload is complete. Use exact spelling.
See User Roles and Permissions in Salesforce Spiff. If you’re assigning custom roles, delete this column from the template and use the role_uuid column instead. |
| role_uuid | Required for custom roles | The alphanumeric UUID of a custom role that an admin created in Spiff. See Create a Custom Role in Salesforce Spiff. To find the UUID of a custom role, select the role on the Role Management page and copy the UUID from the page URL, such as |
| preferred_currency_code | Optional | Use three-letter ISO codes. At least one conversion rate for the currency must exist in Spiff, otherwise the record shows an error and the import fails. You can modify this value after the upload is complete. For supported currency codes and information about converting currencies, see Currency in Salesforce Spiff. |

Option 1: Upload the Modified Template
Spiff provides two ways to import the users you added to the template. The quickest option is to upload the modified file in the Users page of the Admin menu. This option maps the records in the .csv file to normalized Spiff user table entries for you. You don't have to specify the data mapping.
- In the Upload Your Users to Spiff window where you downloaded the template, browse to the file you downloaded and modified.
- To check for errors, click File Import Status in the toolbar.
- Review and fix any errors, and try the upload again, if necessary.
To edit users later, click Download in the toolbar, modify the downloaded .csv file, and upload the modified file. You can modify only email, name, role, role_uuid, and preferred_currency_code values.
Option 2: Add a Data Source
Alternatively, upload the .csv file through the Data Sources tab. This option requires some extra steps, but you have more control over the precise data mapping in Spiff. Users that you add from the Data Sources tab are available to reference in calculated fields or data filters in Designer.
- Make sure that the tab in the .csv file where you added user records is named users.
-
Complete the steps in Upload Data in the Data Sources Page in Salesforce Spiff.
-
On the Map Tables step, select users.
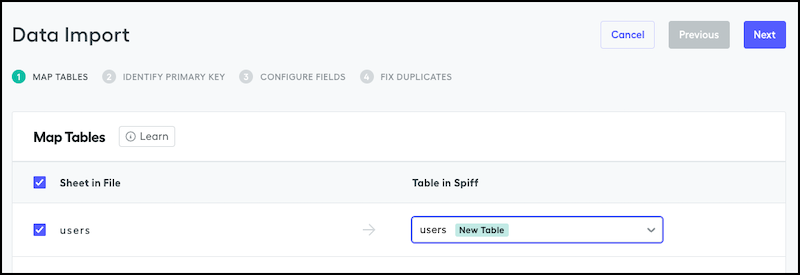 If the users table doesn’t appear, return to the original file and change the tab name to users.
 - On the Identify Primary Key step, verify that you selected the external_id field.
-
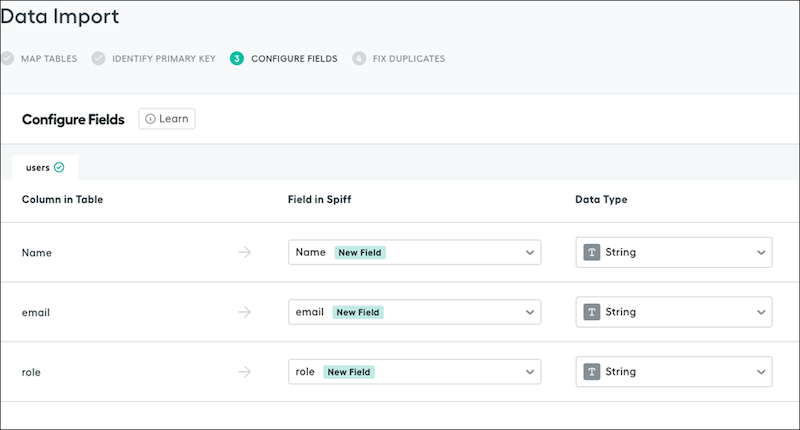
On the Configure Fields step, make sure that you map the data to the users table in Spiff. Verify that all fields are string data types.
-
On the Map Tables step, select users.
After the upload is successful, each user record appears under Users in the Data Imports section.
Next, invite the users to Spiff. See Invite Users to Salesforce Spiff.

