
Loading
Sales Performance Management
Table of Contents
Select Filters

          No results
          No results
          Here are some search tips

          Check the spelling of your keywords.
          Use more general search terms.
          Select fewer filters to broaden your search.

          Search all of Salesforce Help
          User Management in Salesforce Spiff

          User Management in Salesforce Spiff

          Each user in Salesforce Spiff has several attributes, such as their displayed name, email address, role (permissions), and default currency. Additionally, users are typically assigned to various teams, plans, and quotas. These attributes and assignments can all be managed by admins in the user management table and the user profile. Admins can use the user impersonation feature to log in as other users in the system. This lets them see the platform from that user’s point of view.
          Required Editions

          Available in: both Salesforce Classic (not available in all orgs) and Lightning Experience
          Available in: Enterprise, Unlimited, and Developer Editions
          Available for an additional cost in: Professional Edition with Web Services API Enabled

          The Users page under the Admin menu shows a table of all users in Salesforce Spiff.

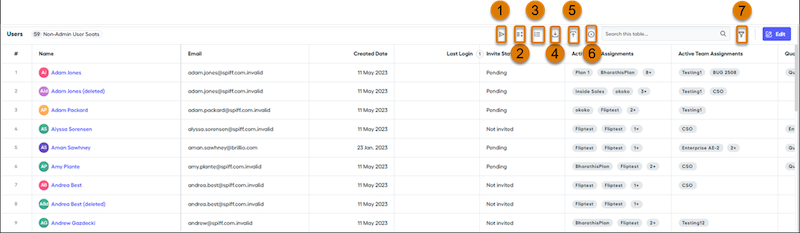
          Users table

          You can edit a user’s name, email, currency, and role.

          Select or drag and select multiple users and invite them to Salesforce Spiff by using the invite icon (1). When you send out initial invites to use Salesforce Spiff, users receive an email informing them that they have 30 days to activate their account.

          There are several actions you can perform on this page.

          • Change the display density (2).
          • Customize the fields displayed in the table (3).
          • Click the eye icon next to a field to display or hide it from view.
          • Download a CSV file with users and user information (4).
          • Manually upload new users to Salesforce Spiff (5).
          • View the status of a file import (6).
          • Filter the list of users by team, plan, invite status, or quota (7).
          • Click a user’s name to bring up their profile.
          • User Profiles in Salesforce Spiff
            On the User Profile for a specific user, you can see segments for User Info, Team Assignments, Plan Assignments, and Quotas. Admins can use the user impersonation feature to log in as other users in the system. This lets them see the platform from that user’s point of view.
          • User Roles and Permissions in Salesforce Spiff
            Give users the appropriate level of access so they can be successful in Salesforce Spiff, and enforce the principle of least privilege. Assign a default role to each user, or create custom roles with access to specific Spiff functionality.
          • Create a Custom Role in Salesforce Spiff
            Fine-tune access for incentive compensation plans and give stakeholders control of specific Salesforce Spiff functionality. If a default Spiff role doesn’t provide the appropriate permissions for a user, create a custom role using a default role as a starting point.
          • Adding Users in Salesforce Spiff
            Add users in Salesforce Spiff by creating individual users manually, importing a spreadsheet with details for multiple user records, or syncing user records from an connected external system, such as Salesforce.
          • Archiving User Accounts in Salesforce Spiff
            After you archive a user account, it’s hidden from Spiff. If you ever must assign this account to a new team or project, it won’t be available. You can unarchive the user account if needed.
          • Set Up Multi-Factor Authentication for Salesforce Spiff
            Multi-factor authentication (MFA) reduces the risk of unauthorized access to systems by requiring users to provide two or more verification factors, such as a password and mobile device with an authenticator app. MFA is optional in Salesforce Spiff and isn't available if your company uses single sign-on (SSO) authentication.
          • Set Up Single Sign-On for Salesforce Spiff
            Support a more efficient experience for users who log in to Salesforce Spiff by setting up SAML single sign-on (SSO) with an identity provider, including Google, Okta, and Microsoft Azure Active Directory. Configure settings in your identity provider and in Spiff.
          • Considerations for Logging in to Salesforce Spiff
            When a user signs in, Spiff checks whether their credentials are associated with single sign-on (SSO) or multi-factor authentication (MFA) systems. Troubleshoot the login flow for any users who are experiencing login issues.
          • Unlock a User Account in Salesforce Spiff
            After ten invalid login attempts by a user, their account is locked in Salesforce Spiff. When the user's account is locked, they receive an email notification. Only an admin can unlock the account.
           
          Loading
          Salesforce Help | Article