
You are here:
User Profiles in Salesforce Spiff
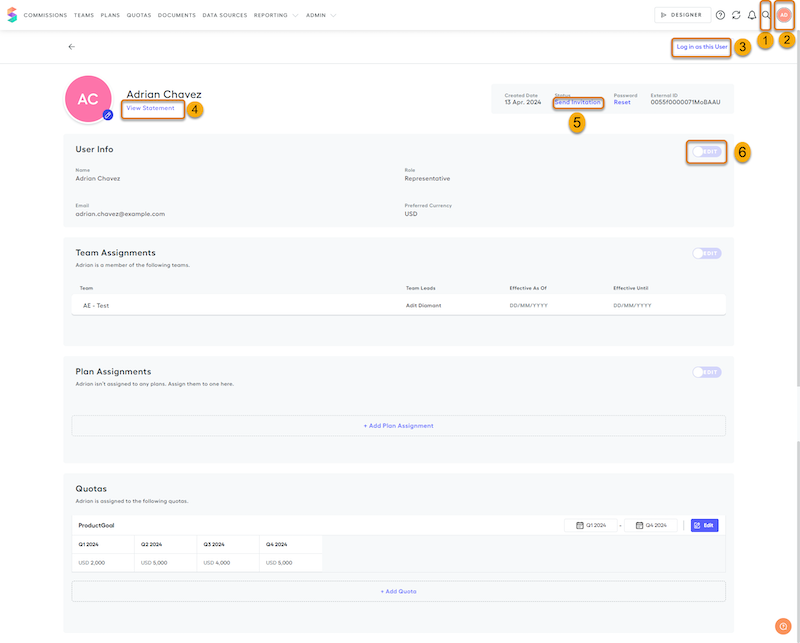
On the User Profile for a specific user, you can see segments for User Info, Team Assignments, Plan Assignments, and Quotas. Admins can use the user impersonation feature to log in as other users in the system. This lets them see the platform from that user’s point of view.
Required Editions
| Available in: both Salesforce Classic (not available in all orgs) and Lightning Experience |
| Available in: Enterprise, Unlimited, and Developer Editions |
| Available for an additional cost in: Professional Edition with Web Services API Enabled |
User Profile
To go to a user’s profile, in the Users table, click a user’s name in blue to open their profile. You can also use the global platform search option to navigate directly to a specific user. On the User Profile for a specific user, you can see segments for User Info, Team Assignments, Plan Assignments, and Quotas. You can also change the user information as well as any plan, team, or quota details related to the user. To make changes, click Edit (6) in any section.
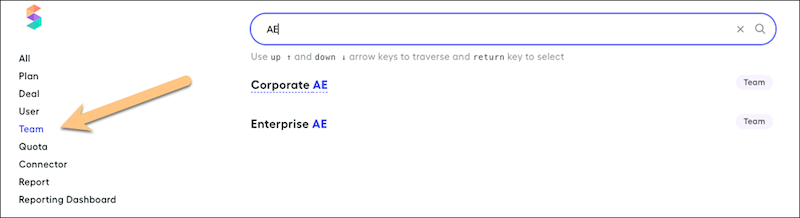
Global Search
Use the platform’s global search (1) to quickly find specific users, plans, deals, teams, quotas, reports, and more. Narrow your search by selecting a specific category from the menu on the left.
User Avatar
You can personalize your avatar by uploading a photo in your user settings, in the top-right corner of the interface. Your avatar is visible to other users based on their role and permissions.
User Impersonation
The User impersonation feature lets admins log in as other users in the system. This lets them see the platform from that user’s point of view. This feature is useful for troubleshooting issues, reviewing permissions, changing a user, and ensuring that everything is set up correctly before a system rollout. However, admins can't impersonate other admin users.
To impersonate a user, an admin must navigate to the user profile and then choose Log In As This User (3). A confirmation window appears, and upon confirming, the admin enters impersonation mode.
While impersonating, the admin has the same access and abilities as the user they’re impersonating, based on that user's roles and permissions. All changes made during this mode are recorded in the System Activity Log. The log shows that the admin is making changes, not the impersonated user,
To exit impersonation mode, click Exit Impersonation. Sessions are limited to 1 hour for security purposes, after which you can choose to end or continue the session. All activities during impersonation are logged for transparency and security.
User Info
In the User Info section, you can update the name, email, role, or preferred currency (if the currency is different from the company’s currency).
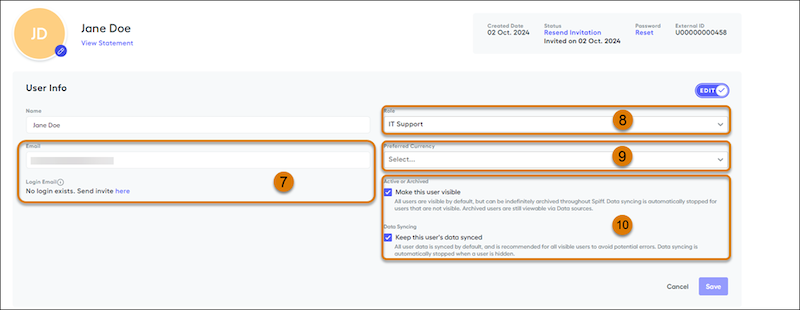
- Email and Login Email (7): Each user added to Spiff requires an Email field entry. This field isn’t required to be unique. However, we recommend that each email address is unique to one user ID. When you invite users to Spiff, the invitation is sent to the email address listed in this field. After the user logs in to Spiff for the first time, following an admin invitation, the email tied to their login will be added to the Login Email field automatically. To change the email tied to a user's login, click Edit, and then update the Login Email field. We recommend updating the Email field as well, so the two fields remain identical.
- Role (8): By default, users are given the Representative user role, which is the most basic role a user can get.
- Preferred Currency (9): You can update the preferred currency for a user if the currency is different from the company’s currency. The preferred currency dropdown appears only if you’ve synced or uploaded currency rates.
- Active or Archived (10): When Make this user visible is selected, the user is active. To archive a user, deselect this option. The user is set to Archived in all related plans, payout rules, and so on. To stop a user’s information updates from an external source or from Salesforce, deselect Keep this user’s data synced.
