
You are here:
Create a Custom Role in Salesforce Spiff
Fine-tune access for incentive compensation plans and give stakeholders control of specific Salesforce Spiff functionality. If a default Spiff role doesn’t provide the appropriate permissions for a user, create a custom role using a default role as a starting point.
Required Editions
| Available in: both Salesforce Classic (not available in all orgs) and Lightning Experience |
| Available in: Enterprise, Unlimited, and Developer Editions |
| Available for an additional cost in: Professional Edition with Web Services API Enabled |
| User Permissions Needed | |
|---|---|
| To create a custom role: | A Spiff user role with this permission turned on. Users: Edit |
- From the Admin menu, select Role Management.
-
Copy the role that you want to use as a starting point.
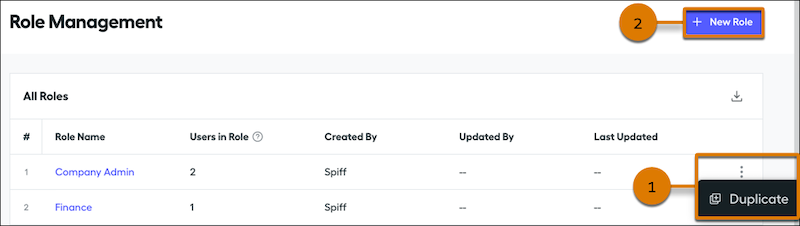
- From the list of roles, hover over the role that you want to copy, click the three dots menu, and select Duplicate (1).
- Or, click New Role (2) select the role that you want to copy. Enter a name and click Add New Role.
- To rename the role, place your cursor in the heading and enter a different name.
-
On the Permissions tab, select the permissions that you want to turn on.
-
If the permission description mentions prerequisite permissions, make sure that you turn on those prerequisites.
For example, the Designer Configuration: Manage permission requires that you also turn on permissions for editing data sources, statements, and more.
-
If the permission shows a dropdown for selecting the level of data access allowed, choose the appropriate option.
- My Own—Only the user’s data
- Teams I Manage—Only data for the teams that the user manages
- Company—Data for the entire company
-
If the permission description mentions prerequisite permissions, make sure that you turn on those prerequisites.
- On the Settings page, select the landing page in Spiff where users with the custom role arrive when they log in.
- Save your changes.
To edit a custom role after you create it, hover over the role, click the three dots menu, and select Edit. Or, select the role from the list and click Edit on the role details page.
After you create a custom role, wait up to two minutes before you can assign the new role to a user. After you edit a custom role that’s assigned to a user, wait up to two minutes before the user’s account reflects the changed permissions.
When you import user records from another source, you can specify custom roles when you import users manually, upload users with the object API, or sync user records with a webhook. If you use the Salesforce connector to import users, all users have the default Representative role assigned. You can later update roles manually from the Role Management page.
