
You are here:
Configure Callbacks for Salesforce Voice
Don’t make your customers wait when no rep is available to take their call. Give them an option to request a callback.
Required Editions
This article applies to:
Salesforce Voice (Native Telephony)
| View supported editions. |
| User Permissions Needed | |
|---|---|
| To configure callback in Agentforce Contact Center: | Agentforce Contact Center Admin (Salesforce Voice) permission set. Learn how to view permissions in this permission set. |
Salesforce Voice uses contact requests to store callback information for voice calls routed by Omni-Channel. A contact request is a Salesforce object that represents a customer’s request for your organization to get back to them about an issue or inquiry. At a scheduled time or when a rep becomes available, the contact request is pushed to the rep in the Omni-Channel utility. If you set up the feature to dial automatically, once the rep accepts the request, Omni-Channel initiates the callback by automatically dialing the customer’s number from the contact request. If you set up the feature so that reps can preview the contact request details first, reps accept the request then review details. To start the callback, they manually click to dial the outbound number specified in the contact request.
Consider Callback Configuration Options
You can set up callbacks for Salesforce Voice through one of these options:
- Interactive voice response (IVR): Configure an Omni-Channel flow that creates contact requests and routes them to reps.
- Web forms: Capture customer data via a web form to generate contact requests. Then use a record-triggered flow to route the contact requests to reps.
- Agentforce Voice: AI agents gather information and automatically create contact requests. An Omni-Channel flow then routes the contact requests to reps.
This article explains how to use IVR to create and route contact requests.
Before You Begin
- Create or edit a service channel that supports routing contact requests.
- Define or edit a routing configuration.
- Set Routing Model to Most Available or Least Active. External Routing isn’t compatible with Salesforce Voice (Native Telephony).
- Because the routing configuration is for a queue that handles callbacks as outbound voice calls, set Percentage of Capacity to 100%.
- Create or edit a queue. Add Contact Request as a supported object. Associate the queue with the routing configuration and add contact center reps to the queue. Reps in this queue must have access to a presence status where they’re available to receive and make voice calls and handle contact requests.
- Provision a number and add a Voice channel to your Agentforce Contact Center.
Configure Queued Callbacks through an Omni-Channel Flow
To route callbacks to available reps right away, without specifying callback timing, configure your IVR for queued callbacks. Create an Omni-Channel flow that offers the callback option, creates a contact request, and routes the request to a rep. Although the flow details can differ based on your business logic, the flow must cover the basics. Review the following example, which illustrates how to use an IVR in an Omni-Channel flow to create and route queued callbacks to a rep.
- In Flow Builder, create an Omni-Channel flow.
-
In the Manager tab, add variables for the Omni-Channel flow. For each of them, select Data
Type of Text.
-
Add a
recordIdvariable and mark it as available for input. -
Add a
CallerNamevariable. -
Add a
CallbackNumbervariable. -
Add a
CallerPhoneNumbervariable. -
Add a
contactRequestIdvariable.
-
Add a
-
To store a Salesforce Voice Call record ID in the recordId flow variable and store the
incoming caller’s phone number in the CallerPhoneNumber variable, add a Get Records action to
the flow.
- In the Object field, select Voice Call.
-
Add a condition where Voice Call ID equals recordId.
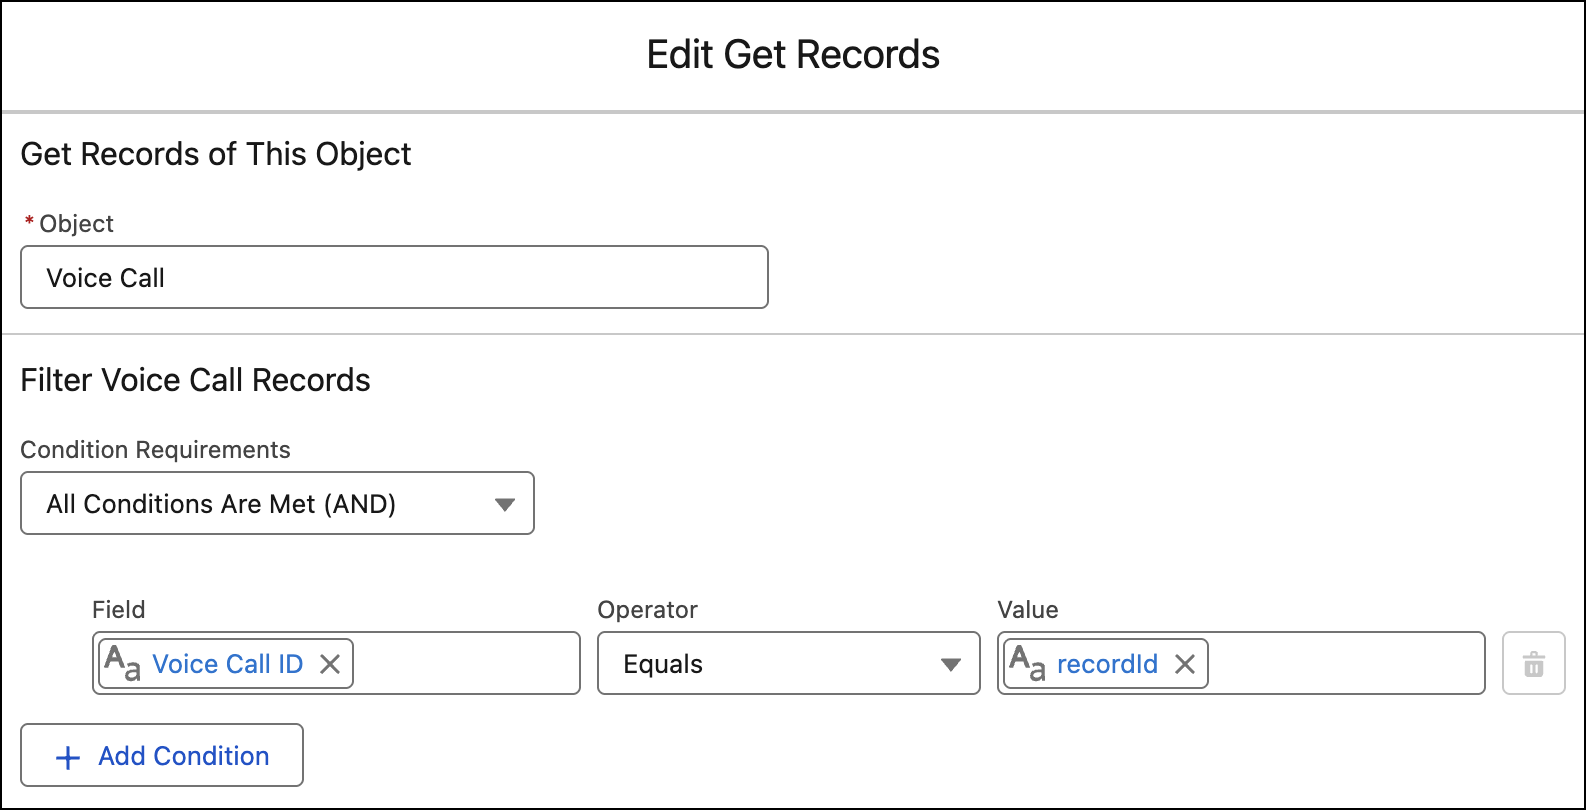
- For How Many Records to Store, select Only the first record.
- For How to Store Record Data, select Choose fields and assign values (advanced).
- For Where to Store Field Values, select In separate variables.
- In the Field field enter FromPhoneNumber, and in the Variable field enter CallerPhoneNumber.
-
To associate the Voice Call with a specific contact and store a name in the CallerName
variable, add another Get Records action to the flow.
- In the Object field, select Contact.
-
Add a condition where Business Phone equals CallerPhoneNumber.
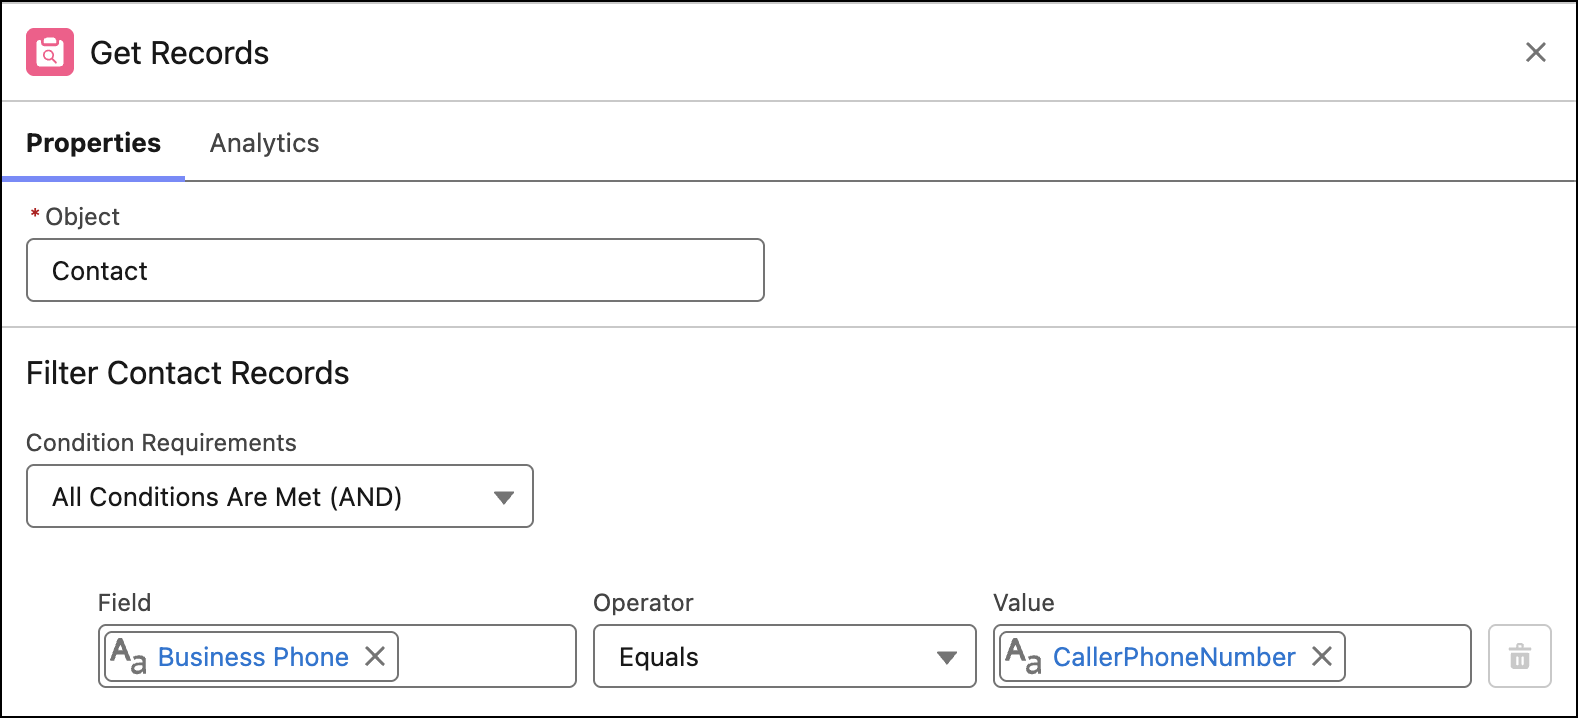
- For How Many Records to Store, select Only the first record.
- For How to Store Record Data, select Choose fields and assign values (advanced).
- For Where to Store Field Values, select In separate variables.
- In the Field field enter FirstName, and in the Variable field enter CallerName.
-
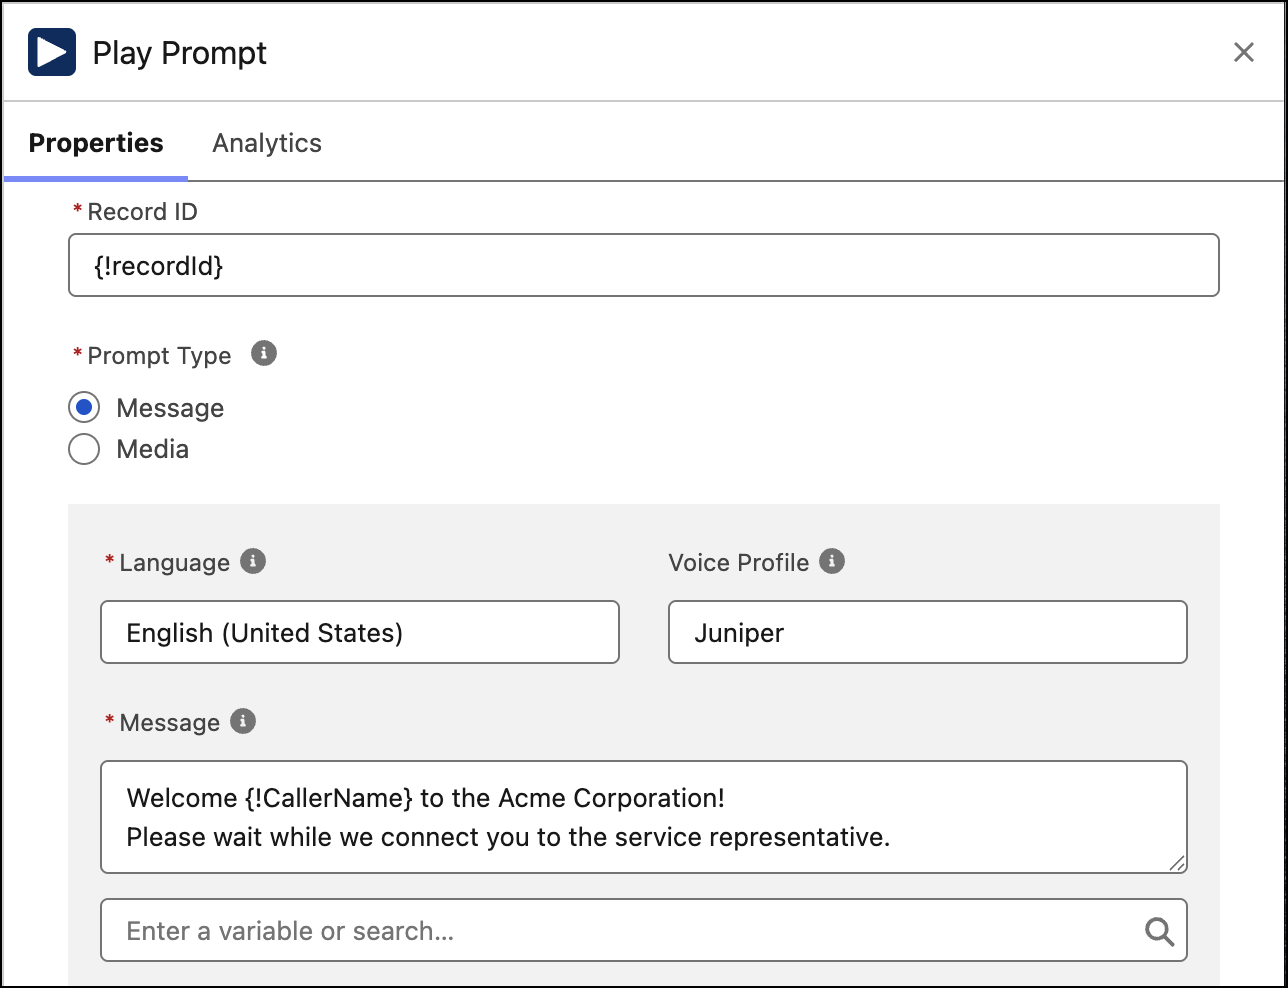
To welcome callers, add a Play Prompt action with a greeting.
- In the Record ID Variable field, enter {!recordId}.
- For Prompt Type, select Message to enter text read by an AI Voice Profile. Or, to use a prerecorded prompt, select Media.
-
To optionally personalize the greeting, use the CallerName variable in the message.
-
Optionally, to check queue status, add a Check Availability for Routing action.
- Select the Service Channel that supports voice calls, and Check Availability for Queue.
- Choose Select Queue, and select the queue that the call would get routed to.
- For Return Output, select Return all.
-
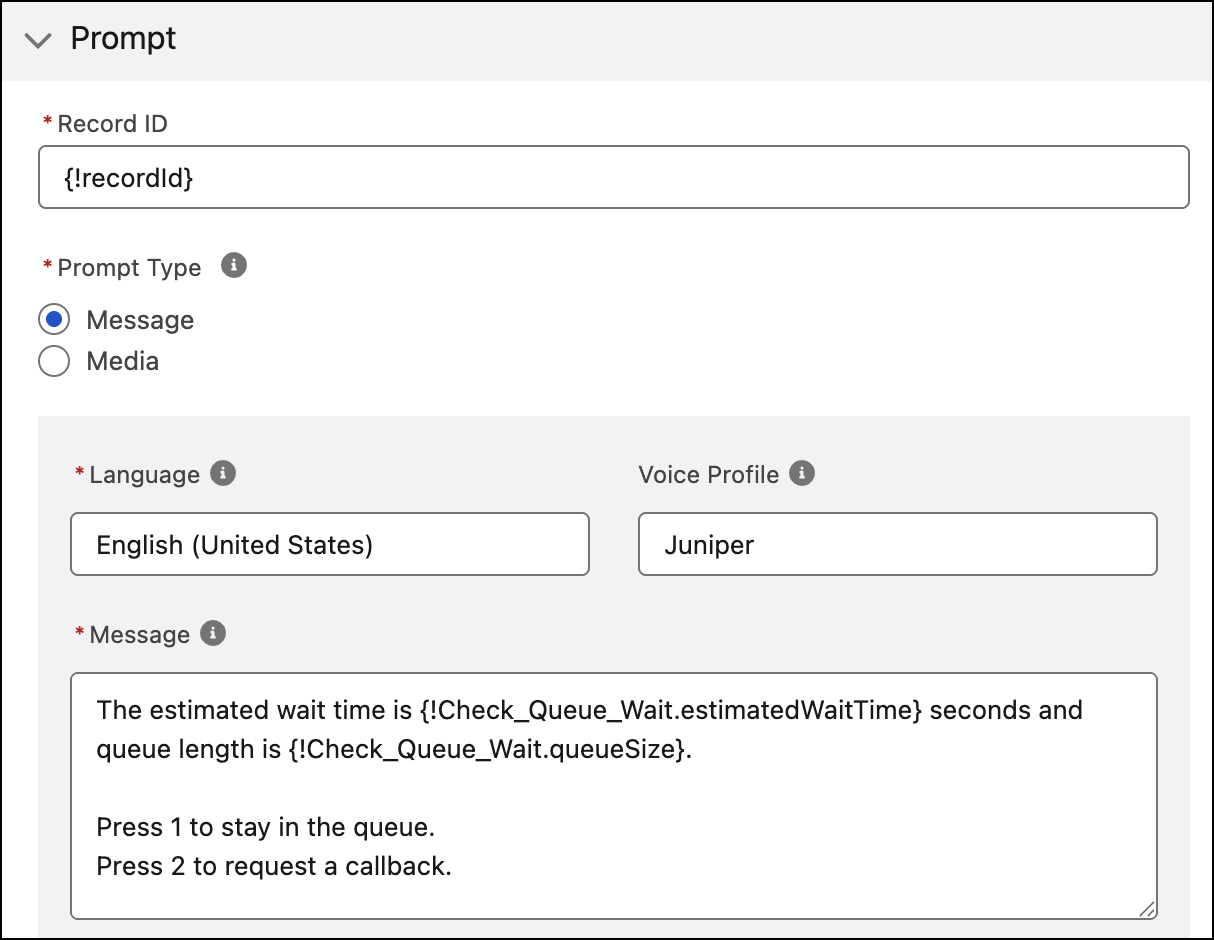
To the estimated wait time and prompt callers to choose whether to request a callback or
wait in a queue, add a Play Prompt action.
-
In the Record ID Variable field, enter
{!recordId}. -
For Prompt Type, select Message to enter text read by an AI Voice
Profile. Or, to use a prerecorded prompt, select Media. As an example,
your prompt can instruct callers to press 1 to stay in a queue or press 2 to request a
callback.
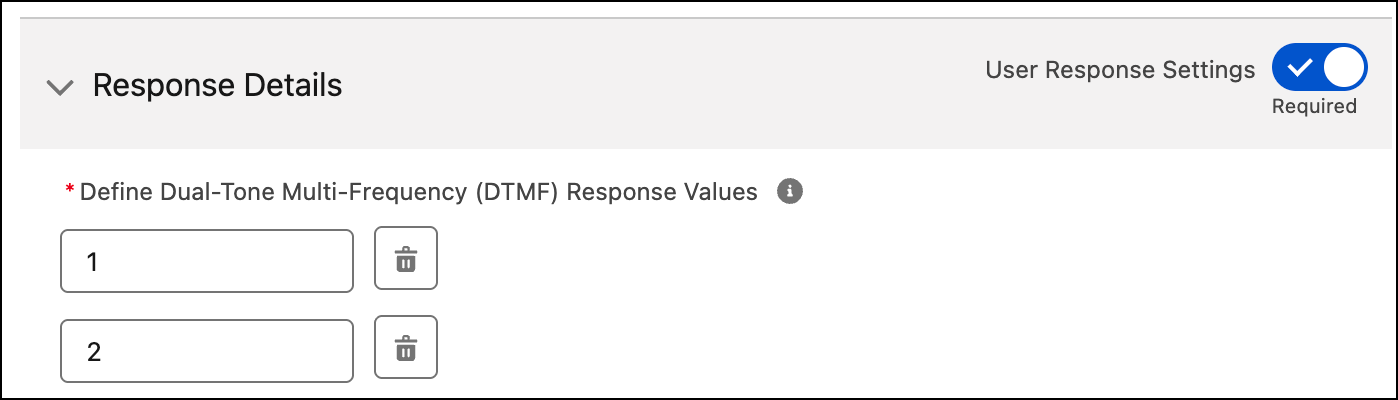
-
In Response Details, turn on User Response Settings. Enter
Dual-Tone-Multi-Frequency (DTMF) Response Values that match the instructions from your
prompt.
-
In the Record ID Variable field, enter
-
Add a Decision action.
- Add outcomes that correspond to outputs from the Play Prompt Action. For example, add a Queue option where the Dual-Tone-Multi-Frequency value equals 1 and a Callback option where the Dual-Tone-Multi-Frequency value equals 2.
-
For each Outcome, in the Resource field, search for Outputs, select the Play Prompt
action where you asked for a user response, and then select Dual Tone Multi-Frequency.
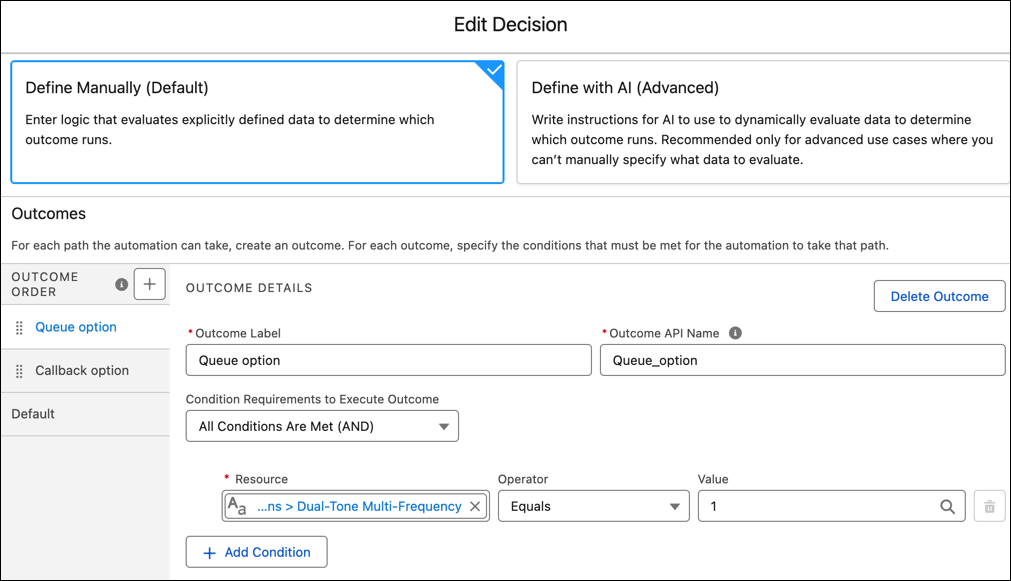
- For the Queue option, add a Route Work action to route the Voice call to a queue.
-
For the Callback option, you can optionally add logic to confirm the callback number and
give the customer the option to set a new callback number that’s different from the one they
called with. Then you set the callback number by using an Assignment action.
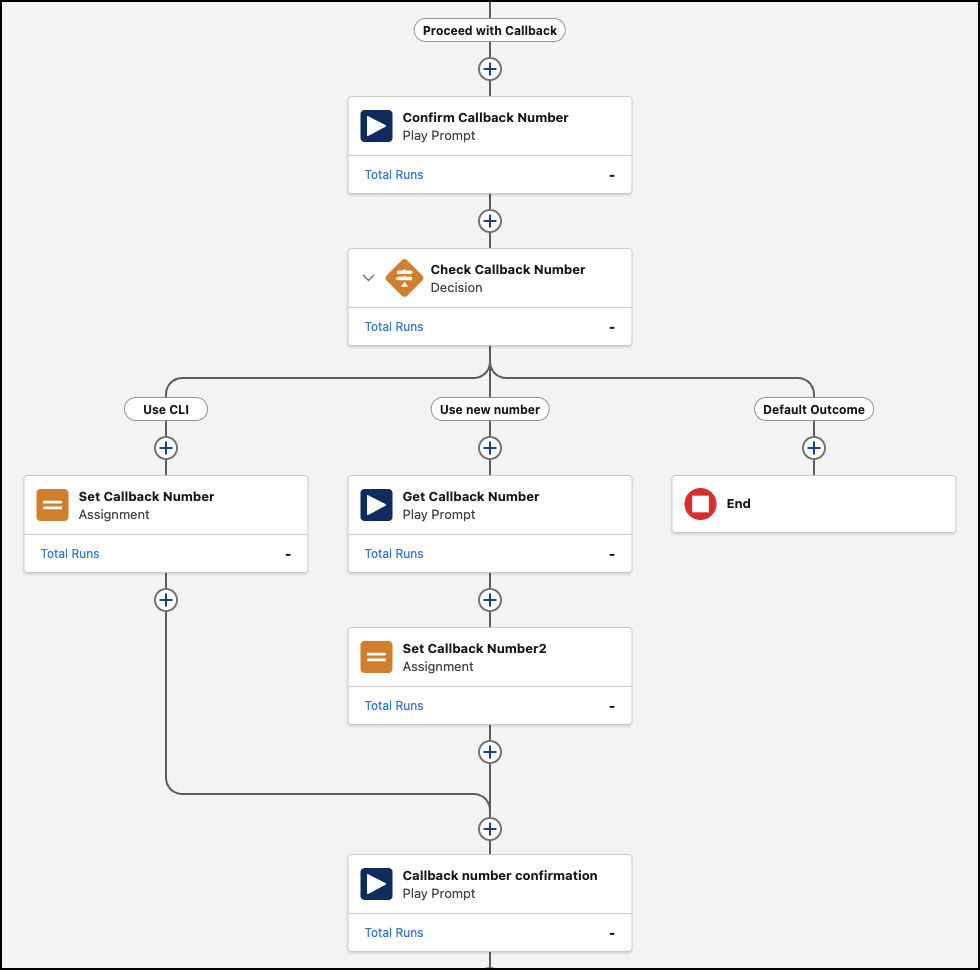
For a simplified example, add an Assignment action. In the Variable field, enter CallbackNumber. In the Value field, enter CallerPhoneNumber.
-
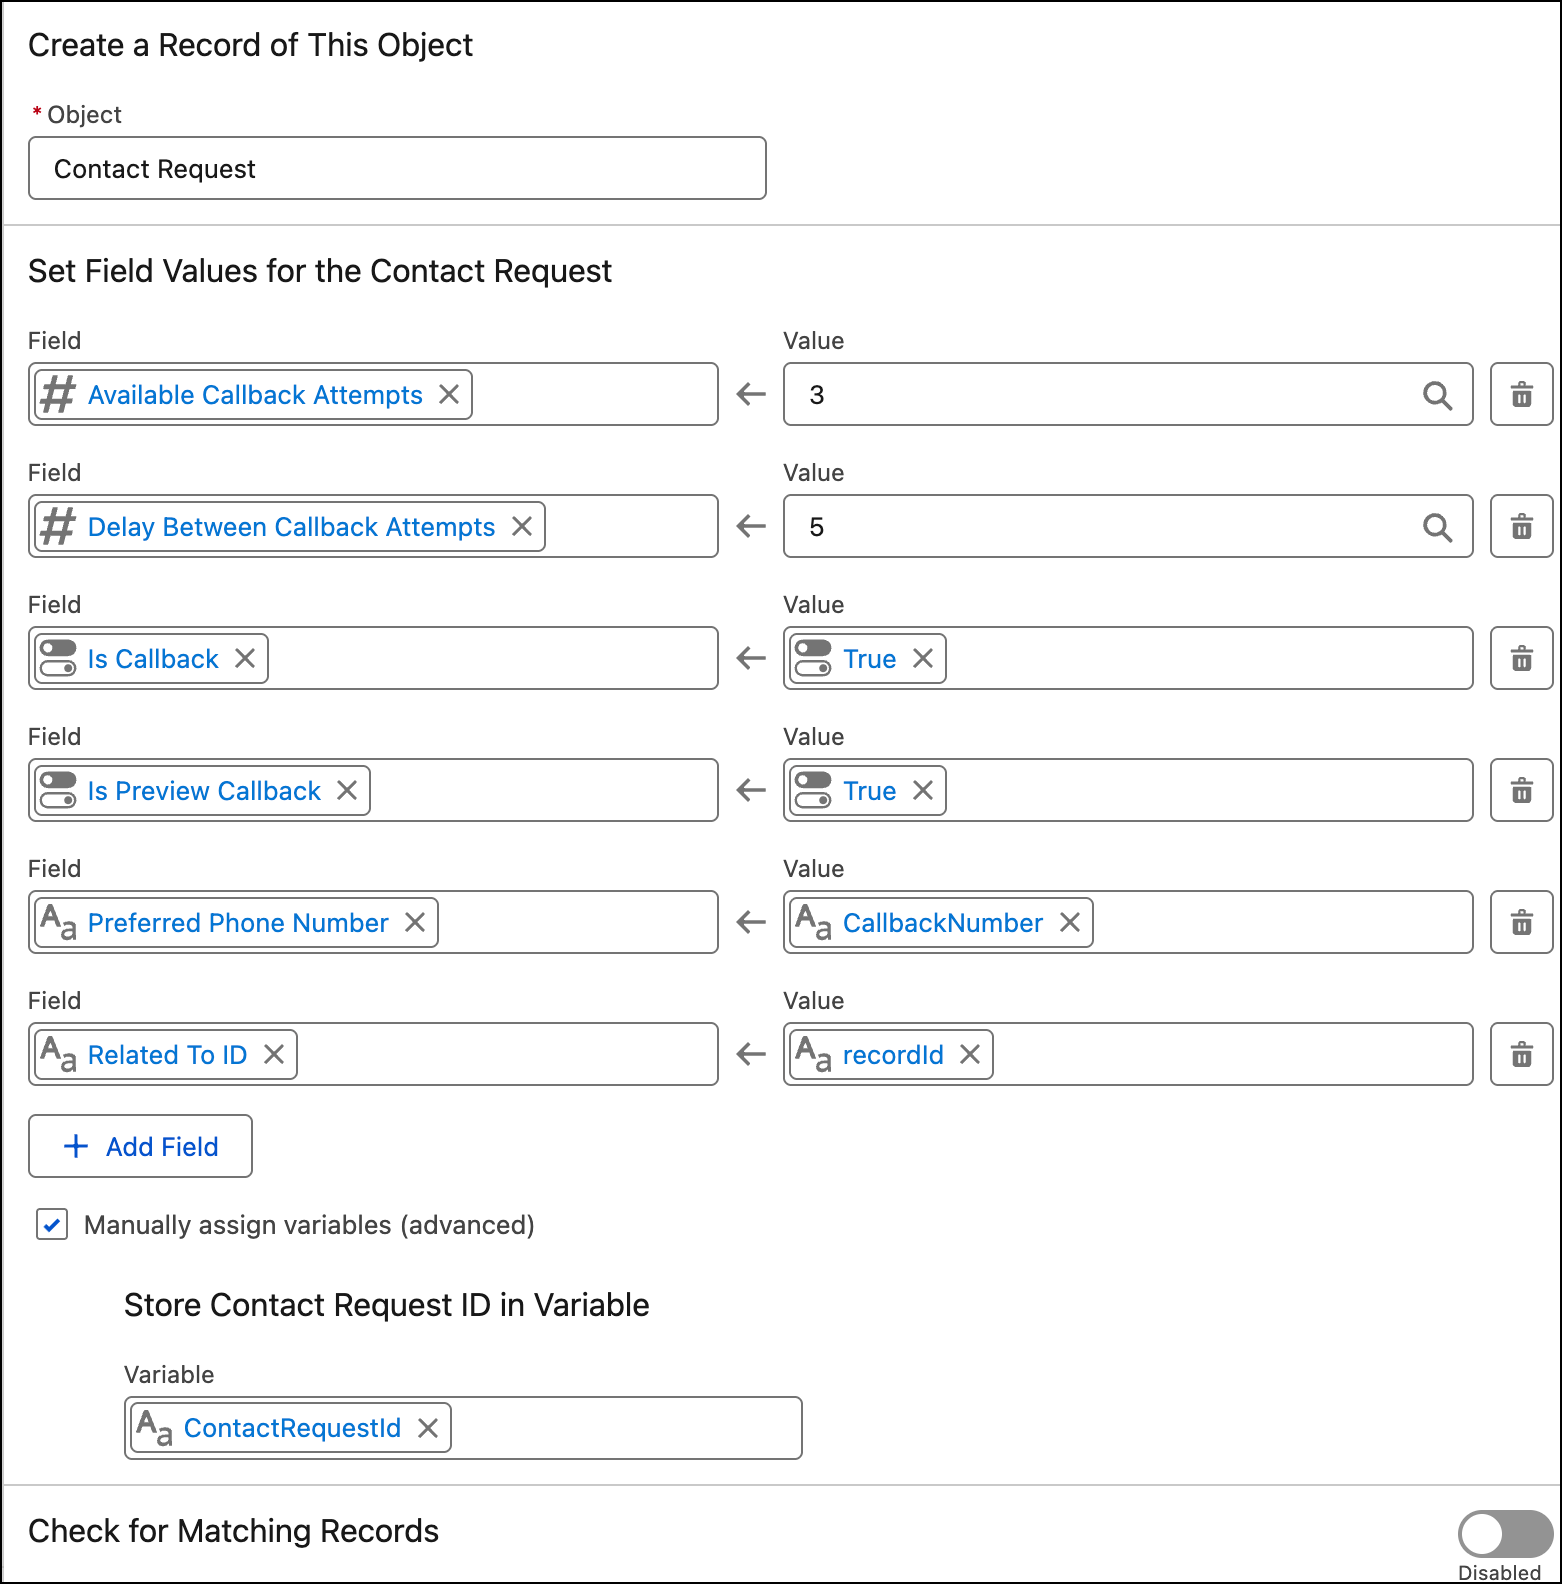
To create a Contact Request object and associate callback information with it, add a Create
Records action.
- Select Manually for How to set record field values.
- Select Contact Request as the object.
- To set values for the Contact Request fields, make selections in the Set Field Values section. See next steps for details.
- (Required) To mark the contact request as a callback, add the Is Callback field and set the value to True.
- (Required) To set a phone number for the callback, add the Preferred Phone Number field and set its value to CallbackNumber.
-
(Required) To relate the contact request to the voice call, search for WhatId and add the
Related To ID field, which represents the WhatId. Set its value to
recordId. - (Optional) To specify the service channel that handles callbacks, add the Preferred Channel field and set the value to the service channel that you created for voice calls.
- (Optional) To specify the number of callback attempts and delays between callback attempts, add the Available Callback Attempts and Delay Between Callback Attempts fields and set their values. The maximum callback attempts value is 5. The maximum delays between callback attempts value is 10,080 minutes (7 days). If you don’t set a number of callback attempts, the customer receives one callback attempt only with no callback retries.
- (Optional) To give the rep time to gather context and preview the contact request details before clicking to dial the outbound call to the customer, add the isPreviewCallback field and set the value to True. Without this field set to true, Omni-Channel dials the call automatically after it routes the contact request and the rep accepts it.
-
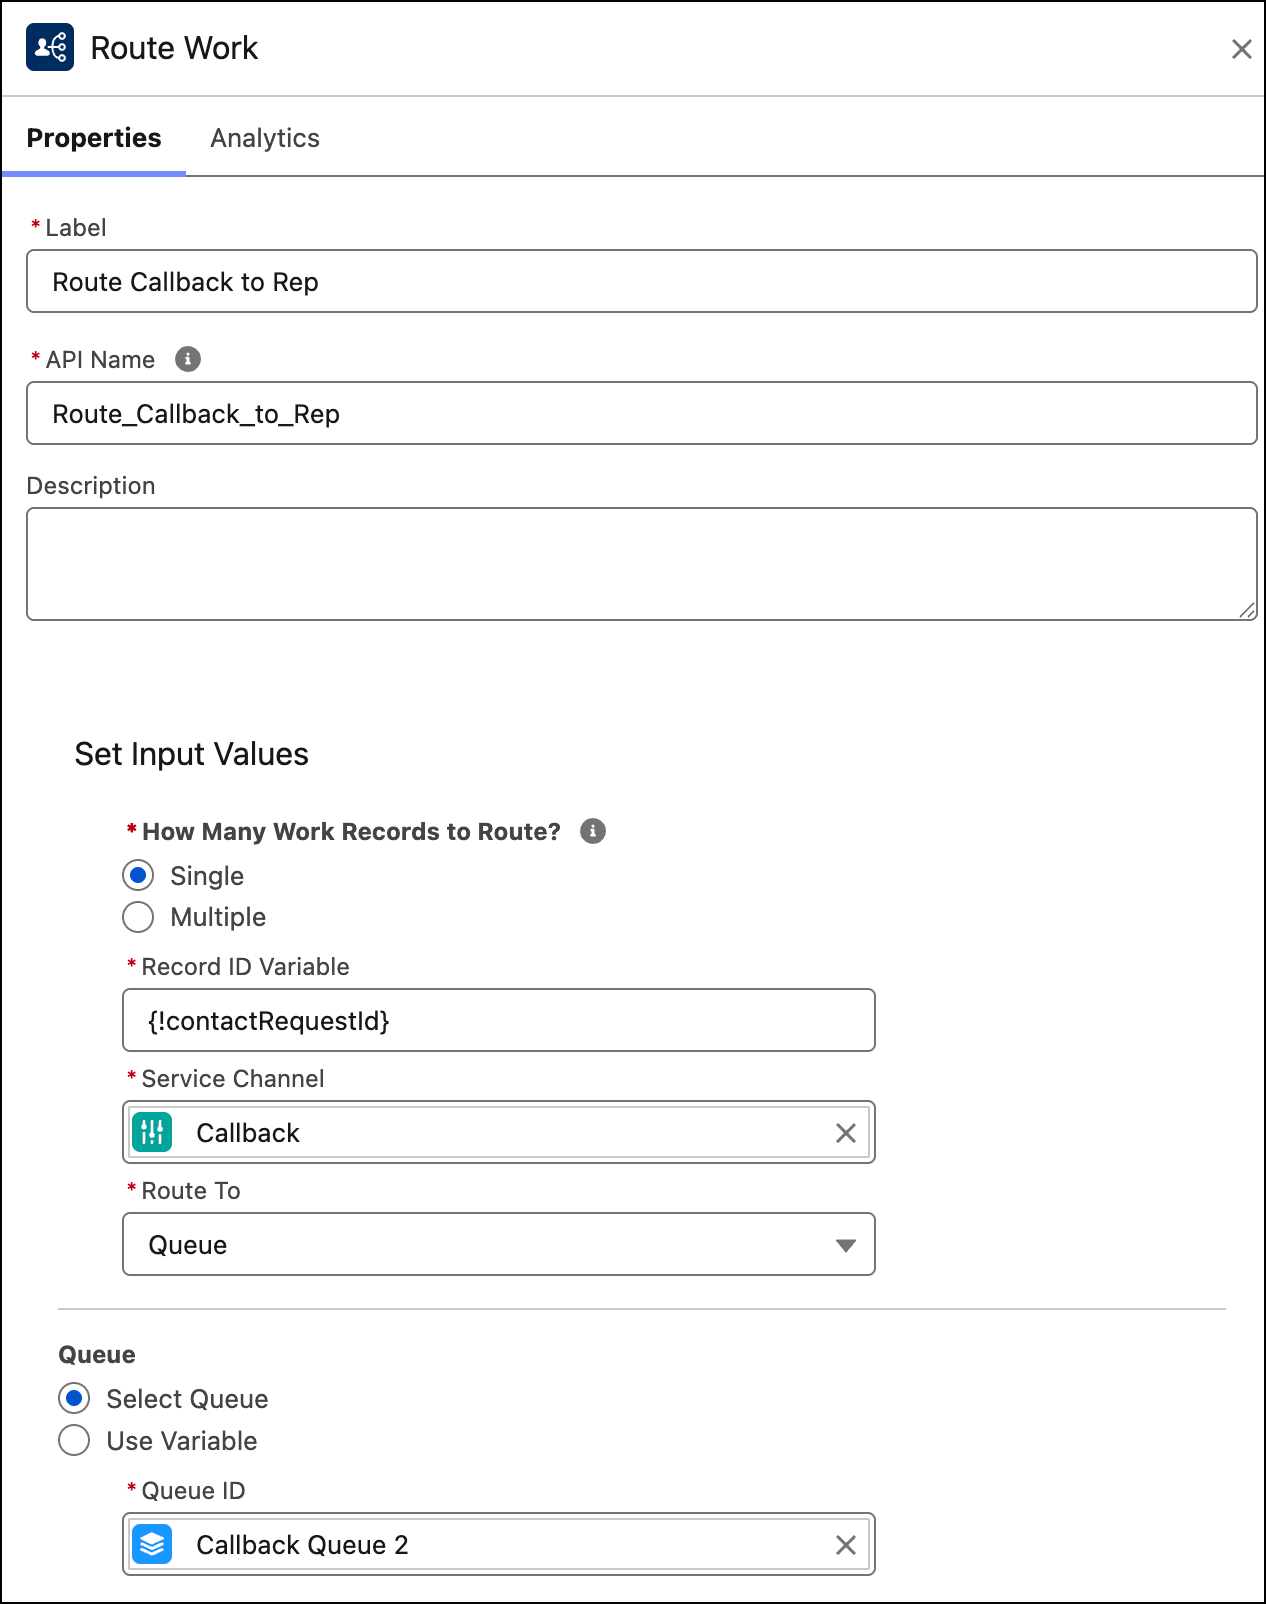
To route the callback, add a Route Work action.
- In the How Many Work Records to Route field, select Single.
-
In the Record ID Variable field, enter
{!ContactRequestId}. - Select the service channel that routes contact requests.
- In the Route To field, select a destination.
- To let the customer know that their callback request is processed, add a Play Prompt action with a message telling the customer that someone will return their call.
- To end the call, add an End Call action.
- Save and activate the Omni-Channel flow.
- To link the Omni-Channel flow to the claimed phone number, from Setup, in the Quick Find box, enter Communication Channels, and then select Communication Channels.
- In the All Channels tab, go to the channel you want to manage and click to see its details.
- In the Omni-Channel Routing section, click Edit.
- In the Routing Type field, select Omni-Flow. In the Flow Definition field, select the Omni-Channel flow that you created. Select a fallback queue.
- Save your work.
Configure Scheduled Callbacks through an Omni-Channel Flow
For scheduled callbacks, customers request a callback for a specific time, or admins control callback timing options. After a specified delay, Omni-Channel routes the contact request to a rep. Create an Omni-Channel flow that offers the callback option, creates a contact request, and routes the request to a rep at the specified time. Although the flow details can differ based on your business logic, the flow must cover the basics. Review the following example, which illustrates how to use an IVR in an Omni-Channel flow to create and route scheduled callbacks to a rep.
- In Flow Builder, create an Omni-Channel flow.
-
In the Manager tab, add variables for the Omni-Channel flow. For each of them, select Data
Type of Text.
-
Add a
recordIdvariable and mark it as available for input. -
Add a
CallerNamevariable. -
Add a
CallbackNumbervariable. -
Add a
CallerPhoneNumbervariable. -
Add a
contactRequestIdvariable. -
Add a
SlotHourvariable.
-
Add a
-
To store a formula for calculating a scheduled callback, in the Manager tab, add a formula
with the API name
ScheduledDateTime.- For Data Type, select Date/Time.
-
Enter a formula to calculate a time option for a scheduled callback. For example:
{!$Flow.CurrentDateTime} + (VALUE({!SlotHour}) / 24).
-
To store a Salesforce Voice Call record ID in the recordId flow variable and store the
incoming caller’s phone number in the CallerPhoneNumber variable, add a Get Records action to
the flow.
- In the Object field, select Voice Call.
-
Add a condition where Voice Call ID equals recordId.
- For How Many Records to Store, select Only the first record.
- For How to Store Record Data, select Choose fields and assign values (advanced).
- For Where to Store Field Values, select In separate variables.
- In the Field field enter FromPhoneNumber, and in the Variable field enter CallerPhoneNumber.
-
To associate the Voice Call with a specific contact and store a name in the CallerName
variable, add another Get Records action to the flow.
- In the Object field, select Contact.
-
Add a condition where Business Phone equals CallerPhoneNumber.
- For How Many Records to Store, select Only the first record.
- For How to Store Record Data, select Choose fields and assign values (advanced).
- For Where to Store Field Values, select In separate variables.
- In the Field field enter FirstName, and in the Variable field enter CallerName.
-
To welcome callers, add a Play Prompt action with a greeting.
- In the Record ID Variable field, enter {!recordId}.
- For Prompt Type, select Message to enter text read by an AI Voice Profile. Or, to use a prerecorded prompt, select Media.
-
To optionally personalize the greeting, use the CallerName variable in the message.
-
Optionally, to check queue status, add a Check Availability for Routing action.
- Select the Service Channel that supports voice calls, and Check Availability for Queue.
- Choose Select Queue, and select the queue that the call would get routed to.
- For Return Output, select Return all.
-
To share the estimated wait time and prompt callers to choose whether to request a callback
or wait in a queue, add a Play Prompt action.
-
In the Record ID Variable field, enter
{!recordId}. -
For Prompt Type, select Message to enter text read by an AI Voice
Profile. Or, to use a prerecorded prompt, select Media. As an example,
your prompt can instruct callers to press 1 to stay in a queue or press 2 to request a
callback.
-
In Response Details, turn on User Response Settings. Enter
Dual-Tone-Multi-Frequency (DTMF) Response Values that match the instructions from your
prompt.
-
In the Record ID Variable field, enter
-
Add a Decision action.
- Add outcomes that correspond to outputs from the Play Prompt Action. For example, add a Queue option where the Dual-Tone-Multi-Frequency value equals 1 and a Callback option where the Dual-Tone-Multi-Frequency value equals 2.
-
For each Outcome, in the Resource field, search for Outputs, select the Play Prompt
action where you asked for a user response, and then select Dual Tone Multi-Frequency.
- For the Queue option, add a Route Work action to route the Voice call to a queue.
-
For the Callback option, you can optionally add logic to confirm the callback number and
give the customer the option to set a new callback number that’s different from the one they
called with. Then you set the callback number by using an Assignment action.
For a simplified example, add an Assignment action. In the Variable field, enter CallbackNumber. In the Value field, enter CallerPhoneNumber.
-
To get a scheduled callback time from the customer, add a Play Prompt action. In this
example, we provide callback time slots.
- In the Record ID Variable field, enter {!recordId}.
- For Prompt Type, select Message to enter text read by an AI Voice Profile. Or, to use a prerecorded prompt, select Media. Ask the caller to select their preferred callback timing slot.
- In Response Details, turn on User Response Settings. Enter Dual-Tone-Multi-Frequency (DTMF) Response Values that match the instructions from your prompt.
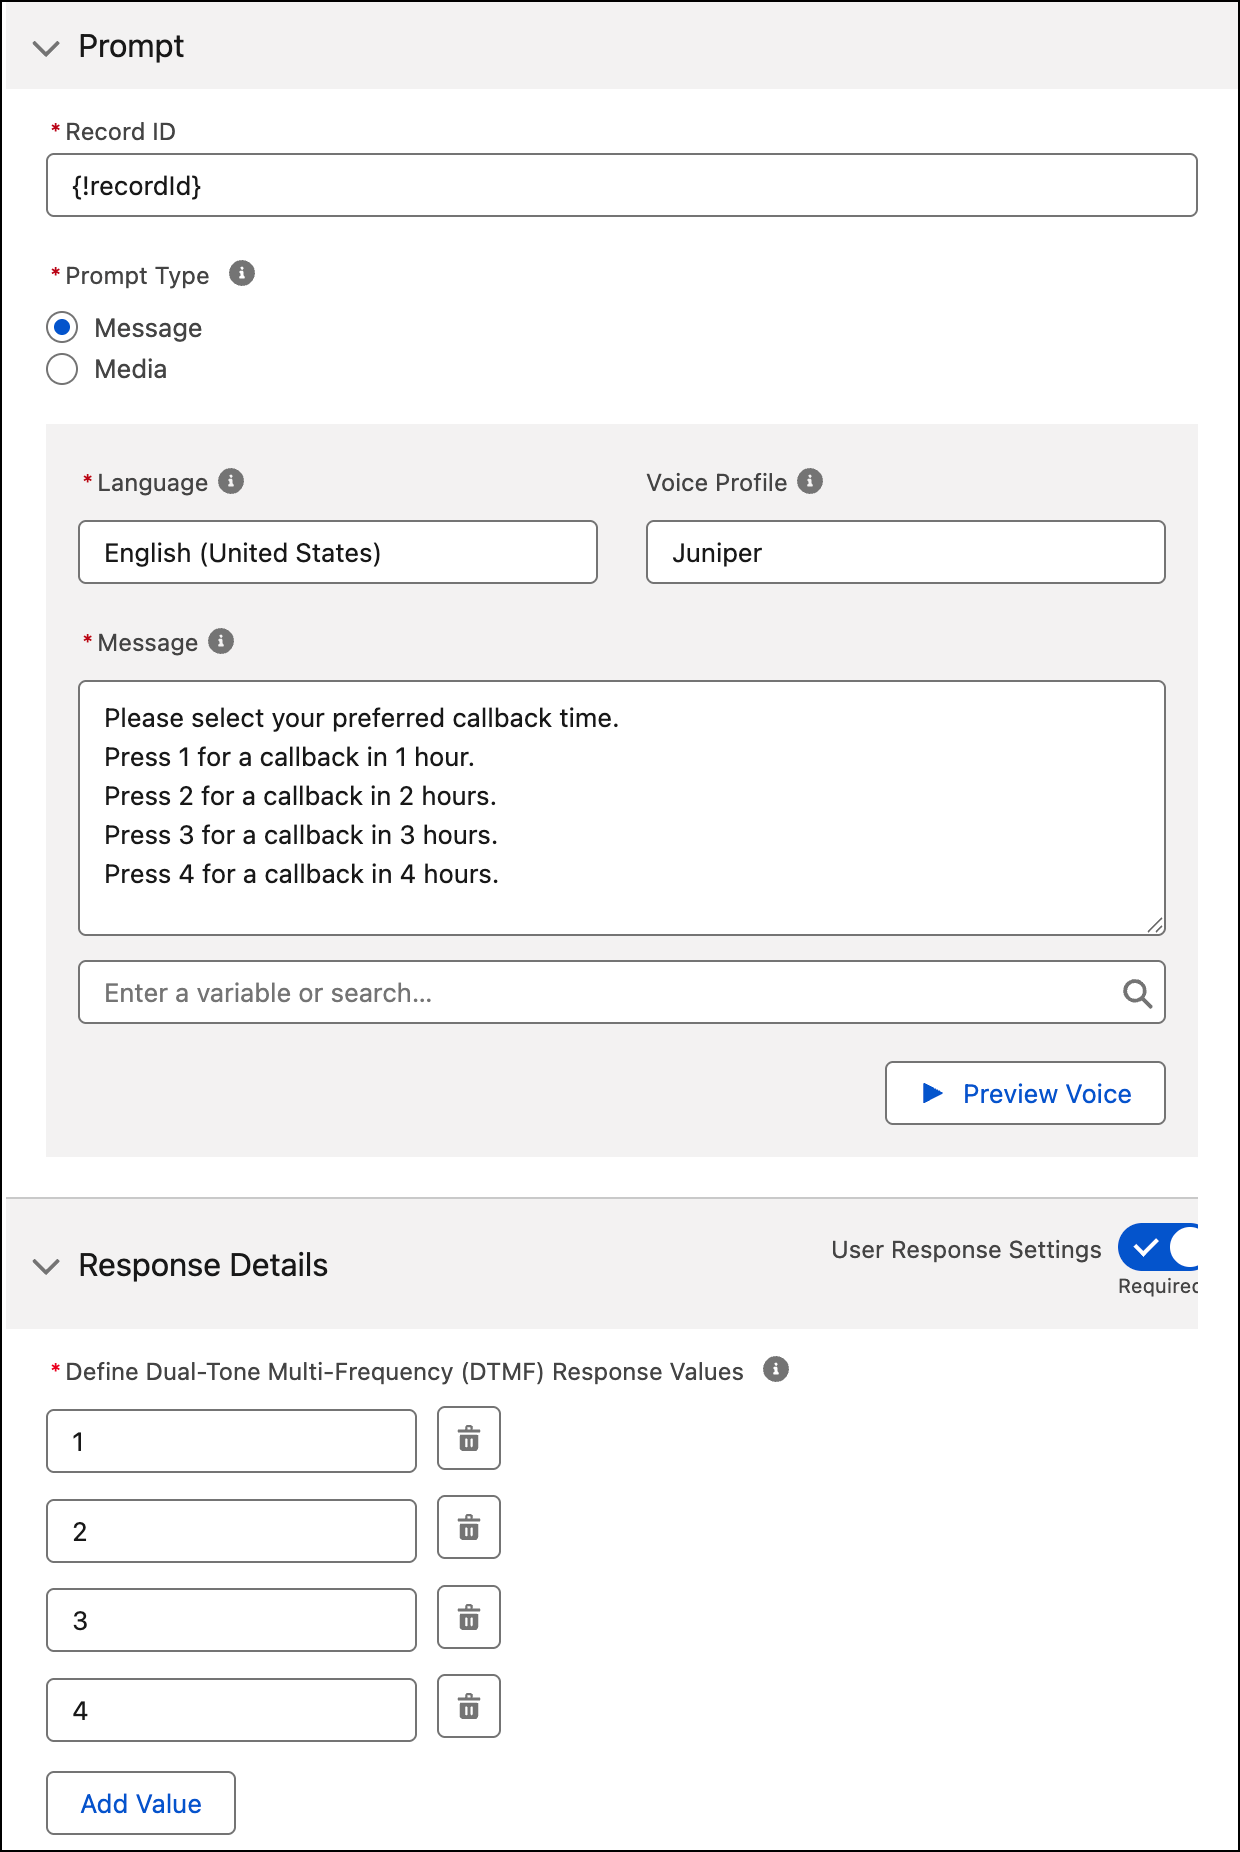
- To set the value of the SlotHour variable, add an Assignment action. In the Variable field, enter SlotHour. In the Value field, search for Outputs from the Play Prompt action where you asked for users to select a time slot, and select Dual-Tone Multi-Frequency.
-
To create a Contact Request object and associate callback information with it, add a Create
Records action.
- Select Manually for How to set record field values.
- Select Contact Request as the object.
- To set values for the Contact Request fields, make selections in the Set Field Values section. See next steps for details.
- (Required) To mark the contact request as a callback, add the Is Callback field and set the value to True.
- (Required) To set a phone number for the callback, add the Preferred Phone Number field and set its value to CallbackNumber.
-
(Required) To relate the contact request to the voice call, search for WhatId and add the
Related To ID field, which represents the WhatId. Set its value to
recordId. - (Optional) To specify the service channel that handles callbacks, add the Preferred Channel field and set the value to the service channel that you created for voice calls.
- (Optional) To specify the number of callback attempts and delays between callback attempts, add the Available Callback Attempts and Delay Between Callback Attempts fields and set their values. The maximum callback attempts value is 5. The maximum delays between callback attempts value is 10,080 minutes (7 days). If you don’t set a number of callback attempts, the customer receives one callback attempt only with no callback retries.
- (Optional) To give the rep time to gather context and preview the contact request details before clicking to dial the outbound call to the customer, add the isPreviewCallback field and set the value to True. Without this field set to true, Omni-Channel dials the call automatically after it routes the contact request and the rep accepts it.
-
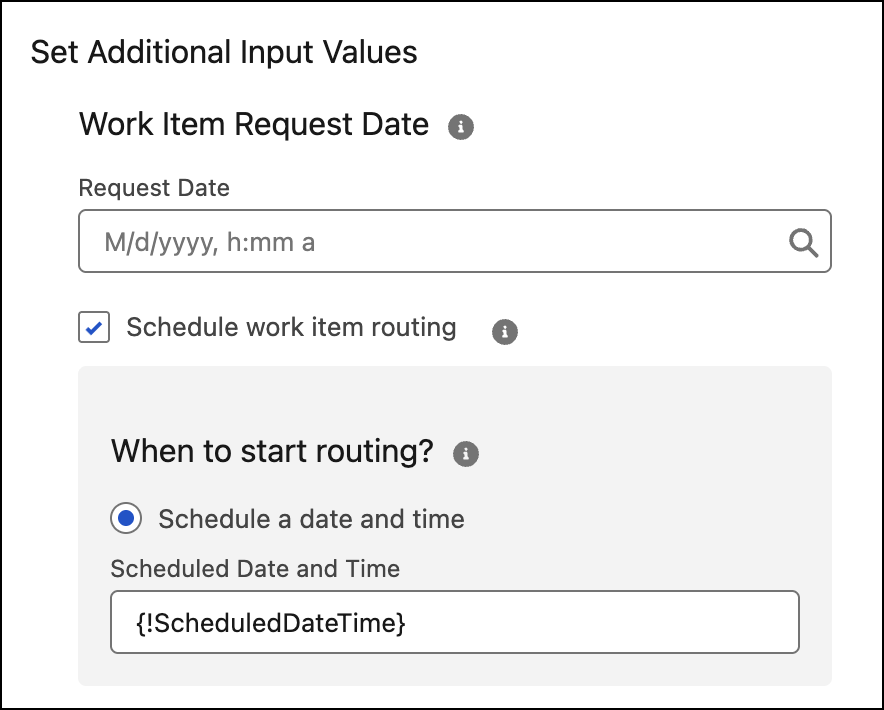
To route the callback at the specified time, add a Route Work action.
- In the How Many Work Records to Route field, select Single.
-
In the Record ID Variable field, enter
{!ContactRequestId}. - Select the service channel that routes contact requests.
-
In the Route To field, select a destination.
-
To schedule the callback at the time slot that the customer requested, select
Schedule work item routing. Then select
Schedule a date and time and enter
{!ScheduledDateTime}.
- To let the customer know that their callback request is processed, add a Play Prompt action with a message telling the customer that someone will return their call.
- To end the call, add an End Call action.
- Save and activate the Omni-Channel flow.
- To link the Omni-Channel flow to the claimed phone number, from Setup, in the Quick Find box, enter Communication Channels, and then select Communication Channels.
- In the All Channels tab, go to the channel you want to manage and click to see its details.
- In the Omni-Channel Routing section, click Edit.
- In the Routing Type field, select Omni-Flow. In the Flow Definition field, select the Omni-Channel flow that you created. Select a fallback queue.
- Save your work.
Configure Related Records
Salesforce creates the outbound callback’s Voice Call record with Contact Request ID set as the RelatedRecord ID. Don’t manually set the RelatedRecord ID to another value.
To allow reps to access the related contact request from an outbound callback voice call record, in Setup, go to Object Manager. Edit the Voice Call object’s page layout to include the Related Record field.